M12S - Replication 2
This mechanic is split into three parts: Staging, Replication and the Reenactment phase.
Staging
The Lindwurm will start off this mechanic by casting Staging first. What this cast does is it will create a clone of each party member on each clockspot. The clone that is going to tether to you is completely random.
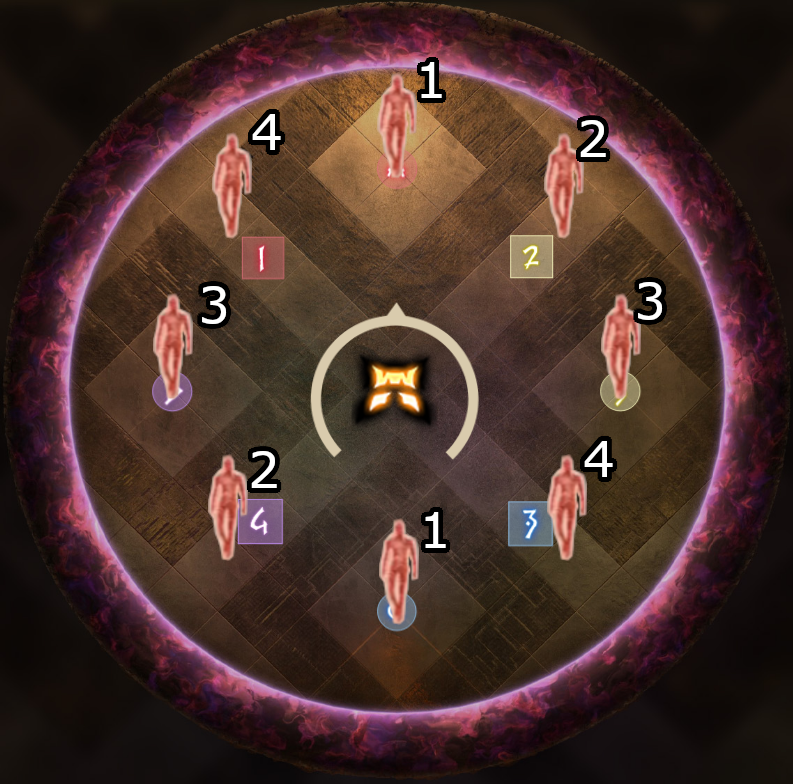 |
The clones will always spawn in a very specific order, which is AC > 24 > BD > 13 waymarks. The order in which the clones spawn is actually very important, because during the reenactment phase, the clones will activate in the same order in which they spawned in.
As for what the clones do, the clones will mimic the same attack that the original experienced. E.g. if you were a defamation, then your clone will become a defamation, and if you were a stack, your clone will also become a stack.
Replication
Once the clones are in place, the Lindwurm will follow his initial cast up with Replication, which will create 6 clones of himself. After the clones are created, each of the clones and the Lindwurm will create a tether that is accompanied with an attack.
 | Once the castbar ends, the boss will jump on top of the player that its tethered to, inflicting a small AoE on the player it jumped on. Upon landing, the boss will also fire a protean to the four other closest players and a defamation on the furthest player. | |
 | An attack that is intended to be soaked by four players. If the stack does not hit any players, whether it be because the player died or if there was nobody under the clone, then the attack will inflict a strong raidwide bleed instead. There are two boss clones with a stack icon. | |
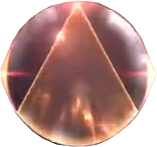 | Fires a cone in the direction that you're looking at. Do not hit your party members with this. This attack resolves half a second after the stack goes off. There are two boss clones with a cone icon. | |
 | The player with this tether will be attacked by a defamation, which is a giant AOE. Any other players who are caught in the blast radius will be sent flying off the arena, instantly killing them. There are two boss clones with a defamation icon. |
Now that we know what each attack does, the next question would be the following: What is the optimal way of resolving this mechanic?
In the early days of this fight, the A player would take the boss tether and send the boss to waymark A, making north the space where most of the mechanics would be resolved. While this early week strategy was just as valid of a strategy as anything else, the players soon realize the inconvenience of doing so because as you remember, waymark AC was the first set of clones that were spawned in during Staging.
This means that when the boss casts Reenactment, the clone at A, which is where the boss was sent to, will explode first and fire four proteans to the closest players. Now, this alone wouldn't be a problem, but the issue here is that the boss itself will also attack you at the same time with Netherwrath Near/Far, which is a two-man stack AoE fired at two players.
You want to avoid having to deal with two mechanics at the same time if possible, so to solve this problem, the early week raiders started to experiment by using a different cardinal waymark as the relative north instead, which was D and B. The experiments were successful as both attempts went on to become famous PF strats, those strats being Banana Codex (D north) and Ushiko (B north). Of the two, Ushiko is the dominant strategy in JP.
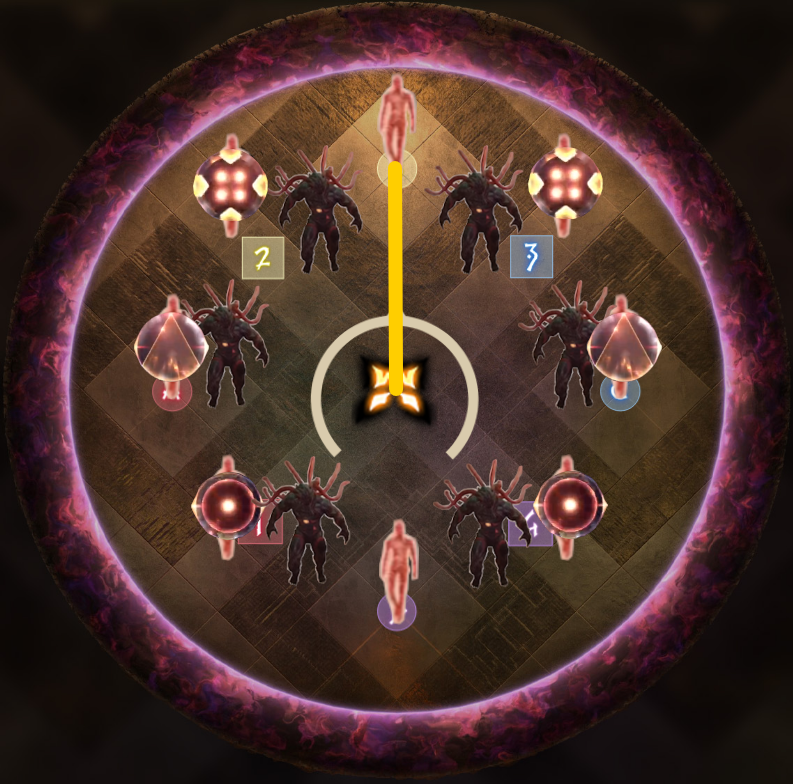
Ushiko strategy
Ushiko uses waymark B as north instead with the following tether setup for the clones. Identify which waymark your clone is stationed at and grab the correct tether from the boss clones, using the snake priority if you have to.
| Waymark player | Tether | Snake priority (B north) | |
|---|---|---|---|
| Counterclockwise | Clockwise | ||
   |    | ||
 | |  | |
| | ||
| | ||
| | ||
 | Nothing | ||
To further understand how this mechanic is solved, you can follow the explanation below in which this mechanic is broken down even further.
| 1. | Identify on which waymark your clone is, because this is completely random! The waymark determines your role in the next mechanic, and thus which tether you need to take. Once you've identified your waymark, you should start hunting for your tether, respecting the snake priority if necessary. Don't be afraid of accidentally touching other people's tether and make it a priority that you get the correct tether, because if you don't, you will cause a wipe. Once you've found your tether, grab it and make the tether as short as possible to prevent other people from stealing it. Do not stretch your tether until the tether has solidified. |  |
|---|---|---|
| 2. | You can start getting to your positions upon seeing your tether solidify. The cones and stack players should immediately run towards north and preposition at the wall to bait the protean, with the cone players outside and the stack players inside. The player with the boss tether should run to B and stand on the inner tile of the waymark. For reference, see the image to the right. The players with defam and no tether should split up on the west/south/east side of the arena. The player with no defamation should be at south, so that he/she can bait the far defamation from the boss itself. You have time until the boss finishes casting Firefall Splash to get to your positions. The positions are static, so do not try to yolo this! |  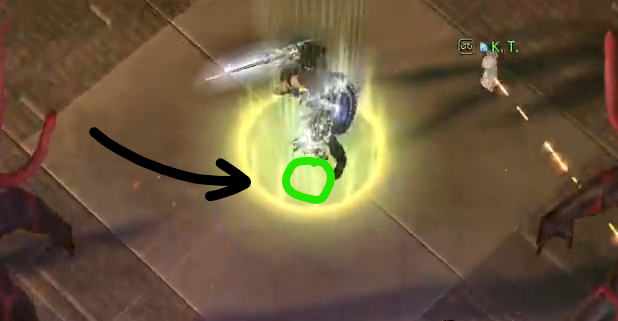 |
| 3. | Once the defams and the proteans are resolved, immediately get to your light party stack positions at waymark 2 and 3. The cone players should preposition themselves so that they can safely uptime without shooting the cone at any player. As for the boss tether and no tether players, they should rotate clockwise to join their respective light parties. Dodge the Snake Kick once the cones have resolved. |  |
| 4. | The Lindwurm will cast Reenactment and Netherwrath Near/Far soon. The first set of clones are harmless, so you can fully focus on the netherwrath baiting. As a reminder, netherwrath is a two-man stack AOE that is shot to the two nearest or farthest players. This attack is baited by the cone and stack players, so put the stack players at the inner circle of the boss, while the cone players are at max melee range behind the stack players. No matter whether the boss uses Netherwrath Near or Netherwrath Far, the attack will resolve itself as long as the positioning is correct. Anyone else who are not involved in the netherwrath baiting should be standing on the boss circle, at the inner side of the arena. | 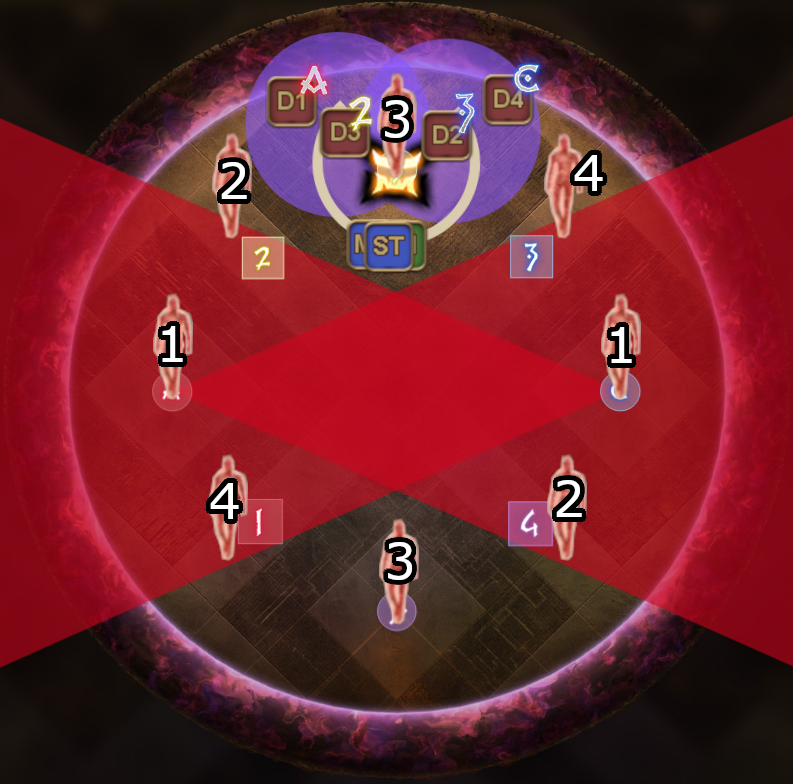 |
| 5. | After taking the netherwrath, the stack and cone players should immediately preposition themselves at the wall again because they will be soaking another set of proteans. Meanwhile, the other group should now run out and head over to waymark 2 to soak the stack. On the other side of the arena, a defamation will go off which you can ignore. | 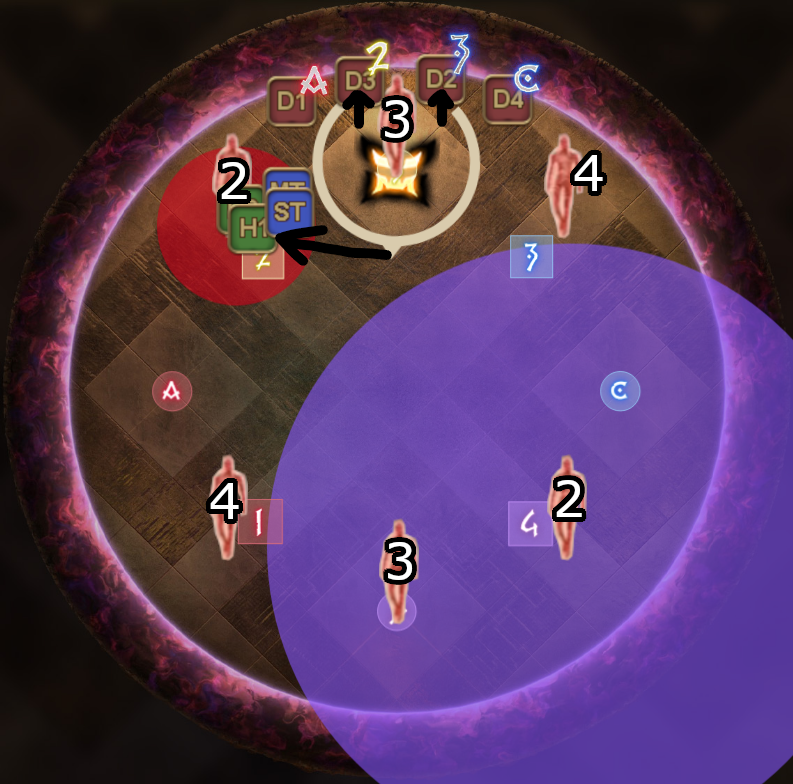 |
| 6. | The four proteans will now resolve. Be careful that you're not too close to the B clone and are properly positioned at the wall, because that clone will explode in a small AoE due to the original having experienced getting jumped by the boss. For the party that is moving from waymark 2 to waymark 3, if you're not confident in your speed, then a good reference to use is to stay out of the boss's hitbox. The attack does not come from the boss itself, but it is a very accurate reference regardless in order to not be too close, causing an untimely death. | 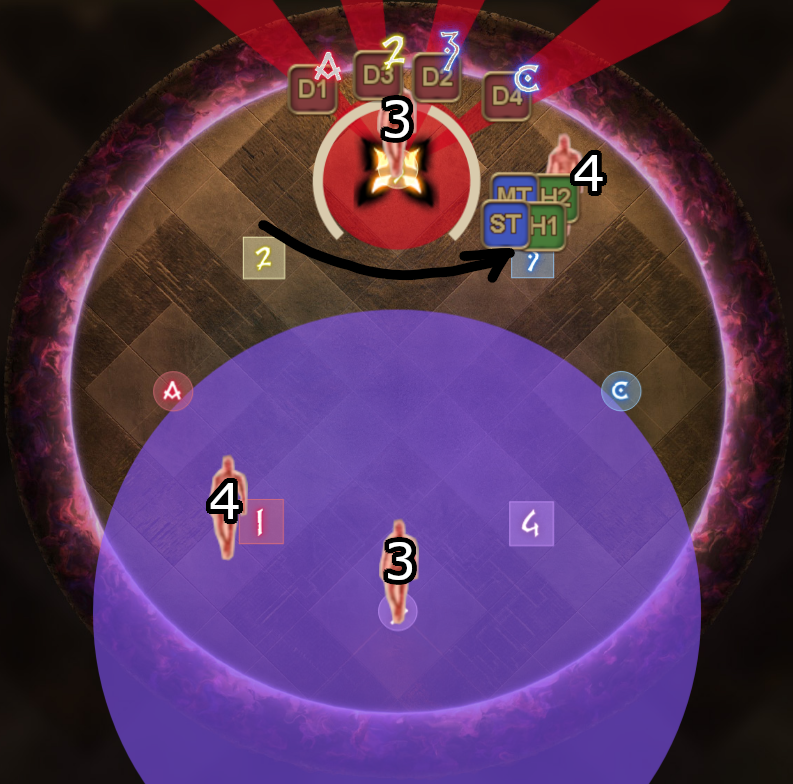 |
| 7. | The stack/cone group have free movement, as long as they dont get too close to the defamation or the stack. Once the 2nd stack has been soaked by the other group, this mechanic is essentially over. Have the MT start pulling the boss back to the center of the arena. |  |
This mechanic looks overwhelming at first, but once you understand why things happen as is, then things should naturally click after practicing a few times. Below are some samples if more PoVs are needed.
| | |
|---|---|---|
| | |