M12S - Idyllic Dream
Be prepared as the Lindwurm will now cast Idyllic Dream, which is a strong raidwide that sends you into an alternate dimension. This mechanic lasts for 3.5 minutes, making this the longest savage mechanic you might have encountered in Dawntrail.
This phase is brutal, as this mechanic is essentially 5-6 mechanics combined into one, not to mention the numerous memory checks in here. If you haven't been doing so, then you are recommended to start using macros in order to keep track of what is happening around you. Here's a checklist of where you can apply macros in this mechanic:
- Was it 十 or X first during staging?
- Apply a mark on yourself, depending on which waymark your clone is.
- Is it north or south safe?
- Who has to swap during towers? Melees or ranged?
- Is it stack or defamation first?
- Which clone got sucked into the portal?
- Which island is safe?
If you do not have set up the macros yet for the self marking, then head over to the intro to grab them.
Staging
Just like Replication 2, this mechanic has a Staging, a Replication and a Reenactment phase.
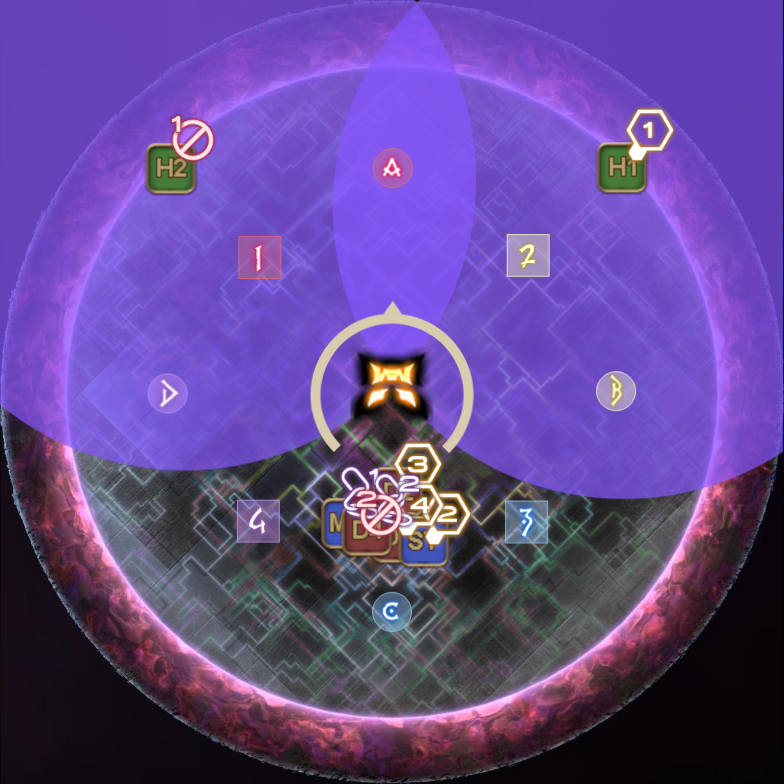
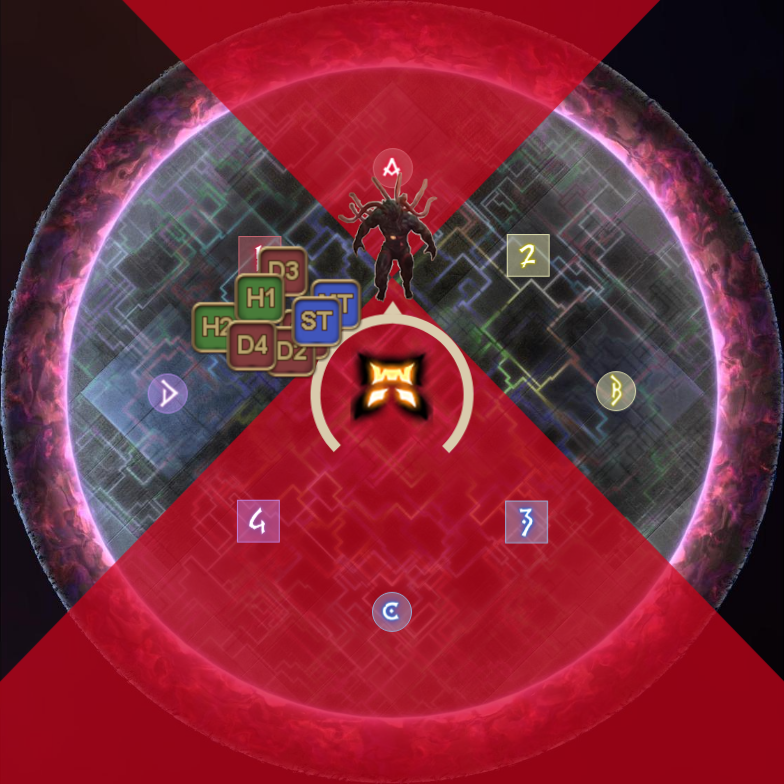
Immediately upon entering this new dimension, the boss will cast Staging which will summon a player clone on each clockspot. The set of clones can spawn in either a 十 or an X formation.
| 十 Cardinal | X Intercardinal |
|---|---|
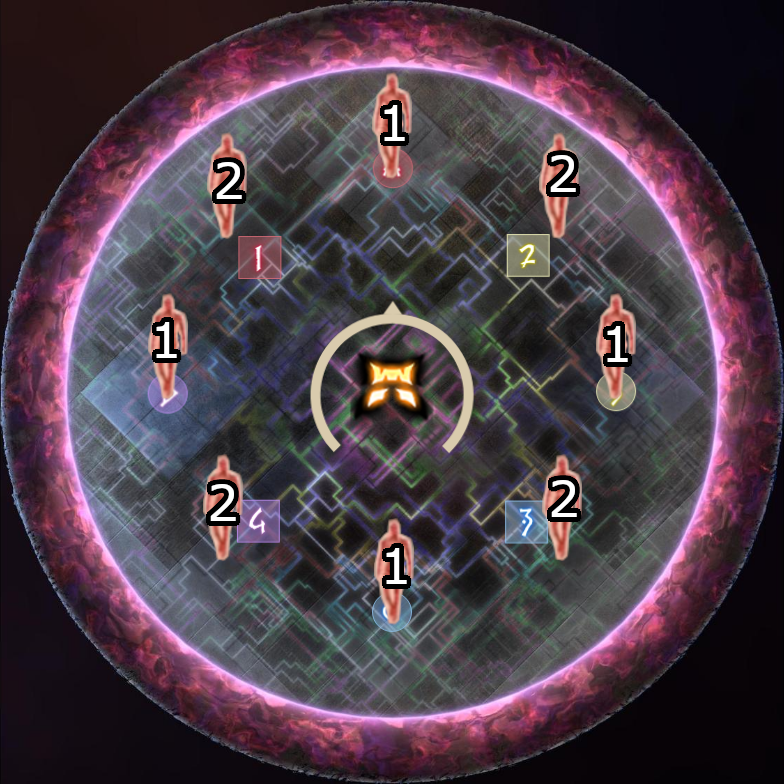 |  |
Memory check:
- Remember whether it is 十 or X first.
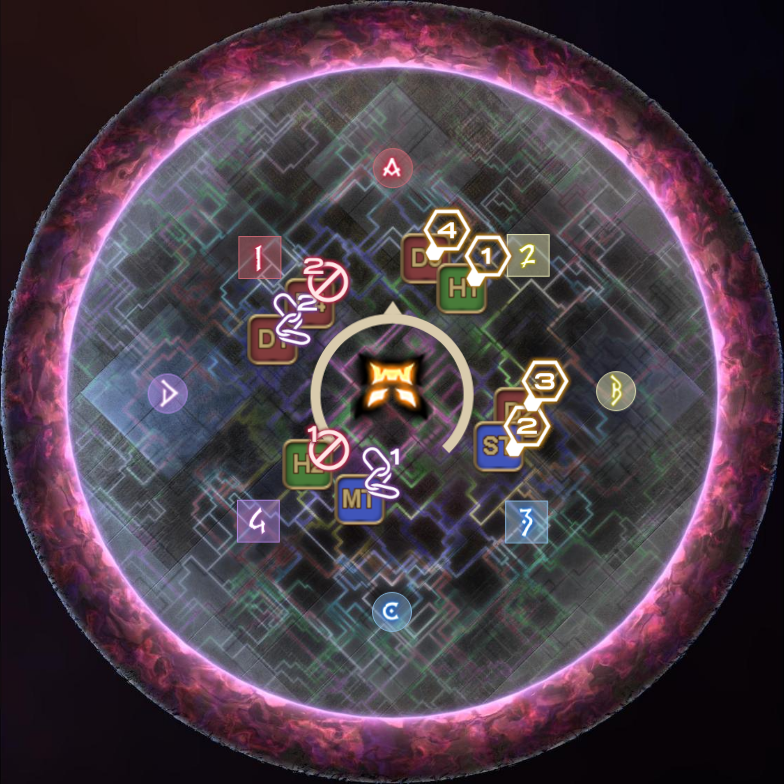
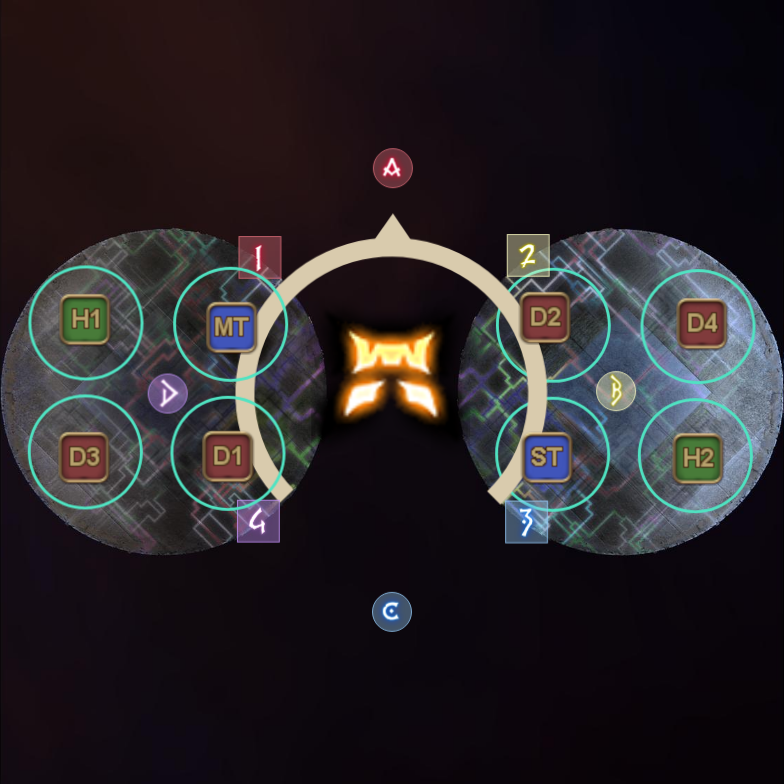
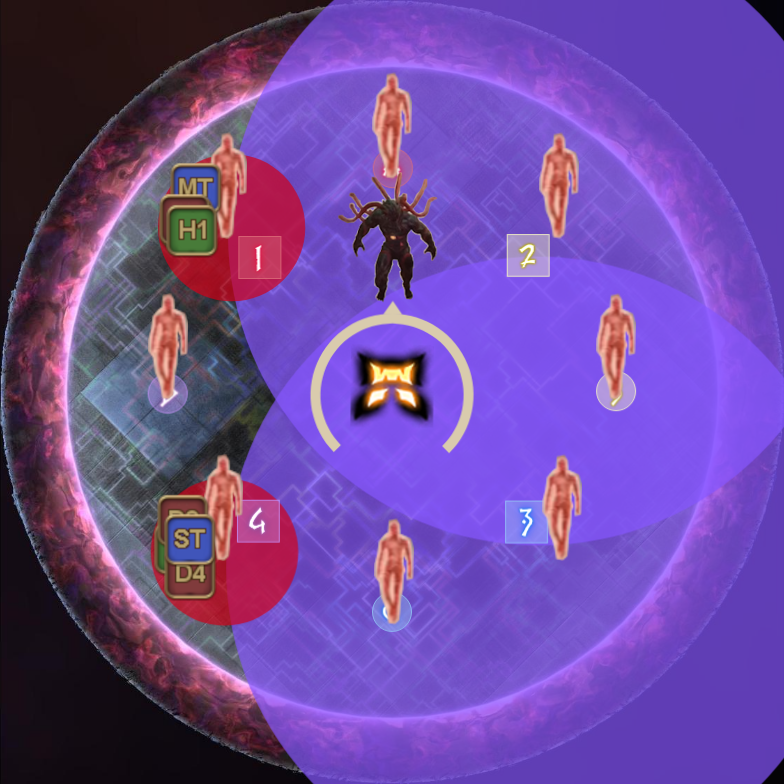
Player Clone Setup
Some future insight here is necessary, because what you're asked to do here now makes absolutely no sense until you know what is going to happen later in this mechanic. To spoil ahead as to what is going to happen later, the boss will summon 8 boss clones, four of them being defamation clones and the other four being stack markers.
The player clones will resolve in either a 十 or an X formation during Reenactment later, so your goal here is to make sure that both formations has 2 of each attacks, which allows your party to reliably resolve the rewind. There are multiple possible solutions, but at its conceptual level, all PF strategies circulating at the moment uses 4:4 as the basis.
| Game8 Nukemaru (OneAce) and Kanatan | Team DN |
|---|---|
 | 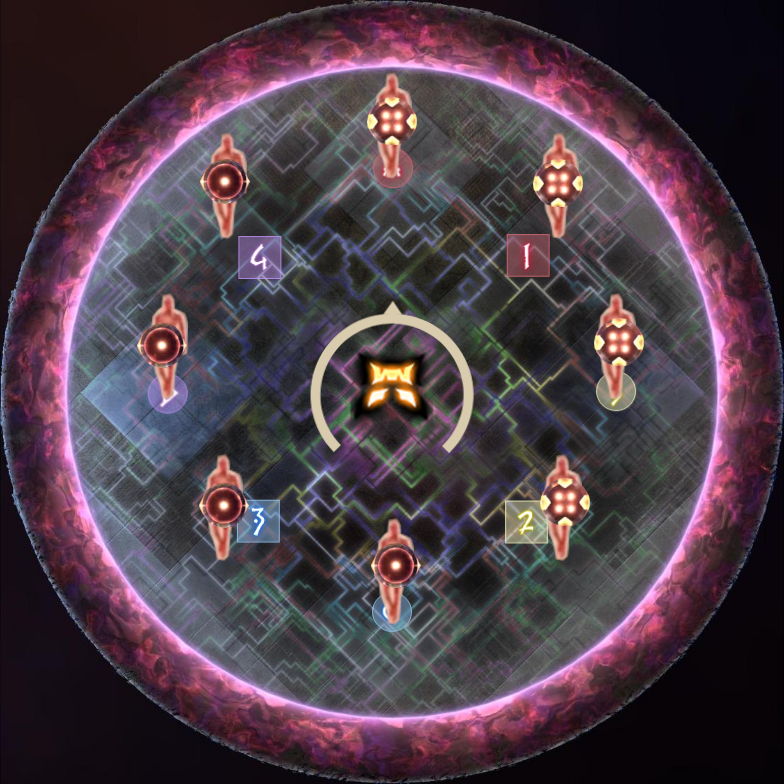 |
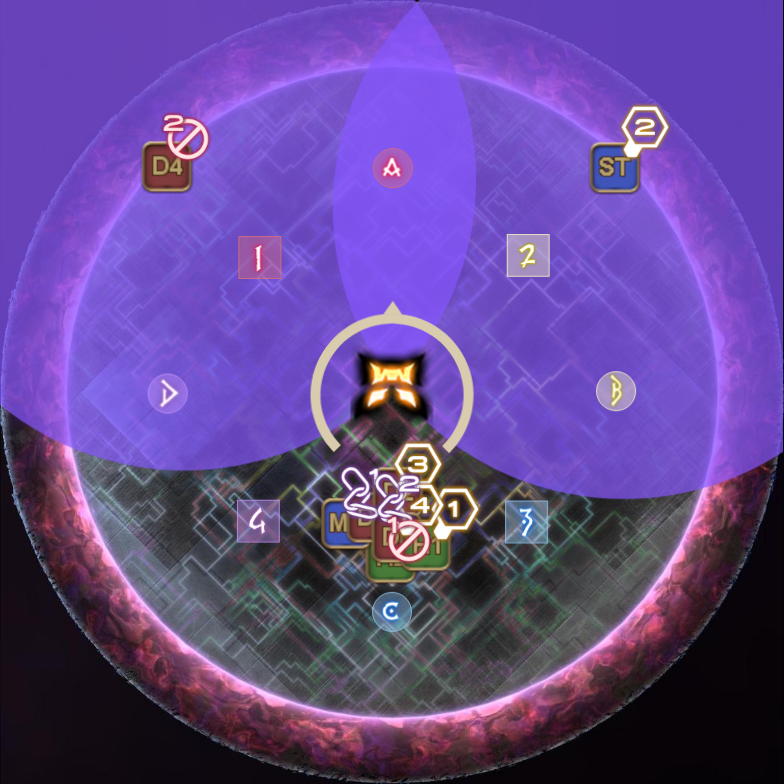
Now that we know what our goal is during the setup, the next step is to create some structure in how we assign the tethers to the players to prevent people from yolo'ing and doing whatever they want when grabbing the tethers. Again, there are also multiple ways to handle this.
Kanatan and Team DN focuses on using snake priority. On the other hand, OneAce's approach is to abuse insight they already have by knowing how the defam/stack patterns will spawn in the future, which allows them to preemptively make some artificial swaps in order for players to be prepositioned from the start. OneAce is the dominant strategy in JP, so this will be the focus in this guide.
Upon identifying your clone, as part of the OneAce strategy, you want the pairs 1-B and 4-C to swap. Once swapped, you can now press the macros to assign a marker on yourself. If done correctly, the setup should be something like the following.
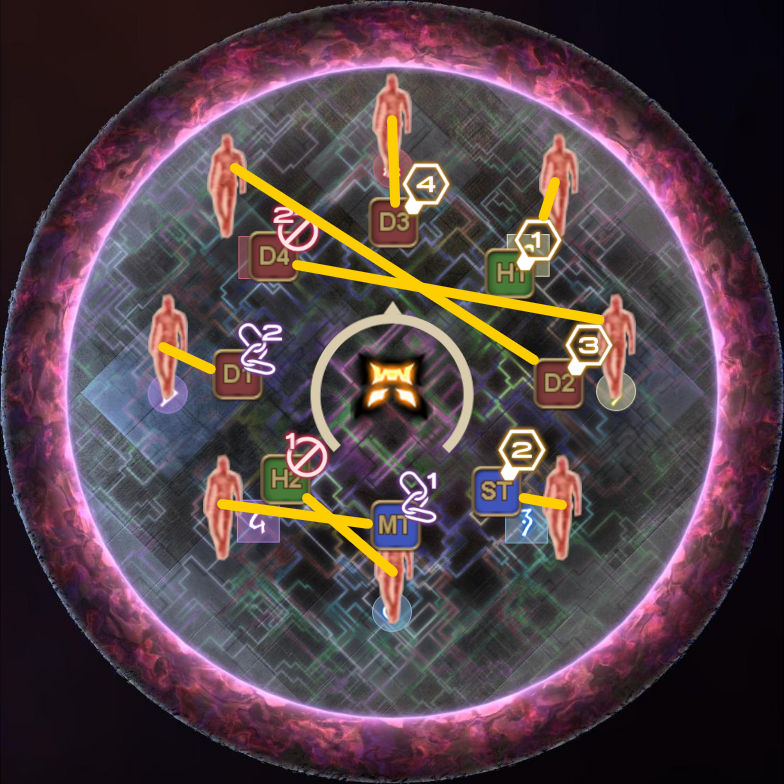
To reiterate, if you did not set up the macros yet, then you are recommended to do so. However, if you cannot for whatever reason, like being a console player for example, then you need to rely on understanding the mechanic and patterns to determine your role.
Memory check:
- If you are not selfmarking, then you need to remember what your waymark is and determine your role from there.
Twisted Vision
Once you've finished your preparations with the player clones, the Lindwurm will now cast Twisted Vision to send you to another alternate dimension. If you did not succeed in tracking your player clone earlier, then you will have another opportunity to do so later, but for now, focus on what is to come next.
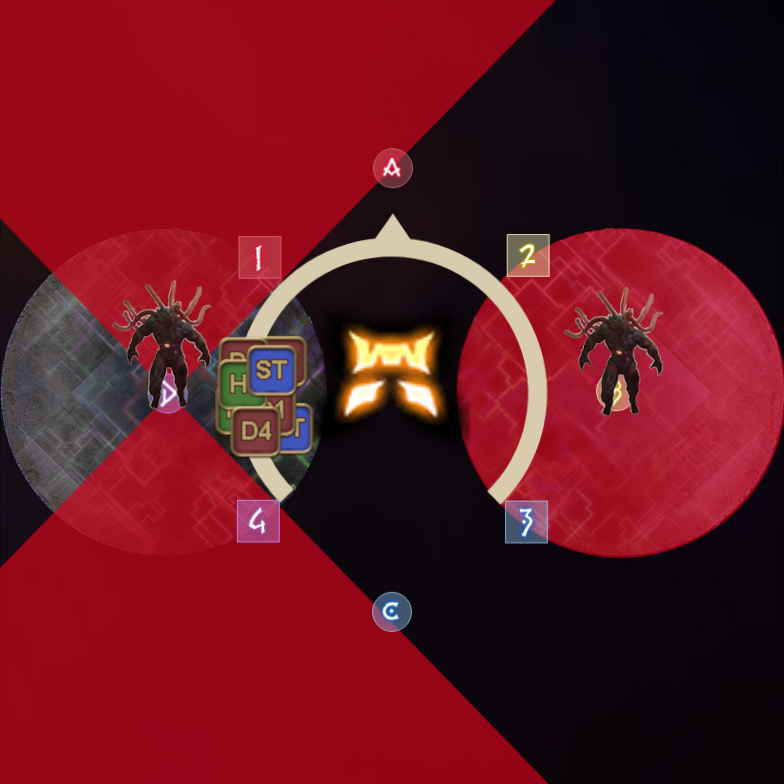
In this dimension, the boss will create three clones of itself in very specific positions. Each of the clones will do one of the following:
- North/South cone cleave
- West/East cone cleave
- The clone in the middle will always do a chariot kick.
Your goal in this dimension is to identify which clone is doing the north/south cone cleave, because that area will be the safe spot to dodge into later. This clone is randomly either north or south.
| North safe | South safe |
|---|---|
 |  |
Before the clones can execute their attacks though, the boss will use Twisted Vision again to send you back to the previous dimension.
Memory check:
- Was north or south safe? Remember which clone this is, as this information will be useful until the end of this mechanic.
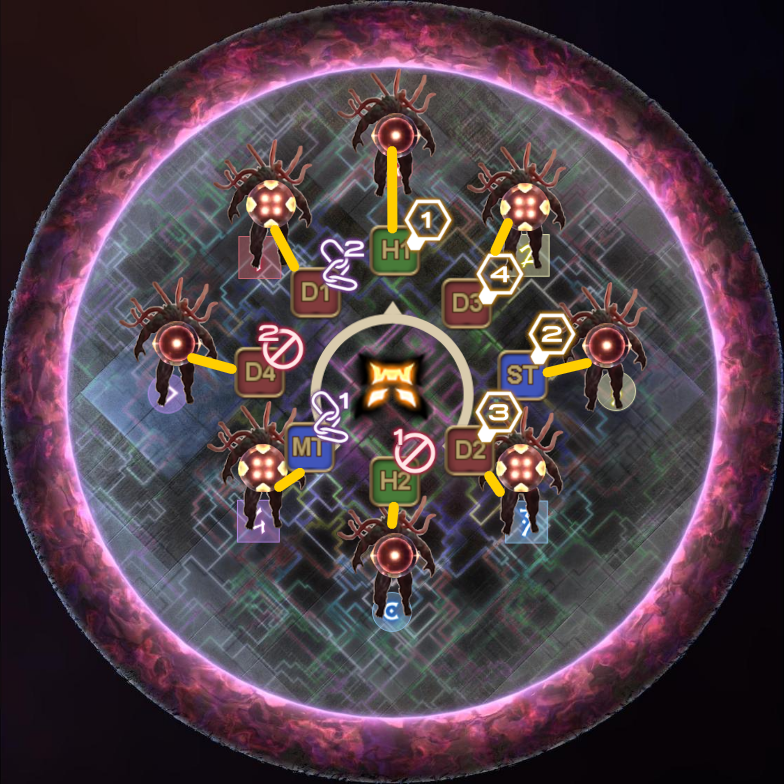
Replication
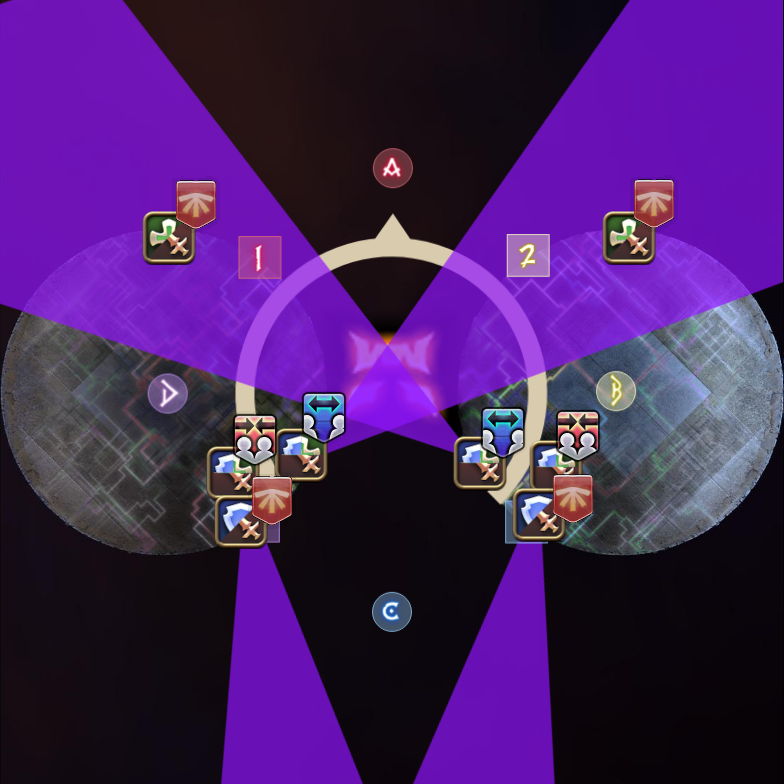
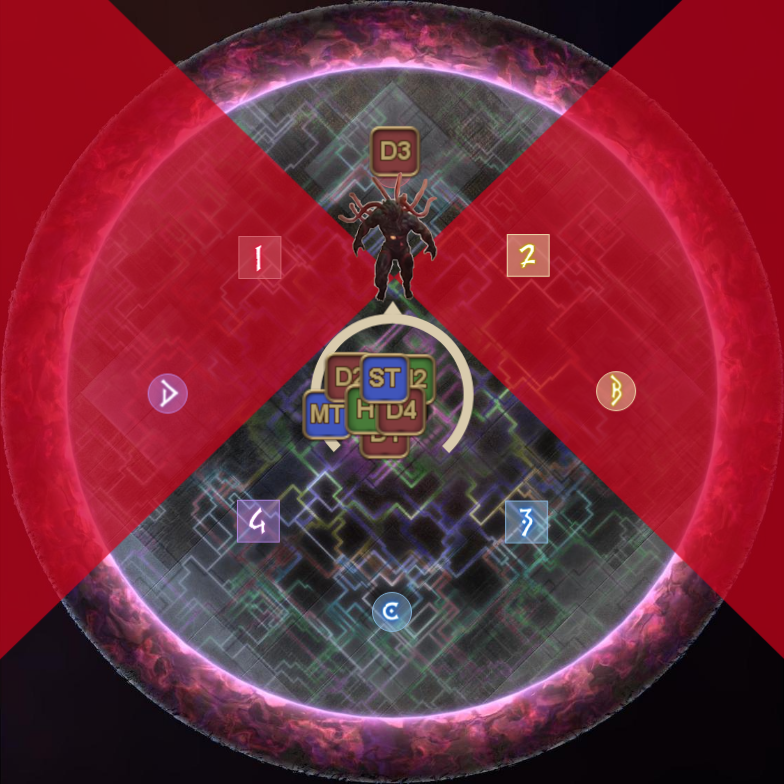
Now that you're back into the dimension where the player clones are, you have one final chance to identify where your clone is. Do this fast, because the boss will cast Replication soon to summon another horde of clones that you have to deal with.
If you know what your role is, then try to preposition yourselves in between two waymarks of the opposite colors. This allows you to grab whichever tether you need later by simply looking left and right.
As what was spoilered earlier, the boss will now summon 8 clones on each clockspot which will either have defamation or stack tethers. The patterns always alternate between stack and defamation, which means that all stacks/defamations will spawn in either a 十 or an X formation.
 |  |
Stack or defamation first?
With the tether out of the way, the next logical question is as follows: How do you know whether it is stack or defamation first? The answer is actually simple if you happen to be paying attention to the boss clones, because when the boss spawned its clones using Replication, you will notice that the clones spawned in a very specific order, which is AC > 24 > BD > 13.
If you've understood how Replication 2 works, then this should sound very familiar to you. This essentially means that whichever attack was cardinal will start first.
| Stack > Defamation > Stack > Defamation | Defamation > Stack > Defamation > Stack |
|---|---|
 |  |
Lindwurm's Meteor
Did you remember whether it was north or south safe during the alternate dimension? This now becomes relevant, because as soon as the tether solidifies, the boss will send you into the alternate dimension again by using Twisted Vision.
Be fast, because the clones will attack almost instantly the moment you are transported into this dimension. As a note, the chariot clone is closer to the southern side, so you will have to stay outside of the waymarks as well if you are to dodge their attacks.
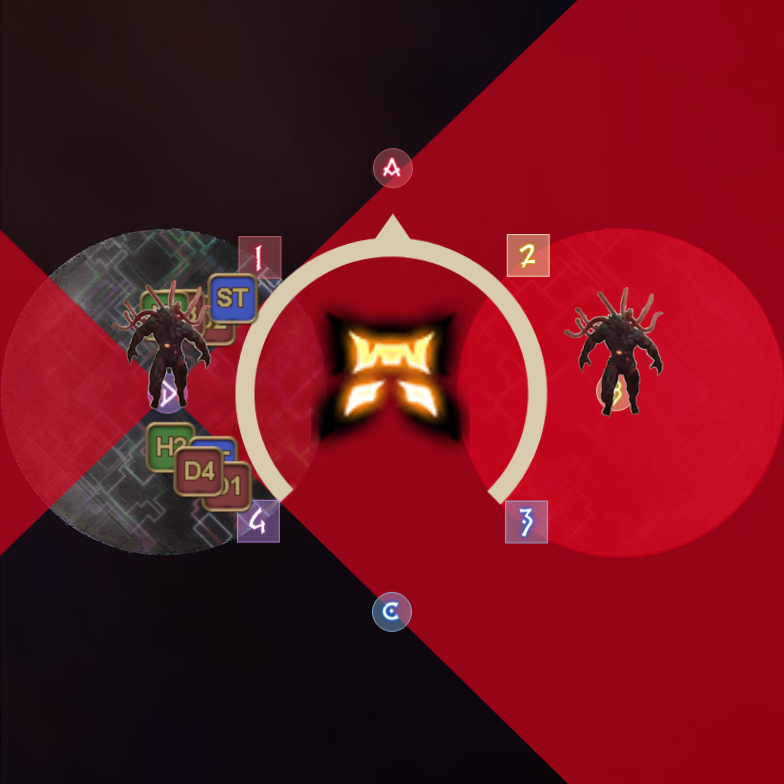
After dodging the clones, the boss will cast Lindwurm's Meteor to destroy the arena, leaving two small islands behind which is telegraphed. Send the MT group to the west island while the ST group goes to the east island.
The raidwide follows the trend of this fight, which is oneshotting your party if they are negligent in mitigations, so make absolutely sure to mitigate it! For reference, you can already apply your mitigations once your tether solidifies right as you are about to be sent to this alternate dimension.
Memory check:
- Was it stack or defamation first?
Split islands
Immediately as the islands are getting destroyed, the Lindwurm will cast Downfall, summoning four meteor towers on each island. Each of these meteors have their own properties and debuffs that your party will need to deal with once they are soaked.
Below is an explanation as to what each meteor tower does.
| Meteor type | Description | Associated debuffs |
|---|---|---|
 | The player who soaks this tower will be inflicted with a pyretic debuff that lasts for 5 seconds, which prevents you from moving. If you decide to move anyway, then the debuff will kill you by causing you to explode. Attacking however, is fine, so feel free to keep attacking the boss. |  |
 | Upon soaking this tower, a giant spire will erupt from where this tower is soaked after a short delay. Immediately get out of your tower after you soak it, so you don't get hit by this sneak attack. Moving out of the way will also help signal to your party members, especially the player who took the aero meteor, to go to where you are so that they don't get hit by this. EN PFs commonly refer this as the twister tower. | |
 | Upon soaking this tower, a purple laser will fire from the center of the tower to the player that is soaking it. Getting hit by this purple laser will inflict doom, which needs to be cleansed through Esuna or a BRDs Warden's Paean. Your objective as the person soaking this tower is to avoid hitting other party members with this laser. Remember that the laser is shot from the center of the tower to the player, not from the direction in which the player is looking at. |    |
 | The player who takes this tower will be sent flying up in the air. The impact is at the center of the tower and the direction you fly towards to is dependent on where you are standing. You will not be able to remain on your island, so your goal here is to land on the other island. |  |
Notably, the doom and aero meteors are interesting because they have their own set of debuffs that needs to be resolved in a specifc way. Below is some more explanations as to what each debuff does.
| Debuff | Description | Notes |
|---|---|---|
| Once the timer of this debuff runs out, this debuff will inflict holy damage on the player. If the player also happens to be vulnerable to light damage, then this debuff will instantly kill this player instead. |  |
| Fires a laser cone towards the nearest player when the timer runs out. | |
| Fires a laser cone towards the furthest player when the timer runs out |
Study up on what these meteors do, but keep it in the back of your head for now. The boss will send you to another alternate dimension before this resolves, but before it does, there are some preparations that your party must do.
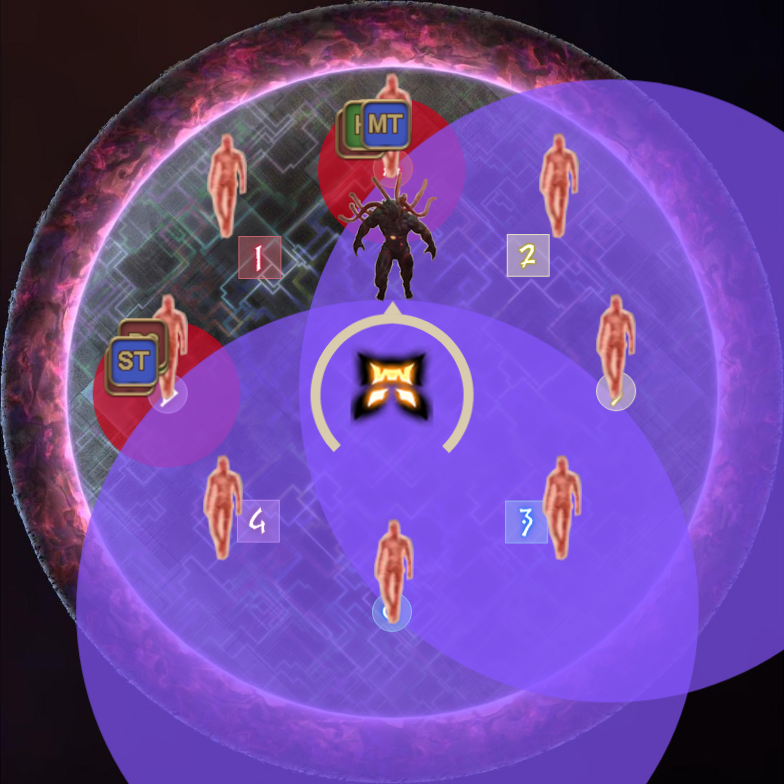
Once each light party has safely entered their islands, you want to immediately preposition by having each player go to a tower. While looking at the boss, have the supports on the left while the DPS are on the right. Place the ranged at the back towers so that the melees can maintain their uptime.
The spread position is important, because the boss will soon cast Arcadian Arcanum in order to attack two players on each island will a holy AoE, inflicting a vulnerability in the process. This attack will try to target the same roles, but will target a random player on the same island instead if it can't find two players of the same role. This can happen if someone went to the wrong island or if there were deaths.
Players with this vulnerability are not allowed to take either the Doom or Aero towers, so they must swap with their melee/ranged partner if they are under the wrong tower. If the debuffs are messed up, then you will have to rely on sight to make the swap work.
| Example 1 | Example 2 |
|---|---|
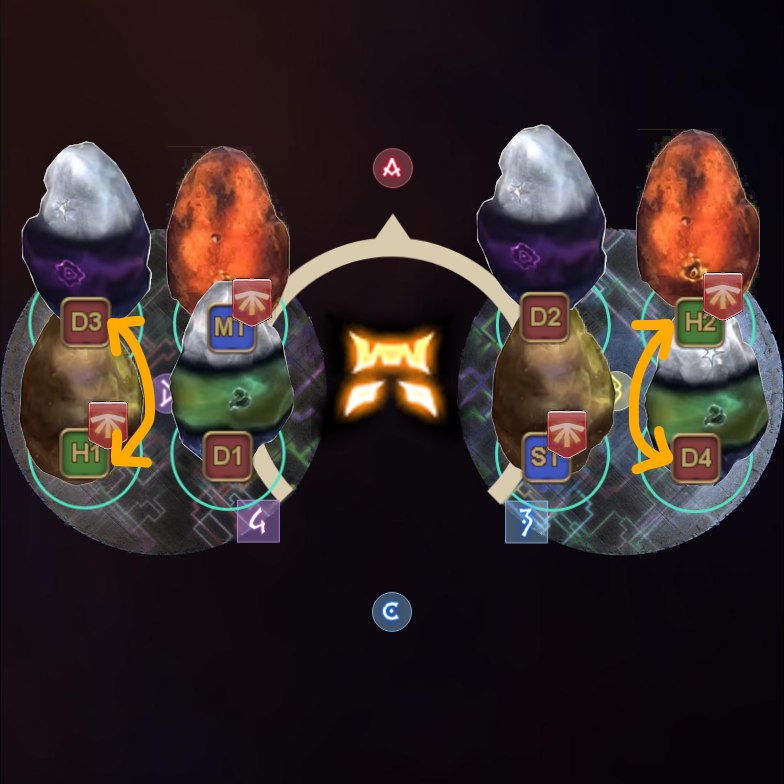 |  |
You do not need to actually make the physical swap, as long as both of you remembered whether you had to swap or not. To simplify things a bit, the meteor tower positions always spawn in a specific pattern that forces either all melees or all ranged to swap. This can be useful as a macro callout if utilized.
Once you're done with the setup, remembering whether you had to swap or not, get ready to move as the boss will use Twisted Vision again to send you back to the previous dimension.
Memory check:
- Do you have to swap with your partner for the towers?
Replication - Resolution
The boss clones will now resolve, so hopefully, you or your shotcaller has remembered whether it is stack or defamation first. There will be four attacks in total, alternating between stack and defamation.
| Stack first | ||||||
|---|---|---|---|---|---|---|
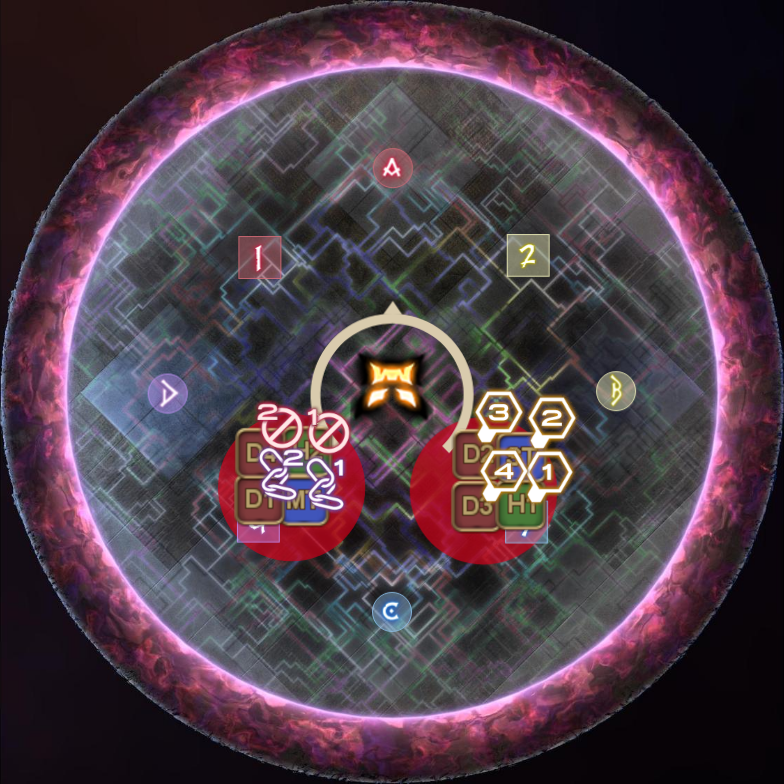 | > |  | > | | > |  |
| Defamation first | ||||||
| > | | > | | > | |
Do not try to preposition as a defamation player when it is stack first, because a 3-man stack can and will kill the party. If its not your turn to run out for defamation, then try to be as south of the boss as possible, to prevent any accidents from being caused by a slow or greedy defamation player.
Once all four sets of attacks have been resolved, return to your islands because the boss will soon send you back to the two islands after he finishes casting Twisted Vision. If you are not prepositioned near your islands when it finishes casting Twisted Vision, then you will fall to your death, so be careful.
Split islands - Resolution
Did you remember whether you had to swap or not? Regardless, you have 3 seconds to react when the boss finishes casting Twisted Vision in order to correctly solve your tower.
Now here's the second part of this mechanic, which is essentially where most parties choke in, even though the mechanic is simple in nature. Because of the various debuffs that were applied, two players will now shoot a beam at the closest players while two others will shoot a beam at the furthest players.
Your party needs a setup that allows you to resolve all beams without the beams clipping any other unintended targets. There are multiple ways to do this mechanic, but Nukemaru specifically has the following setup, which allows you to resolve the beams with ease.
The position is as straightforward as it can be, but identify first where the true north is. This is done by looking at the waymarks 1 or 2, or alternatively, locating the true south by finding waymarks 3 and 4. With the assumption that everyone got to their positions correctly, there should be no chance of any deaths happening here.
| Earth meteor example | Fire meteor example |
|---|---|
| Doom meteor example | Aero meteor example |
Temporal Curtain
Upon successfully resolving the laser baits, the boss will cast Temporal Curtain, which will randomly suck in either the north or the south clone. Hopefully you still remember which clone is safe, because this detail is also important here in determining the safe spots for the cleaves.
If the safe clone did not get sucked into the portal, then all the subsequent cones later can be safely dodged by being inside the boss's hitbox. However, if the safe clone did get sucked in, then the safe spots for the cone dodges are always outside the boss's hitbox. Remember this for later!
| Safe clone sucked Stay outside the boss's hitbox! | Safe clone untouched Safe spot always inside the boss's hitbox! | ||
|---|---|---|---|
 |  |  |  |
Observe which clone got sucked into the portal. After that, track the remaining two clones, because they will split themselves up on each island in preparation for the next attack. You want to track where the other cone shooting clone goes to, because that is the safe island while the other island will be covered in AoE by the chariot clone.
Memory check:
- Did the safe clone get sucked into the portal?
- Which island is safe? D or B?
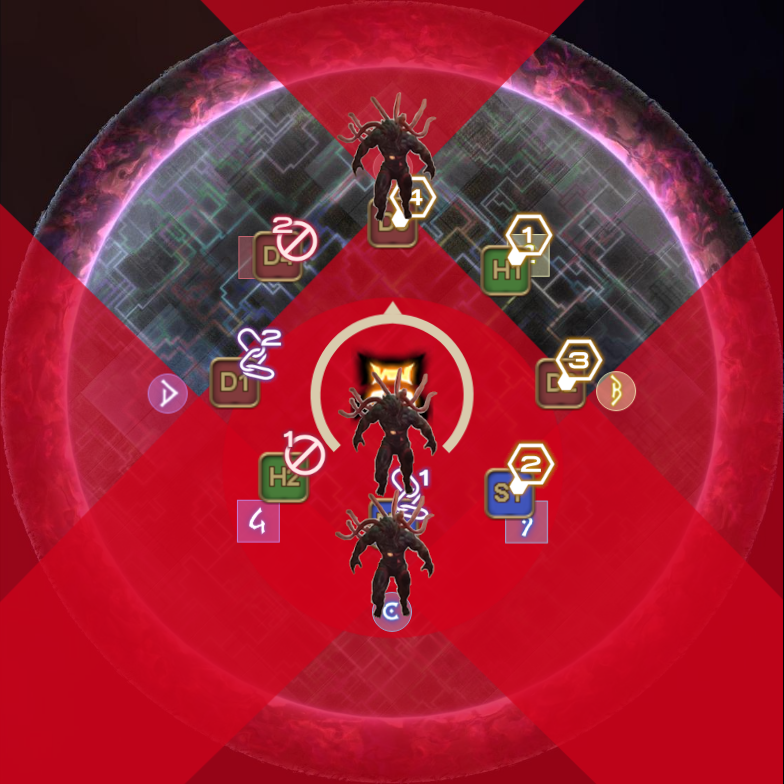
Reenactment
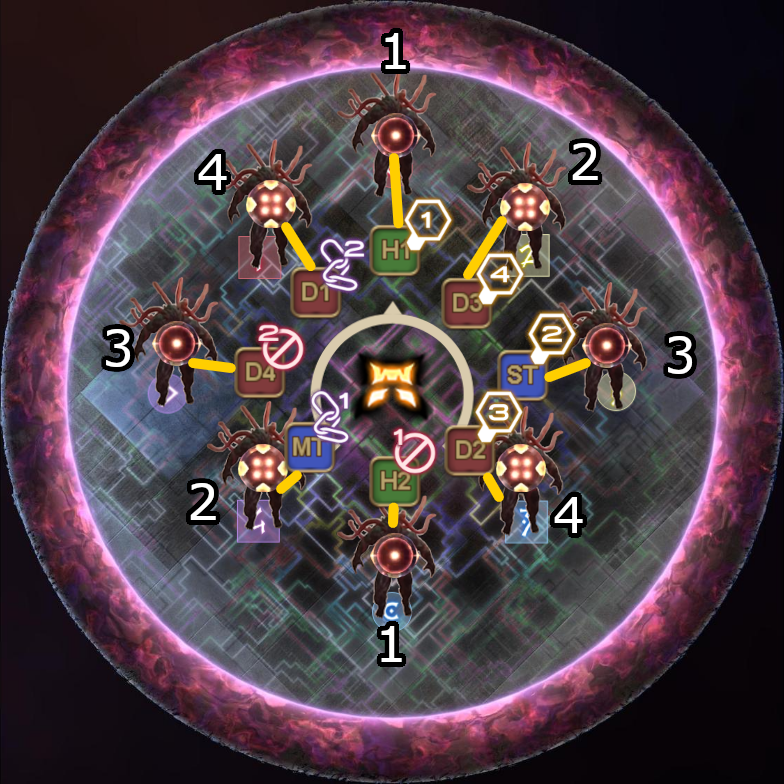
At the start of this mechanic, when the boss created the player clones with Staging, do you still remember whether it is 十 or X first? Well, you better have, because it now becomes relevant as the boss is about to cast Reenactment, causing the player clones to experience the same attacks that they were tethered to.
Assuming everyone has done the tethers correctly, each pattern will always have 2 stacks and 2 defamations. Assign the MT group on the red waymarks, while the ST group takes care of the purple waymarks. Keep your distance, as the defamation will partially overlap the clones, which will kill you if you are too close.
| 十 Cardinal | X Intercardinal |
|---|---|
 |  |
The boss will cast Twisted Vision inbetween the sets, so the order of how this mechanic resolves is as follows:
- 十 or X stack.
- Immediately run to the safe island before the boss finishes casting Twisted Vision.
- Dodge the cone, the boss will cast Twisted Vision again to return you to the arena.
- 十 or X, whichever is left after the 1st set.
- The clone that got sucked will now reappear, dodge its cone!
Below are two examples which you can use as reference to see how this final part is resolved.
| Example 1 Safe clone untouched 十 first, B island safe  | Example 2 Safe clone sucked 十 first, B island safe  |
|---|---|
After dodging the final cone cleave, the Lindwurm will finally end this phase by casting Idyllic Dream. This is then immediately followed up by a Double Sobat, which is hopefully on the tank that is going to invuln this if that is the plan. Don't choke now, you've made it this far and are almost at the end!
Arcadian Hell
The boss will use Replication to summon four clones, which it will use to then spam Arcadian Hell on you. If that fails to kill you, then the boss will multiply, and try Arcadian Hell again but now with 8 clones. If that doesn't kill you either, then the boss will multiply for the final time up to 16 clones and then cast Arcadian Hell. If you fail to kill the boss before it gets its third cast off, then its all over as the boss will instantly obliterate you.