M12S - Blood Mana
The Lindwurm will move back to the middle, casting Mutating Cells to inflict a debuff on all party members. This is then followed up by Blood Mana, which creates a bunch of shapes on the arena.
At the EN PF scene, this is sometimes referred to as the superchain, a reference to the mechanic in P12S where a bunch of similar shapes appear.
| Debuff | Description | Additional note |
|---|---|---|
  | Players with Alpha mutation are not allowed to take any form of damage, which also includes auto attacks from the boss. Players with Beta mutation on the other hand, must take some form of damage before the time expires. Failure to comply to the debuff's requirements will result in the player taking heavy damage when the timer expires, which is likely not fatal but it will give you a damage down. Each debuff group will always contain 1 tank, 1 healer and 2 dps. | 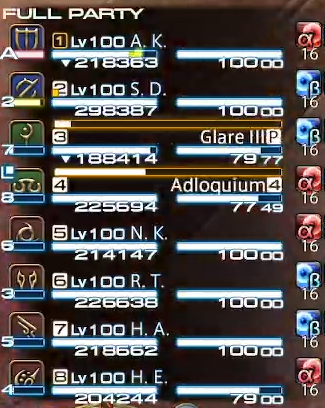 |
 | Once the timer expires on the Alpha/Beta mutation, the cells will undergo through a mutation which causes the debuffs to swap around. If you had Alpha before, then you will now become Beta and vice versa. For the tanks, this is your cue to tank swap. You will never get the same mutation debuff twice in a row. |  |
With the debuffs out of the way, it is now time to focus on the objects that are strewn around.
Blood Mana
Each of the floating objects represent an attack which the yellow black hole will perform, with the order of the attacks being determined by the order in which the objects are sucked in. Here are some examples of how the initial placements are of the objects.
| Example 1 | Example 2 |
|---|---|
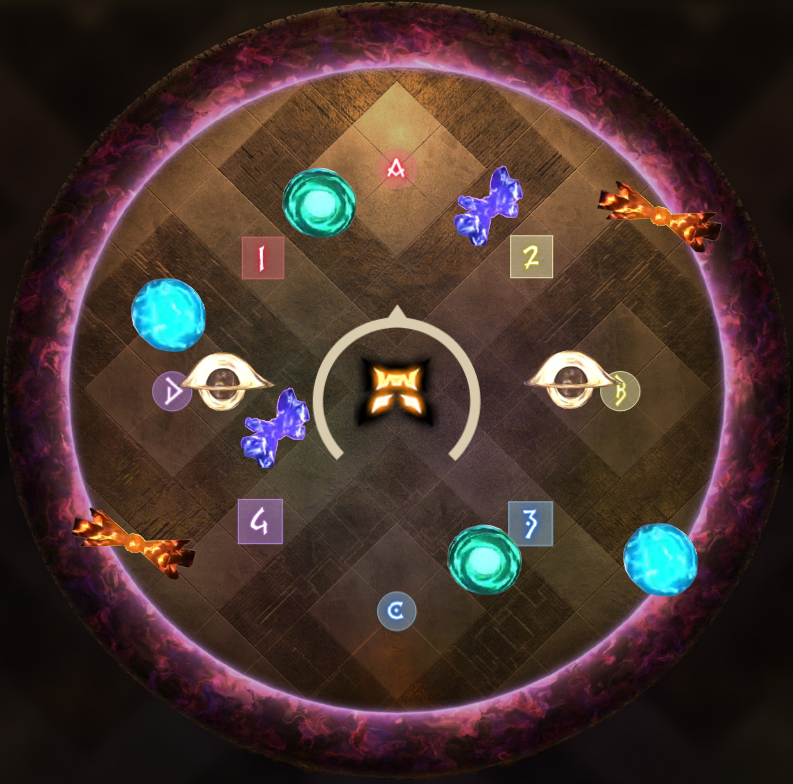 | 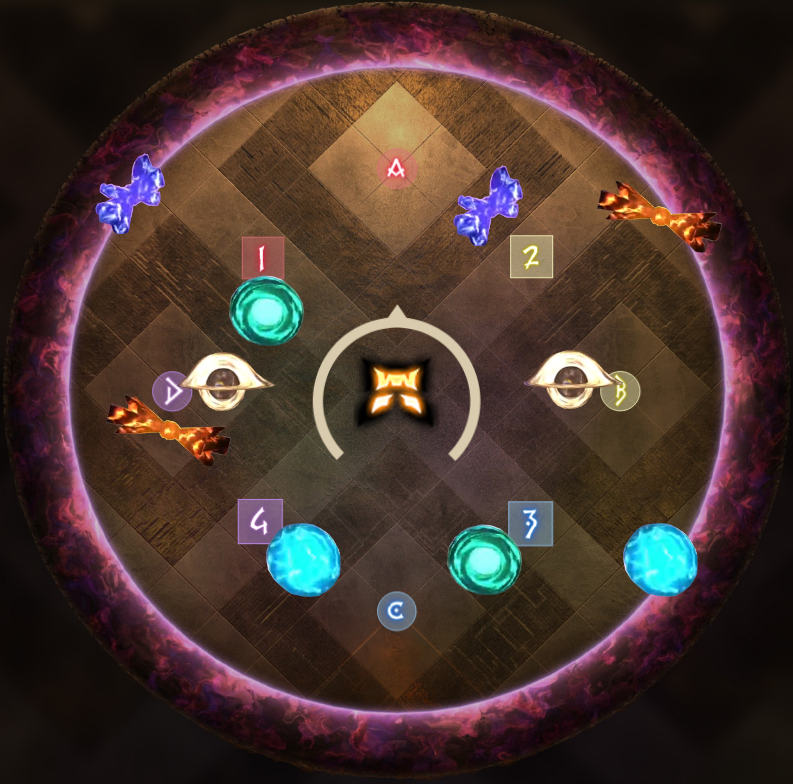 |
For reference, the purple crystal shoots a cone north/south while the red crystal shoots a cone west/east. The green donut and blue ball are self explanatory.
Now, there are two problems presented in this mechanic. As you can see in the examples above, one side has four objects that are evenly distanced. If all four of them go off at the same time, then nowhere in the arena would be safe. Ideally, you want a donut as a safe spot while isolating one of the cones.
The second problem arises as you start thinking about using a donut as the safe spot. For starters, you do not want two donuts to go off at the same time, which defeats the point of creating a donut safespot. You also do not want the other side to have a red crystal go off, in which the cone would blast your donut safe spot.
With these information in mind, you want to treat red crystal + green donut and purple crystal + blue ball as the two groups when dealing with the mechanic.
Resolution
There is a way to delay an object from reaching the black hole, and that is to have one or more party members touch it, which will cause it to temporarily freeze. So, how do you know which object you have to freeze?
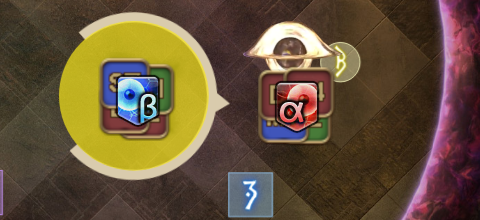
| 1. | The solution is quite simple once you realize that the initial setup is literally telling your party which objects you need to stall. There are always two objects that spawn very close to the black hole. Identify those two objects, because those are the very same objects that you need to stall on the other side of the arena. |  | 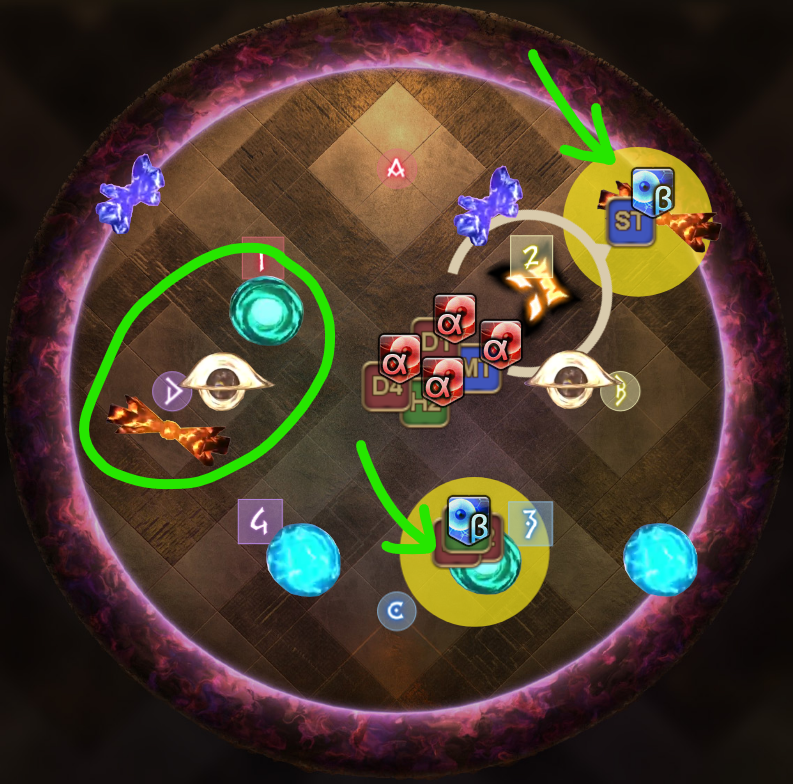 |
|---|---|---|---|
| 2. | The Alpha players should stay in the middle and not be a nuisance to the other players while the Beta players are doing the mechanics. Send the Beta debuff tank to the north in order to stall the northern object, while the non-tank Beta players are to stall the southern object. The explosion is considered a stack, so make sure to clump up together when you touch the object. You cannot take the explosion raw, so make sure to have at least 2 mitigations from the H2. The tank can use Rampart + short mitigation to take on the north object alone. The objects can only be stalled once they start moving, which coincides with your debuff timer being at 2s, so make sure that you see the explosion first to confirm that the object has indeed been stalled. After stalling an object, your debuff will now mutate and this is the cue for the tanks to swap the aggro. Carefully make your way back to the middle once you've done your job. Avoid crashing into any stray objects, because not only will the damage kill you, it will also cause the mechanic to likely fail. | ||
| 3. | The black holes are about to activate, which will happen once the boss casts Blood Wakening, so make your way to the first donut safespot. There are multiple ways to determine where the first donut safespot is, but one common method is to use the starting positions of the objects. Similar to step 1, you will be looking at what the two objects are that spawned closer to the black hole. Once you've located your safe spot, be sure to stand on either north or south of the black hole, preferably south. Once the first donut goes off, you can then start making your way to the other black hole. No matter which side you start in, the way you dodge the attacks will always be the same. | ||
| 4. | Once you've dodged into the second donut, the boss will cast either Netherworld Near or Netherworld Far. This attack is a 4-man stack that will hit either the closest or the furthest player, depending on which attack it casts. If its near, then have all Beta players go inside the boss, while Alpha stays outside. If its far instead, then do the opposite by having the Alpha go inside the boss. | Netherworld Near | Netherworld Far |
 |  | ||
Upon resolving the stack, the boss will end this mechanic by casting Arcadia Aflame. With proper timing, your 15s mitigation can cover both the Netherworld stack and Arcadia Aflame. The Lindwurm will use Double Sobat immediately after the raidwide, so whoever is going to invuln the 2nd tankbuster should provoke while the boss is busy casting his raidwide.
This mechanic is arguably the easiest in this fight so far, but it can still cause wipes if people aren't paying attention. Double check your debuff to determine what action is required of you, and above all, do not crash into an object by accident.