M7S - Sinister Seeds
The Brute Bomber is back, now morphed into the abominable Brute Abombinator. As the Brute Abombinator, he is angrier than ever, which he shows by immediately starting the fight with a Brutal Impact.
Just like its first incarnation in M3S, Brutal Impact are physical raidwides that hit multiple times. This raidwide will start at 6 in the earlier phases, but the amount of hits will increase to 8 as the fight drags onto the 3rd phase.
Brutal Impact is physical, so feint is very effective, while addle and GNB/DRK 90s mitigation are less useful to almost useless. Brute Abombinator will eventually use both physical and magical raidwides throughout this fight, so the tanks and DPS should try to plan their mitigations to specifically counter the attacks that the mitigation is strong against.Stoneringer
Similarly to normal mode, the Brute Abombinator will use Stoneringer to create either a sword or a club on his right arm. The sword means donut, while the club means a chariot. However, the big difference in savage is that the followup tankbuster will now randomly be either Smash Here (closest player) or Smash There (furthest player), instead of the tankbuster always targeting the tank. The party now needs to verify what the boss is casting to determine whether they have to move in or out after dodging the swing.
| Sword + Smash Here | Club + Smash Here |
|---|---|
| Sword + Smash There | Club + Smash There |
Both Smash Here and Smash There are tankbusters meant to be stacked by two tanks, but invulning them in phase 1 is by far the most popular choice in PF. There are two tankbusters in phase 1, so if you want to keep it simple, you can have MT invuln the first one and the ST invuln the second one.
Keep in mind that a PLD can never soak the first Slaminator in phase 3 if they use their invuln in phase 1, something to take into account if your MT is a PLD. Discuss with your cotank on how to deal with P1 and P3 in this case, especially if both tanks are PLD for whatever reason.
Spore Sacs
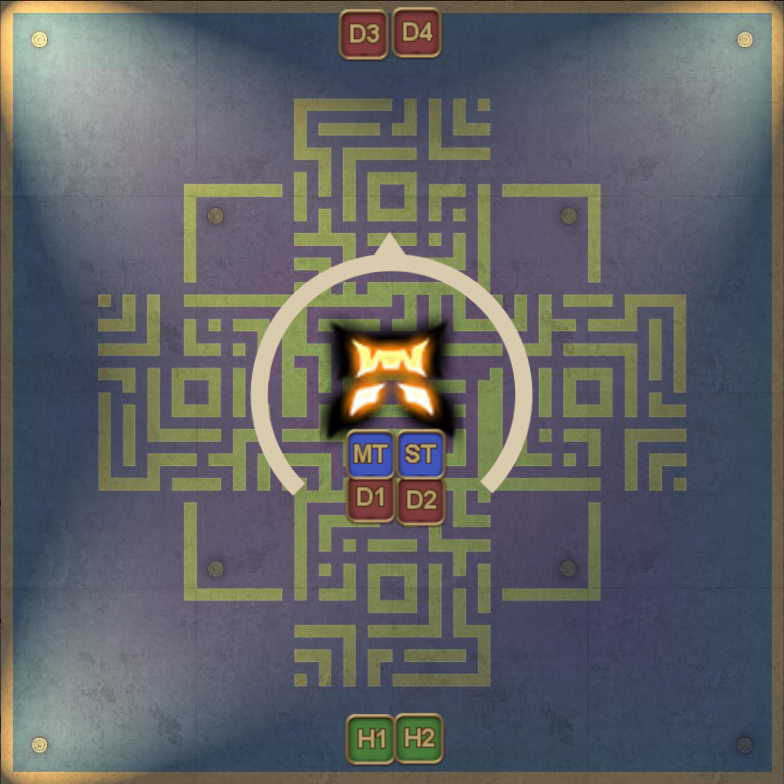
After dealing with the tankbusters, the Abombinator will prepare its first major mechanic by launching Spore Sacs over the map. This is your cue to immediately preposition to your positions, because you have no time to adjust once the boss casts Sinister Seeds, which is the followup. The ranged DPS should go all the way north, while the healers remain south. The melees can all stay close to the boss.
Once the spores land in the arena, it will start to sprout vines which will detonate another set of AoE. Your goal is to identify how the vines sprout and run to your safe spot as soon as you can. This is made simpler from the fact that only two patterns exists.
| Pattern 1 | Pattern 2 |
|---|---|
 |  |
The melees only need to shift left or right, but the ranged need to run all the way to the corner in order to not get hit by the explosions. The timing is very unforgiving, so it is recommended to pop sprint immediately when you see the spore drop down because you will likely get hit otherwise.
Sinister Seeds
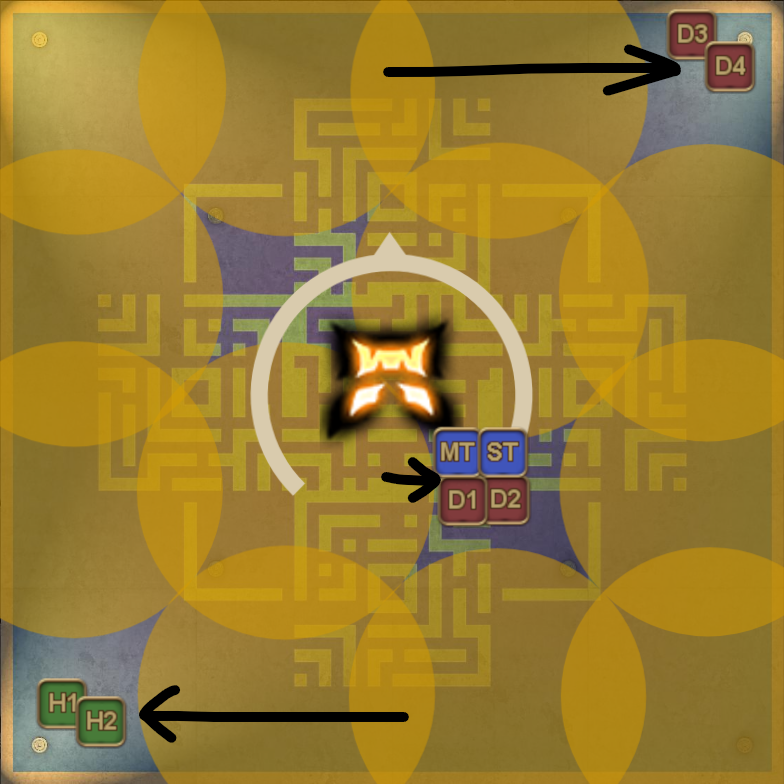
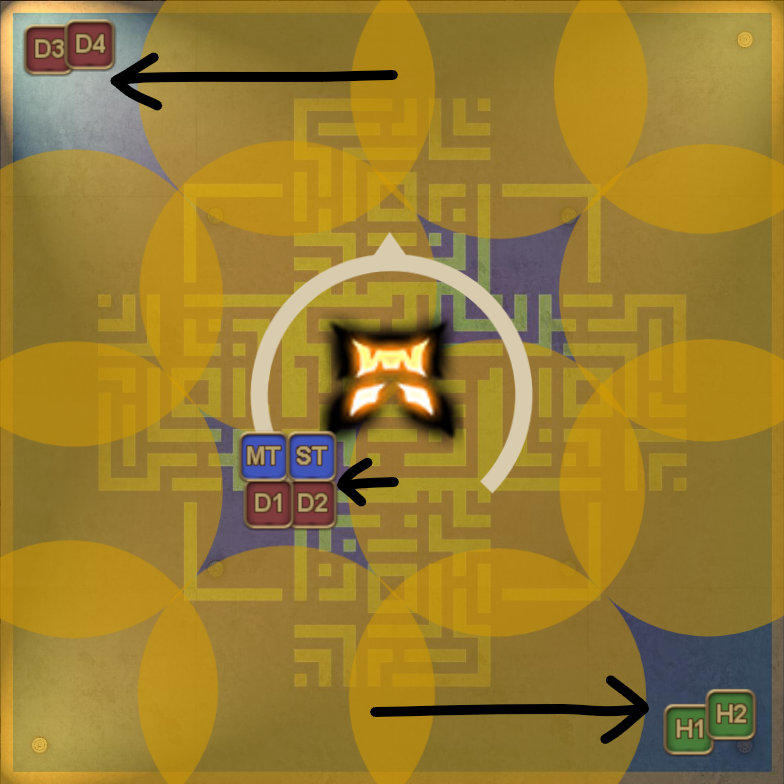
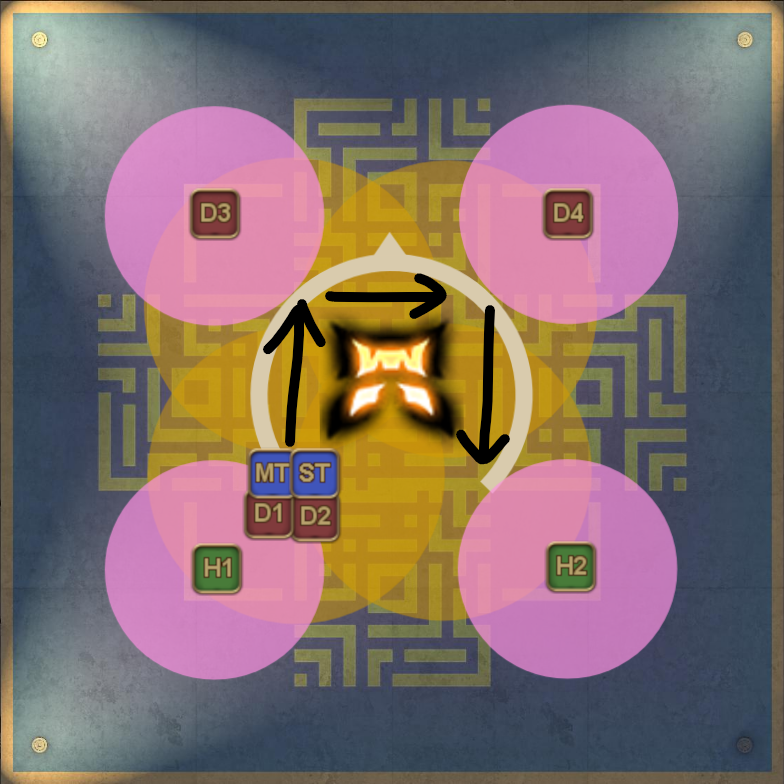
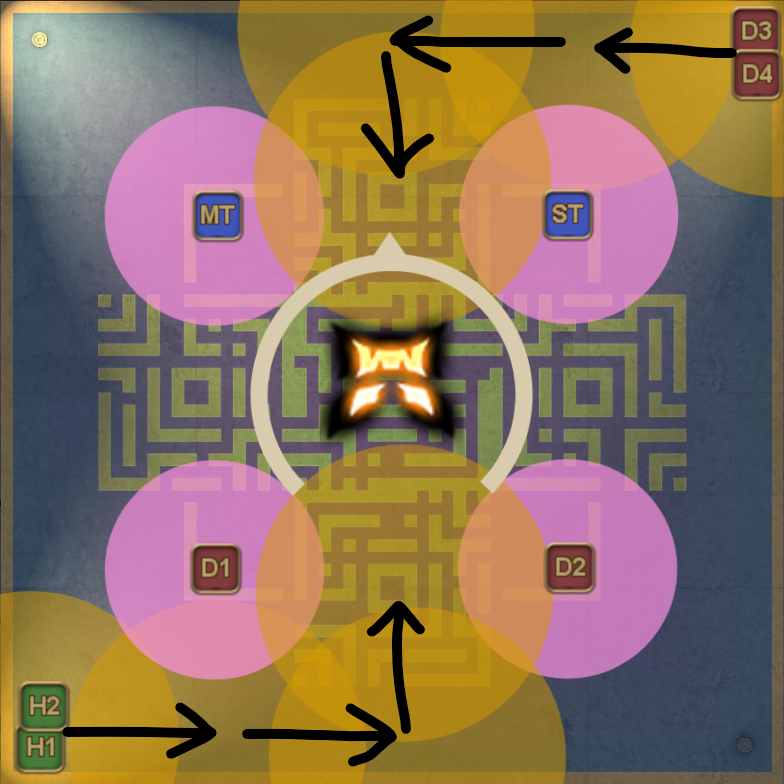
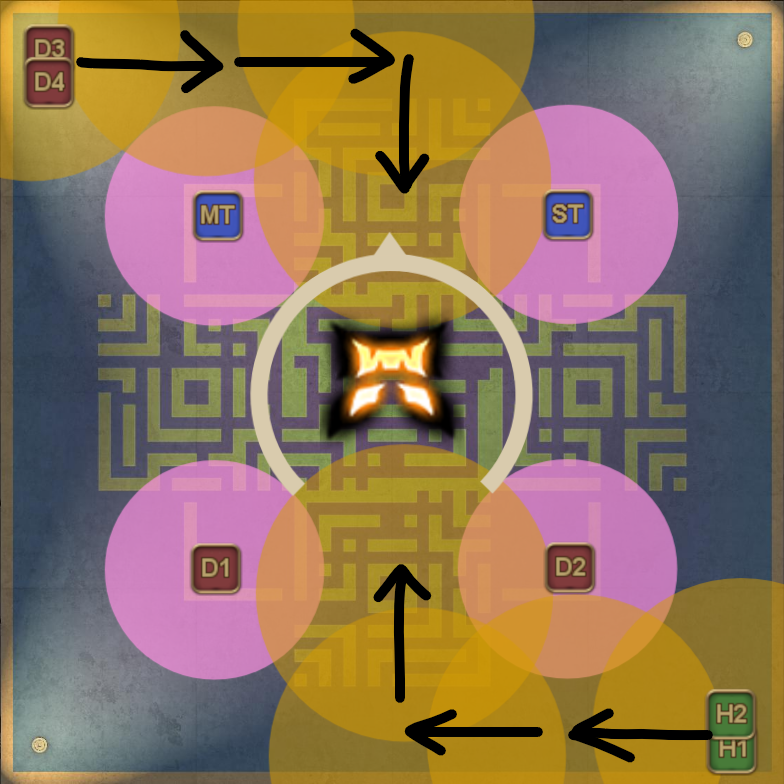
Now this is where things get chaotic, because a lot of things will happen at once. Once the Abombinator finishes casting Sinister Seeds, the four closest player will either get targeted by a purple AoE or they will become the target of a series of baited AoEs. The four furthest players from the boss will get whatever the closest players didn't receive.
The purple AoE are seeds which will explode in a star shape after some time, while the baited AoE will explode like a normal AoE at first but will generate a secondary explosion after some time passes. As if that wasn't enough, the boss will do an untelegraphed stack on both healers, which forces the light parties to group up while avoiding all the attacks.
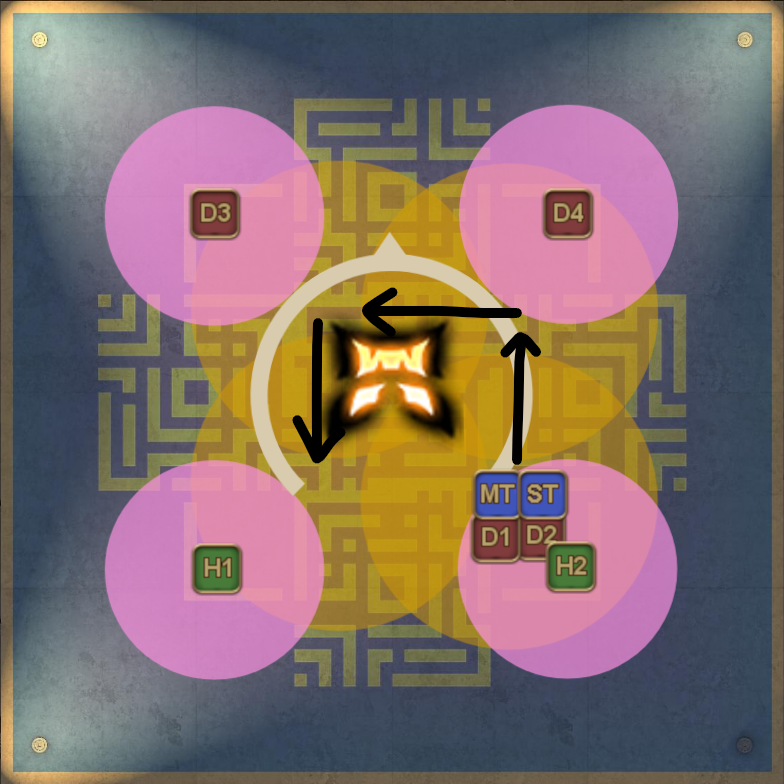
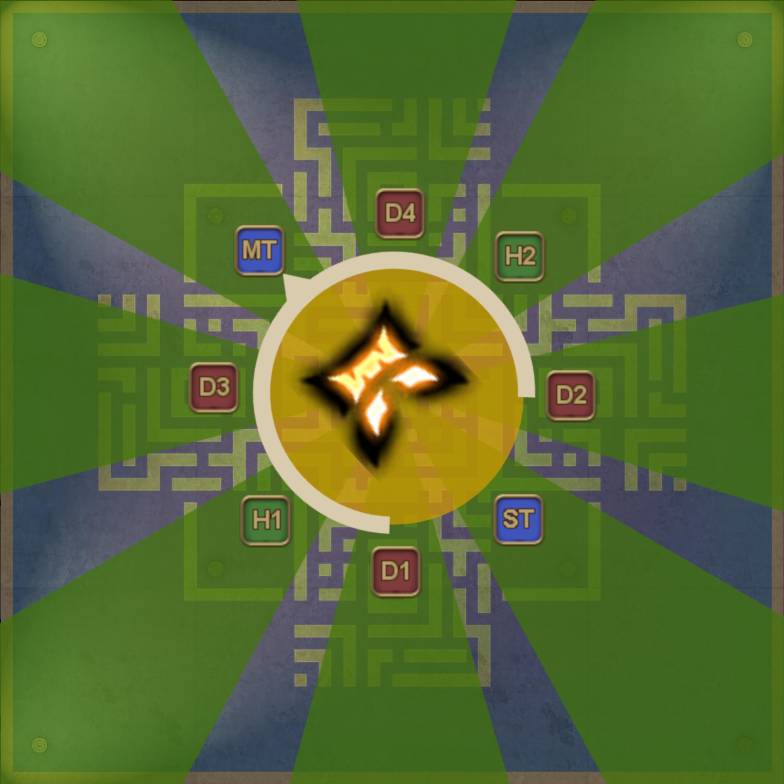
Now, the method to resolving this mechanic is heavily dependent on which group the boss chooses for the baited AoEs. If it picks melees, then they have to mariokart around the boss. In case of ranged players, they will have to travel in a L-shape back to the center of the boss. Regardless of who gets the purple seeds AoE, their AoE needs to be dropped on the golden dots around the center of the arena
| Melee pattern | Ranged pattern | ||||||
|---|---|---|---|---|---|---|---|
 |  |  |  | ||||
 | |||||||
Quarry Swamp
While resolving the baited AoEs, you might notice that there are now a bunch of Abomination adds on the map. During the ongoing chaos, the tanks need to draw the aggro on them to make sure that they won't beat your squishier party members to death. You want to then clump the adds up together, so that your party members can AoE them all down.
There are two ways around it: Your first option is to use skills that aggroes everything around you, like WAR's Equilibrium or DRK/GNB gapclosers. Your second option would be to manually attack all the adds one by one through your enemy list, perhaps coordinating this with your cotank if needed. Regardless of your approach, the adds will most likely sneak a few attacks on your squishier party members, so healers be aware.
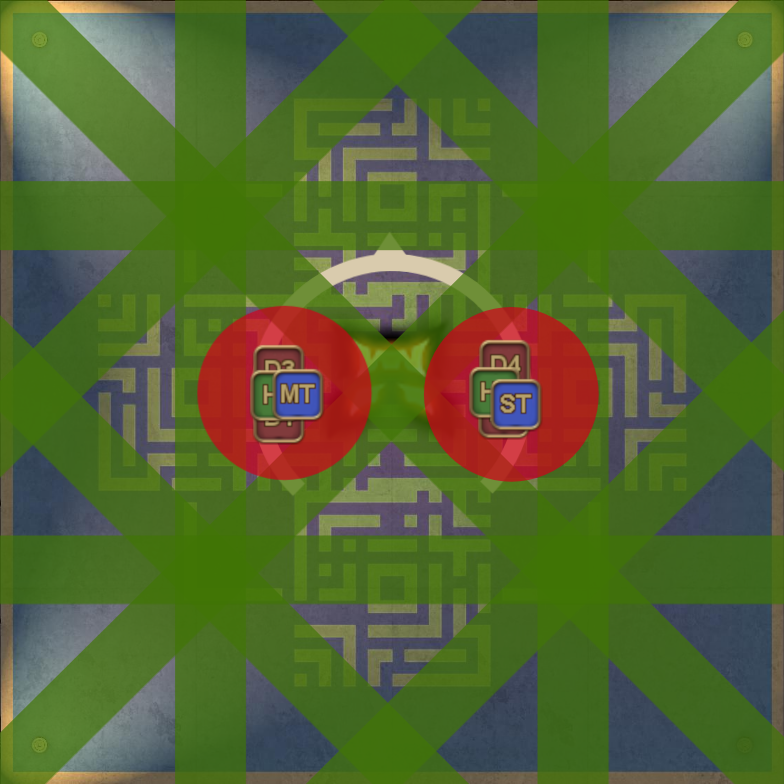
Remember about the secondary explosions of the baited AoE? They are primed to detonate now, so immediately establish the aggro on the adds and pull them west or northwest, depending on where it is safe. Unlike what game8 tells you, which is always west, you have to adjust by going west or NW/north, depending on which pattern you get.
| Melee pattern Go northwest! | Ranged pattern Go west! |
|---|---|
Just like in normal mode, two adds will use Winding Wildwinds (donut) while the other two adds will use Crossing Crosswinds (十 shape AoE). In an ideal world, you want to eliminate all of them before they can get their cast off, but as a precautionary measure, have the tanks interject both Winding Wildwinds adds, while the D3 interjects whatever is left. If all else fails, avoid the attacks because getting a damage down is not something you're looking forward to.
Now, if for whatever reason you're taking too long to kill the adds, then the adds will selfdestruct with Hurricane Force, wiping the party on the spot. If you did manage to kill all the adds on time though, then their corpse will remain on the floor which you can use to break the boss's line of sight. You do want to do that, because the Abombinator will soon use Quarry Swamp in an attempt to petrify you for an easy kill.
Explosion
Three proximity markers will appear around the arena in a triangle shape, in the style of DSR P7 Gigaflares. For those unfamiliar with DSR P7, the proximity markers will appear one by one, in the order that they are going to explode, which means this is essentially a 3-to-1 dodge mechanic.
Similar to DSR, the damage of the proximity is insane if you're too close to the source while it will do moderate damage instead if you've kept your distance. No amount of mitigations will save you if you are too close, so mind your distance if you're trying to go for uptime. Finally, if you happen to be petrified because of Quarry Swamp, then there's nothing to do but to accept your inevitable death.
While running around from the proximities, the Abombinator will use Stoneringer again to prepare his next swing. Identify immediately whether it is a sword or a club once you've dodged the last proximity explosion, and dodge accordingly while accounting whether the boss uses Smash Here or Smash There. In a PF setting, this tankbuster is commonly invulned by the other tank who hasn't used his/her invuln yet.
Pulp Smash
After the tankbuster, a stack marker will now appear as the boss is charging up Pulp Smash. This attack starts as a stack marker, but it will fire off proteans against each player afterwards, forcing players to spread out immediately once the stack is resolved. While spreading out, you must get out of the boss's hitbox as well, or you will get a damage down for your trouble with the assumption that you didn't outright die. As a reminder, game8 does all Pulp Smash boss relatively.
Identify the location of the boss and the player with the stack marker, as the direction which the boss is jumping to will determine where the new relative north is. If you are the stack marker, then refrain from doing anything that would make it harder to determine the new north, like hiding under the boss or suddenly changing the direction the boss is going to jump.
Neo Bombarian Special
If you have survived everything so far, then the Brute Abombinator will now prepare its Neo Bombarian Special to destroy the current platform you're on. This attack itself is a raidwide, but it will also send people flying across the maps as it destroys the arena.
This is your cue to immediately head north, because there's a safe platform across the chasm which you can safely land on once the boss sends you flying. Score as many hits as you can if you're a melee and head up north towards the edge once the cast bar is about to finish.