M7S - Demolition Deathmatch (Strange Seeds)
Demolition Deathmatch
The Abombinator casts Demolition Deathmatch, which will summon the vine again on the player with the highest aggro. Unlike Thorny Deathmatch however, each building now also have a tether of its own, which will solidify into a vine after some time has passed.
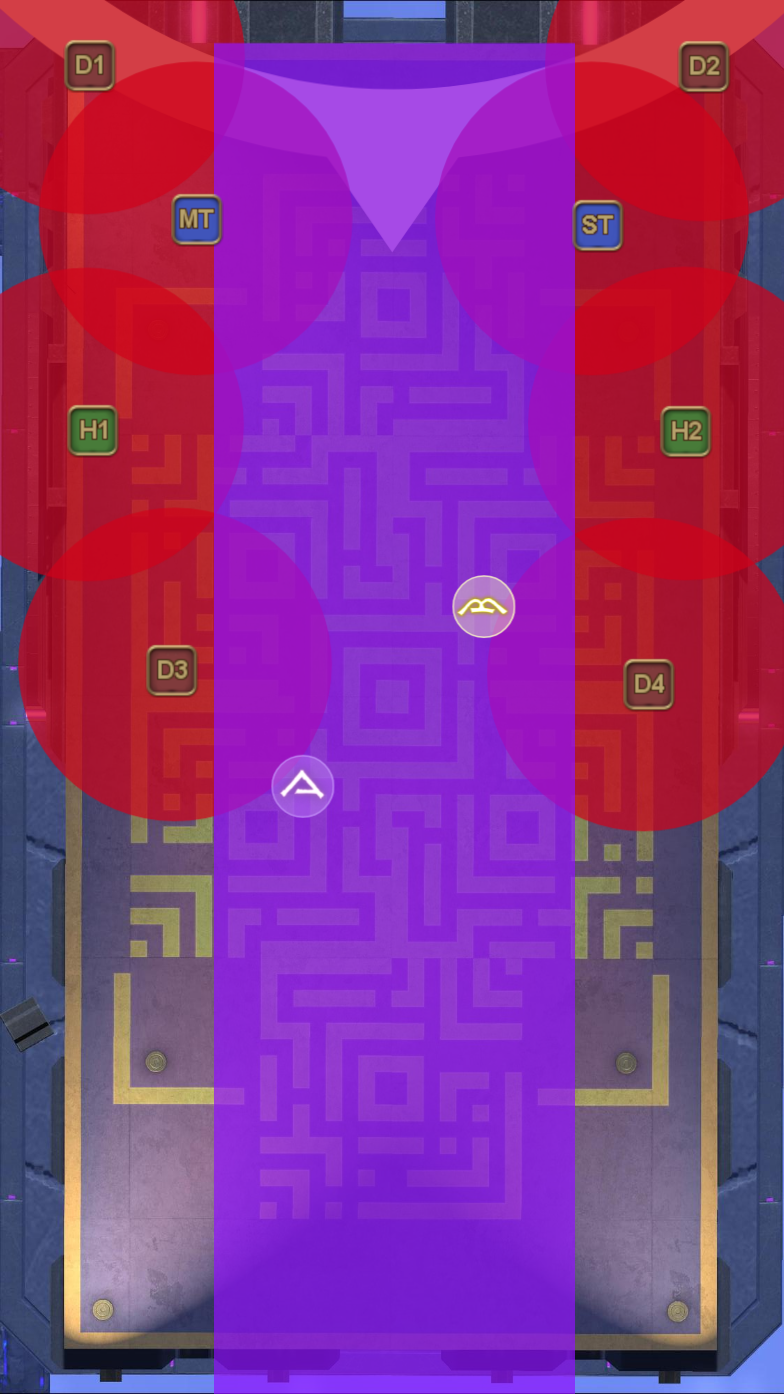
Using the boss as the new north, have the D4 take the southern tether and the D3 take the other tether at either west or east. Try to be near the building before the boss finishes casting Demolition Deathmatch, as that allows you to intercept the tether early and prevent any tether memes from happening.
With the tethers turning into vines, the boss will now target a random tank with Abominable Blink again. Although the mechanic resolves similarly to Thorny Deathmatch, discretion is advised if you want to try and uptime. You can technically uptime by hypermitigating the D4 if you happen to be forced east of the boss, but more often than not, you will most likely end up killing the D4 instead through your greed.
Killing a player with the tether will likely cascade quickly into a wipe, due to the tether jumping to a random player who is likely to be far away as well, so the recommendation here is to play safe if you happen to be the flare tank.
| D3 east Uptime at your own risk with party mitigations | D3 west Hypermitigate your D4 if you want to greed |
|---|---|
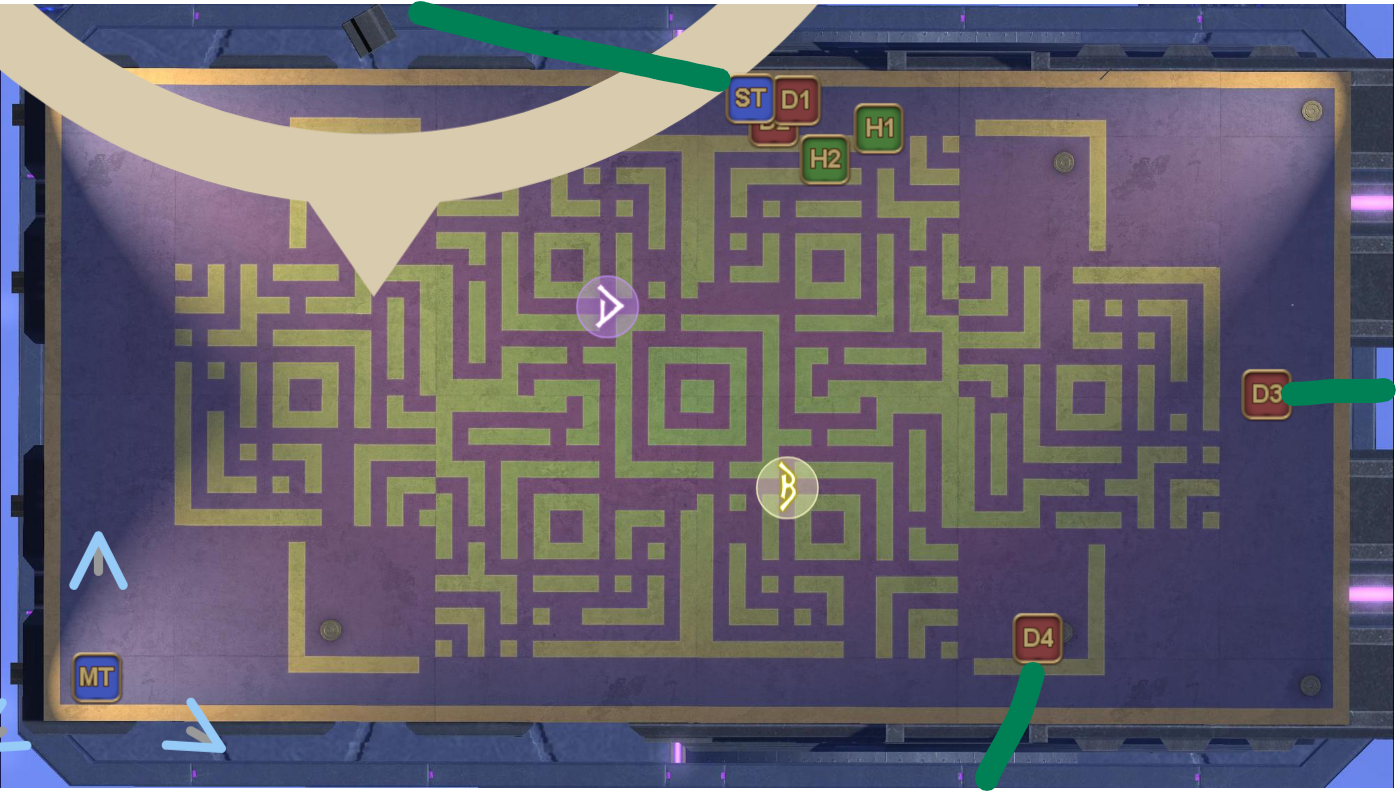 |  |
Strange Seeds
Once the flare is resolved, the boss will cast Strange Seeds. This attack will target one support and one DPS for a targeted AoE, up to four times. The AoE will explode in a star shortly after it is dropped, similarly to what you've seen before in phase 1.
All players will always be targeted at least once by the AoE, which gives you some expectation as to when it is your turn to drop an AoE. Once everyone has gotten their turn, the fifth and last set will target either all support or all DPS with a stack marker, which needs to be soaked by two players.
Sari's strategy
Although very doable by just eyeballing everything, Sari came up with a strategy that brings some structure in how people can resolve this mechanic safely while also maintaining uptime for melees. Ishia's strategy has fallen out of favor due to the immense downtimes, but it shares some concepts which should allow you to easily pick up this latest strategy if you happen to have been hibernating after week 1. Unfortunately though, being able to count up to 4 is still a requirement, so that hasn't changed between Ishia and Sari.
The approach to this mechanic is different for ranged DPS vs all the other players, so the explanation will be broken up in two parts.
Ranged DPS
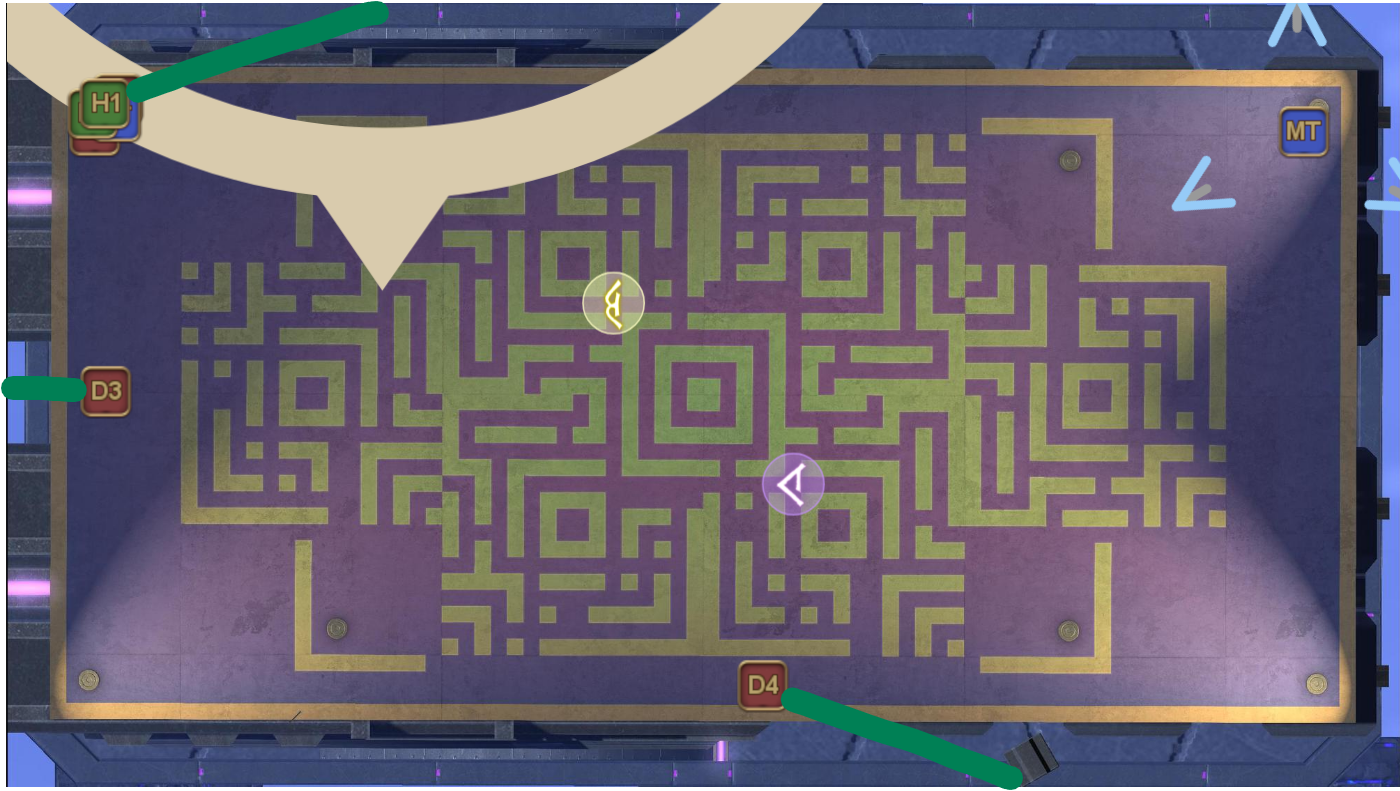
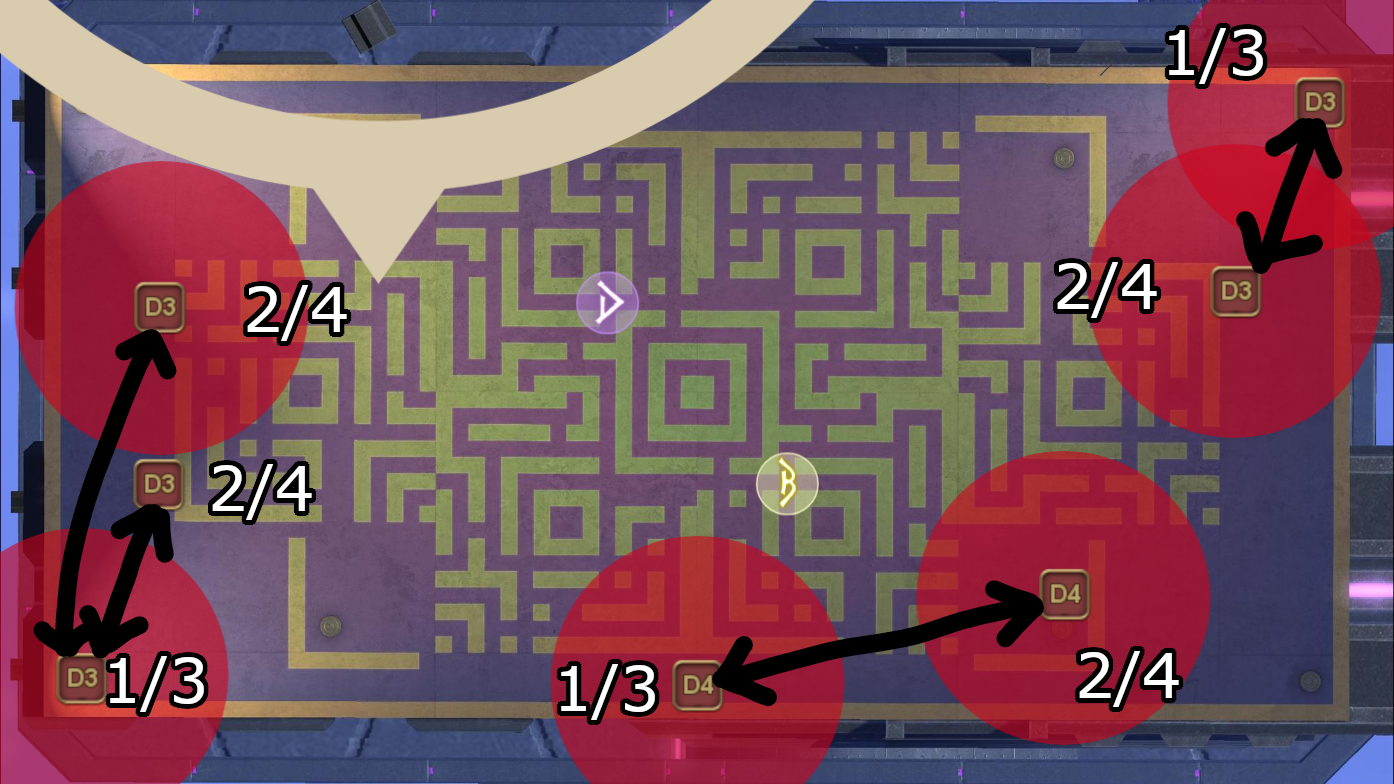
The ranged DPS are tethered to buildings, which limits their movement to around the building that they are attached to. Conceptually, the idea is as follows: Each player is given two spots which functions both as a drop spot for the seed AoE and a safe spot to dodge the star AoEs. Which spot you go to depends on whether you're at the odd or even count. Functionally, this means that you're simply shuffling back and forth between two spots in order to easily solve this mechanic.
The D3 can either end up near the boss or away from the boss, depending on which building the boss is latched on, hence why you see two D3 positions in the diagram below. If the D3 ends up near the boss instead, then keep in mind that you are given three spots instead. Your AoE drop spot is shared with the melee DPS players, and you do not want to be there if another DPS is there to drop their AoE, hence why D3 get a 3rd dodge spot.
Do not drop an AoE on your 3rd spot as D3, which is shown by the lack of a red AoE circle. If you do decide to drop an AoE there anyway, then the resulting star AoE will rip your party members who are near the boss to shreds, which is not optimal for either your prog or your attempt to clear.
 | ||
| D3 PoV (west) | D3 PoV (east) | D4 PoV |
|---|---|---|
All the other players
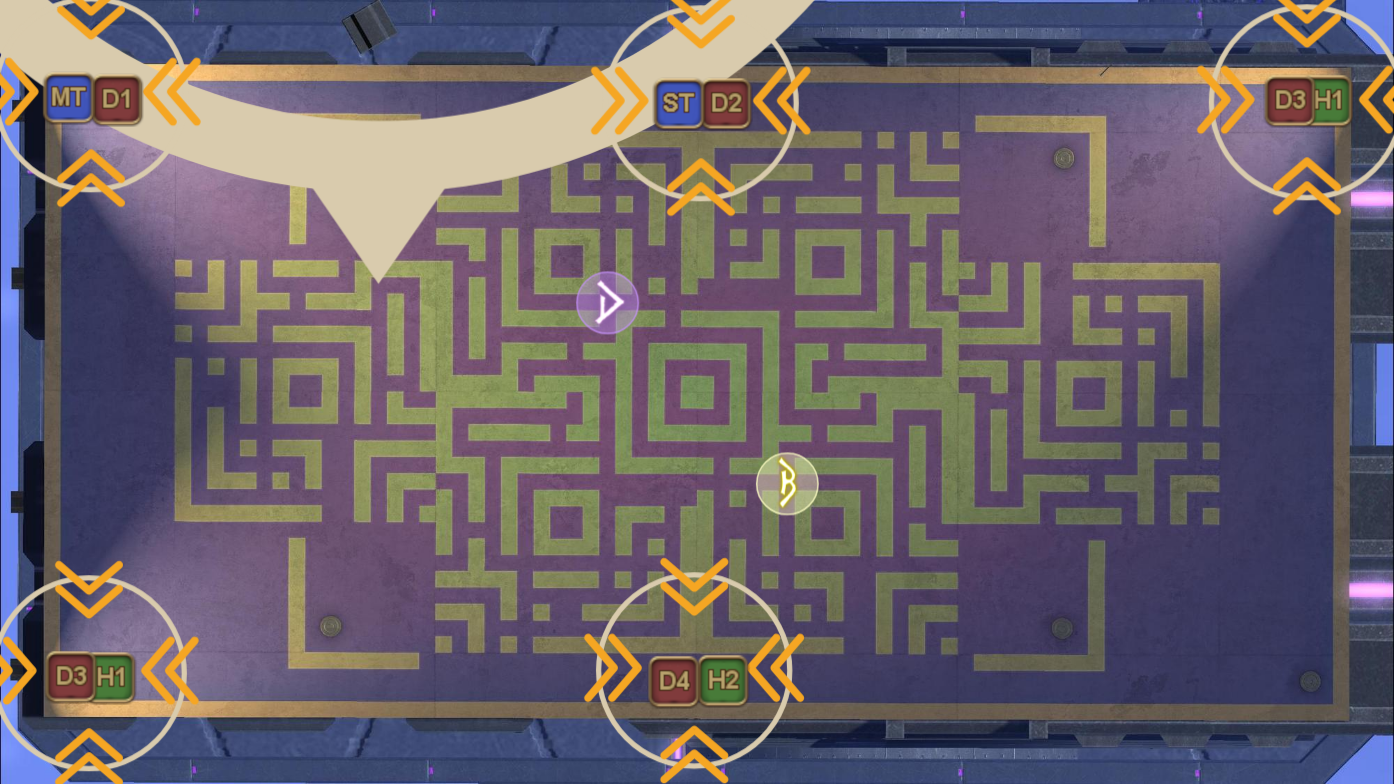
If you thought D3/D4 had it easy, then you're in for a surprise because all the other players have an even easier job. This is because they have two permanent safe spot which they can utilize, with the assumption that everyone in the party can count up to 4 properly. Do take into account of possible human error which forces you to adjust, but having permanent safe zones means that you can just stay inside of it, only going out to drop the AoE if you are selected.
There are two safe zones to pick from: one in front of the boss, which the melees should be at for uptime, and the other that is further towards the east, which is a more attractive option for the H1 if the D3 is far away from the boss. Visibility can be poor if all players are stacking in one location, so as a workaround, you can try and wiggle your character a bit if you're unsure whether you are targeted by the AoE or not.
 | |
| Melee DPS | Support |
|---|---|
Stack Seeds and Brutish Swing
After the 4th set of seeds are dropped, the boss will now target either all support or all DPS with a two-man stack variant of the seed. Make your way to your stack position together with your partner, which should also allow you to naturally dodge the star AoE from the 4th seed set if you're wondering on how you can dodge that.
The mechanic is not over yet! While you were dropping seeds around the arena, the boss sneakily used Stoneringer to create a weapon for his next Brutish Swing. While the sequence of this mechanic remains the same, the big difference in this version of Brutish Swing is that the boss can randomly jump to the far end building instead, which is immediately also the most annoying pattern if its a sword.
| The pattern you're most used to... | The cursed pattern, especially if its a sword... |
|---|---|
Identify his weapon and then identify whether you have to make a run for it or not. You're recommended to pop sprint here, as the timing is unforgiving if you have to run from one side all the way to the other end. Once you dodge his Brutish Swing, he will follow this up with his usual Glower Power spread, which is then followed up by Revenge of the Vines. Below is a Glower Power spread reference if you happen to get the cursed pattern.
Once the dust settles, whether you skillfully dodged all the attacks or had your corpse dragged to the finish by your teammates, the boss decides that he had enough of this slow phase as he destroys the platform you're standing on with Powerslam. Heal up and make sure to mitigate this physical raidwide!
Upon regaining control of your character, you now have the opportunity to immediately pot if you wish to align your last pot window with the last 2m burst window.