M4S - Ion Cluster (Ion Cannon)
Upon resolving the electric cage, Wicked Thunder will cast Wicked Bolt, which is a multi-hitting stack marker. This also signals the end of the Electrope Edge phases as she prepares her next attack, which is signaled by her casting Ion Cluster. As MT, try to pull the boss north before she casts this, as the boss will teleport all the way up north once she shifts to her next attack.
Ion Cluster
Once the boss casts Ion Cluster, she will inflict all players with 3 stacks of Positron or Negatron. If the ST intends to invuln the upcoming Wicked Jolt, then he/she should provoke now and establish main aggro on the boss.
| Debuff | Description | Additional Notes |
|---|---|---|
  | Four players will receive Positron and four players will receive Negatron. Both debuffs will start at 3 stacks once they are inflicted on the players. Your goal is to reduce the stacks, which is achieved by getting hit by a laser of the opposing element. Failure to reduce the stacks completely before the timer runs out results in a lightning bolt striking you, killing you instantly. |  |
Wicked Thunder will shortly teleport to the north and pull out her giant ion cannon. Just like in normal mode, she will start blasting one side of the platforms until they are completely destroyed. But unlike normal mode, the blasts deal really high damage, so everyone should preposition center and immediately get to the safe spot as soon as they can, which can either be west or east. Healers and DPS can only survive up to two hits without mitigation before dying, so pop sprint and some mitigation if necessary.
Ion Cannon
The boss will teleport to the center of your island with the intention of firing her ion cannon on both sides. One side is a Positron laser while the other side is a Negatron laser, so make sure that the laser you're getting hit by is the opposite of the debuff you have, swapping places if necessary. Keep in mind that the laser is also a wild charge, so have the tanks stand in front of the party in order to take the initial impact of the laser cannon.
If your stack is reduced to 2, great. But if your stack is 4 instead, then it means you were daydreaming and standing on the wrong side. Regardless of whether you did it correct or not, everyone who is hit by the laser will now get an additional debuff that they have to resolve.
| Debuff | Description | Additional Notes |
|---|---|---|
 | A small AoE will explode around you, which inflicts a magic vulnerability. This is the only debuff that doesn't allow the player to take a direct hit from the protean laser. The party cannot receive this debuff in combination with either Roundhouse Conductor or Proximate Current. |   |
 | Fires a protean laser at the player farthest from you. The party cannot receive this debuff in combination with either Roundhouse Conductor or Proximate Current. | |
 | A giant donut will go off with you at its center. The party cannot receive this debuff in combination with either Spinning Conductor or Remote Current. | |
 | Fires a protean laser at the player closest to you. The party cannot receive this debuff in combination with either Spinning Conductor or Remote Current. | |
 | Player with this debuff must get hit by a protean laser in order to cleanse this. Failure to do so will cause an explosion to go off instead, which inflicts a huge amount of damage and a damage down on everyone in the party. |
The goal of this mechanic is for the Remote/Proximate Current to beam the Collider Conductor while making sure that the other debuffs aren't causing any casualties. While that is a lot of debuffs that you have to deal with, the good news is that a braindead strategy exists that allows you to resolve this mechanic with ease.
Kuuya's Ion Cluster
Kuuya's Ion Cluster strategy involves fixing all the positions, leaving only three possible spots that you have to think about in order to resolve this mechanic. The priority system for the inner spots involves the supports going towards the outer edge of the arena, while the DPS goes to the inner side.
| Platform on west | Braindead positions | Platform on east | ||
|---|---|---|---|---|
| Supports | DPS | DPS | Supports | |
 |  | 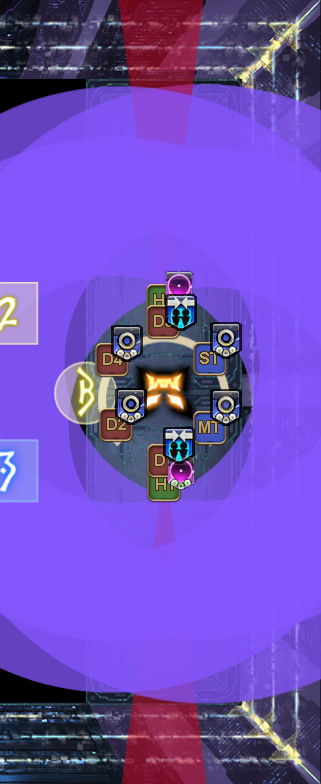 | ||
To identify the inner side and the outer side, you can use the arena lines or the waymarks as reference. The yellow arena lines are always outside and the waymarks are always placed inside.
 |
This phase is not hard with the braindead strategy, but there are some things to keep in mind:
- The lasers can swap around randomly in the three rounds that she fires at you! You have to adjust to the other side if that happens.
- Your Spinning/Roundhouse Conductor position will also be swapped, so keep that in mind.
- The attack is a wild charge, so make absolutely sure that you are standing behind a tank.
- The lasers really hurt, so spread your mitigation out as best as you can to cover all three waves.
- This applies to tanks too regarding personal mitigations, the initial hit is essentially a tankbuster.
- Finally, ST should provoke now if he/she hasn't done so, especially if the MT has invulned the first tankbuster in Electrope Edge 1.
After resolving the ion cannon, the boss will use Wicked Jolt on the player with the highest enmity. Deal with it is as necessary and start pulling the boss back to the center. Point the boss towards south once the boss is dragged back to the center, as this will become the new north during the transition phase to phase 2.