M4S - Cross Tail Switch
Take your time to heal up and/or revive anyone who happen to be yeeted into the void instead. The boss will teleport to you shortly, initiating the 2nd phase of this fight. Take note that her auto attacks hits like a truck during this phase, so all supports should actively help the MT with mitigations or heals. Consider using your mitigations to mitigate auto attacks instead, as there aren't many tankbusters during this phase.
Exaflares
After giving you a short break, the boss will cast Cross Tail Switch, which is a multi-hitting raidwide attack that deals roughly 120k damage per hit, possibly higher without gear. This attack hits up to 9 times, so unless your healers has told you not to, one of the tanks should LB this to survive the onslaught.
It is near impossible to have the tank LB3 cover all the hits so ideally, you want the tank LB3 to ignore the first but cover all the remaining 8 hits so that the party's HP remains healthy for the next mechanic. Account for the 1 second delay in activation and time the LB as perfect as you can to cover as many hits as you can. For reference, you can press LB once the cast bar hits the letter S on the word Switch.
Once you've survived the initial barrage, the arena will be littered with exaflares. Ignore the exaflares on the middle two columns. The middle column exaflares are never safe and only serves to distract you from the actual threat. The sides however, are always randomized and will always go horizontally. Split up your light party groups between west and east, because the boss will cast Wicked Blaze, which is a multi-hit stack marker.
 |
Assuming nobody has fallen off the platform, the image above should be the starting position for everyone in the party. To determine the safe spot on your side, you have to look at the other side of the arena and identify which exaflares are coming towards you. There are only three possible movements for you to consider when solving the exaflares:
- Go down a bit (down 1)
- Go up a bit (up 1)
- Go all the way to the top (up 2)
The exaflares are quite fast, but you should have enough time to walk all the way to the top without resorting to sprint. The most important is that you don't walk off the edge, especially if you're a healer, because that would cause a wipe.
| Example 1 (Down 1) | Example 2 (Up 1) |
|---|---|
Wicked Special
After you've resolved the exaflares, the boss will cast a series of attacks as part of her mini tutorial, starting with Wicked Special. Once she casts Wicked Special, she will either pull out her sword or her dual lasers. Depending on what she pulls out, she will either cleave the middle or the sides of the arena. Remember this attack, as she likes to use this while you're in the middle of a major mechanic.
| Flame Sword Middle two tiles unsafe | Dual Lasers 1.5 tile on each side unsafe |
|---|---|
Mustard Bomb
After resolving Wicked Special, the boss will cast the next mechanic which will reappear later on. The boss casts Mustard Bomb, which spawns two tethers that needs to be taken by the tanks. Spread out as four other players will also be randomly targeted by an untelegraphed AoE attack.
 |
Once the cast goes off, the party will be introduced with a few new debuffs.
| Debuff | Description | Additional Notes |
|---|---|---|
 | The tanks who took the tethers will now have a mustard bomb placed on them. These bombs can be taken away by simply having a player touch you. Upon losing the mustard bomb, the player will gain Mustard Bombproof. |  |
 | Applied when someone takes the mustard bomb off you. The player with debuff will not be able to take away the mustard bomb. | |
 | Everyone who got hit by an explosion, the tanks included, will have their fire resistance lowered. You cannot take the mustard bomb, so avoid the player with the mustard bomb at all cost. |
Two random players will not be attacked by an explosion, allowing them to freely take off the mustard bomb from the tanks. Use the following priority system to determine which tank you take the mustard bomb away from, and stay away from the party to resolve this mechanic.
 |       |  |
Aetherial Conversion and Tail Thrust
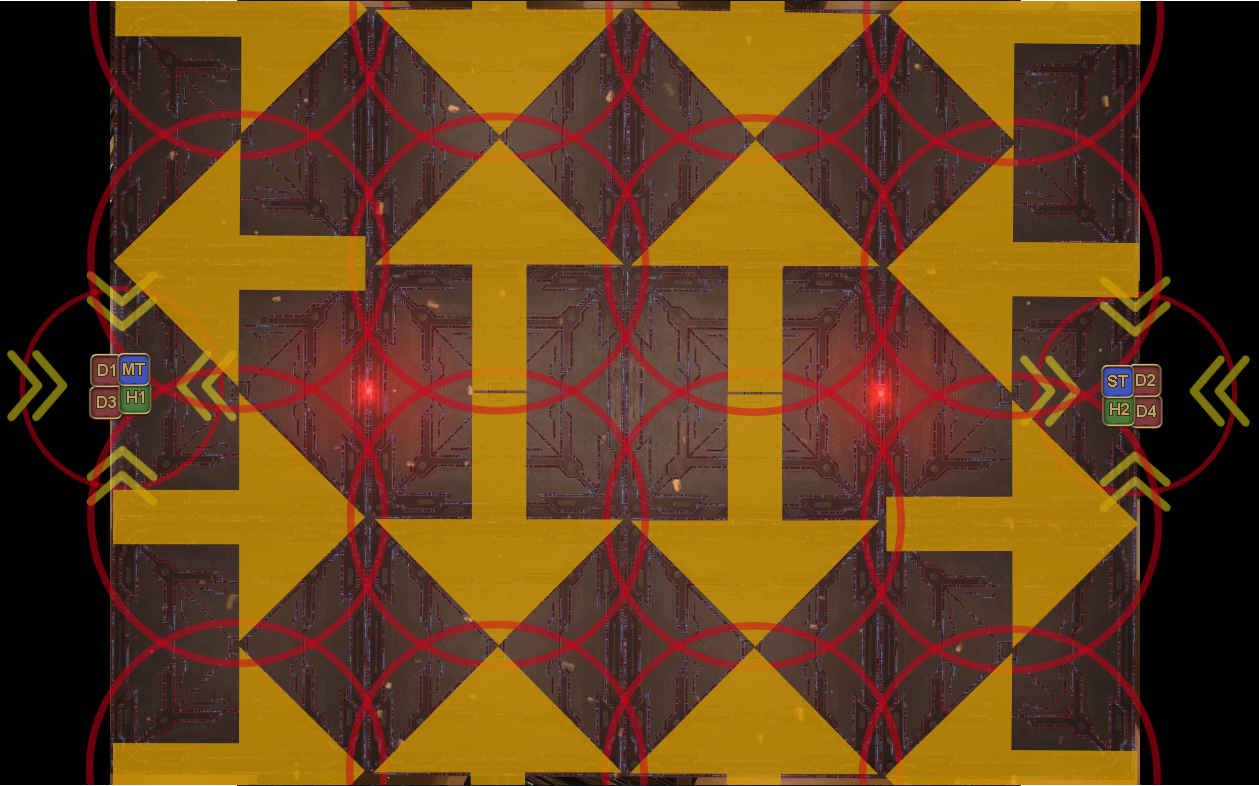
The final mechanic which she will use throughout the rest of the fight is Aetherial Conversion and Tail Thrust. Similarly to M2S, Aetherial Conversion stores the attack while Tail Thrust executes it, which means this attack is a memory check. Aetherial Conversion will store either blue aether (knockback) or red aether (AoE) in her two tentacles. The order in which she charges her tentacles will also decide the order in which she uses the tentacles to attack once she casts Tail Thrust.
The impact points are the two red lights on the arena floor, so align yourself next to them if its a knockback, or go up and dodge to the other side if its red aether. Keep in mind the order of her tentacles being charged, because that determines whether she hits left to right, or right to left.
| Blue Aether (deals damage, careful!) | Red Aether |
|---|---|
This is the only time that she will use Tail Thrust directly after charging her tentacles up with Aetherial Conversion. From here onwards, you can expect that she will use Tail Thrust only after a major mechanic has been resolved.