Kefka Says
After defeating Exdeath and Chaos, Kefka returns back to the middle, lamenting how boring the last phase was. In this phase, Kefka will become targetable again and will remain stationary in the middle throughout the whole phase. Shortly after, Kefka will cast Kefka Says to summon back Chaos and Neo-Exdeath to the arena to tag team you again.
This phase only has one mechanic, but this mechanic lasts for 2 minutes and is so brutal that it puts Idyllic Dream in M12S to shame. You are recommended to prepare macros or to use whatever dark arts tool that fancies you to keep track of everything that is happening throughout this phase.
Once the ensemble is gathered, Kefka will continuously spam Mystery Magic at you, while Neo Exdeath and Chaos will throw 5 strong raidwides at you in the following order:
| Raidwide | Timeline | |
|---|---|---|
| 1. | Grand Cross 1 | 0:00 |
| 2. | Inferno or Tsunami | 0:10 |
| 3. | Grand Cross 2 | 0:15 |
| 4. | Inferno or Tsunami | 0:20 |
| 5. | Grand Cross 3 | 0:30 |
Each Grand Cross can inflict up to 320k damage on a high roll, while each Inferno or Tsunami can inflict up to 240k damage, which can overkill if not mitigated. To survive each Grand Cross, the party must apply at least three mitigations and a shield to comfortably survive, and the healers must heal the party in between every raidwide.
Take note of the timeline and try to cover as many raidwides as you can with your mitigations: 20s mitigations like Holos and Expedience can cover up to three raidwides, while 15s mitigations like D3 mits and Sacred Soil/Kerachole can cover two raidwides.
Grand Cross 1 & 2
Every time Neo Exdeath casts Grand Cross on you, he will inflict a set of debuffs on you. That by itself isn't a problem, but the problem lies in the fact that the debuff effects can be faked. There are no indicators which tells you whether a debuff is real or fake, so you have to actively pay attention by looking at Neo Exdeath and verifying what debuff was applied to you every time!
| Debuff | Description |
|---|---|
 | Once the timer on this debuff runs out, the player with this debuff will emit a gaze attack which will petrify any player that was caught looking at this player. If this is fake, however, then the party must look at this player instead in order to not get petrified. GC1 will always inflict a short timer debuff, while GC2 will always inflict a long timer debuff. In both cases, one random support and one random DPS will receive this debuff. A player can never receive both cursed shriek debuffs. |
 | Also known as stillness, this debuff will kill the player if they were caught moving or even (auto) attacking when the time runs out. In the case of a fake, however, this debuff will become motion instead as the player must be moving in order to not die when the timer runs out. You must be moving or jumping, simply attacking does not count as moving! All players in the party will receive this debuff at some point, whether it is from GC1 or GC2. |
 | Effectively a spread AoE when the timer runs out, which forces you to disengage from the group. If this is fake, however, then this attack becomes a three-man stack instead. This debuff looks very similar to the acceleration bomb on a quick glance, so be careful that you don't confuse those two! You will never receive forked lightning and compressed water at the same time. |
 | A three-man stack attack which you need to soak with your role group when the timer runs out. If this is fake, however, then this attack becomes a spread instead, which you must take alone without hitting anyone else. You will never receive forked lightning and compressed water at the same time. |
So to recap, all players will always receive one of the following debuffs with a random timer in GC1: Acceleration Bomb, Forked Lightning or Compressed Water. On top of that, one random support and one random DPS will be inflicted with the Cursed Shriek with the short timer.
In GC2, all players who had received Acceleration Bomb in the first set will now receive either a Forked Lightning or Compressed Water in GC2. If you already have Forked Lightning or Compressed Water, then you are guaranteed to get Acceleration Bomb instead. The timers on the debuffs are fully random, so it possible that you will have to resolve both Acceleration Bomb and Forked Lightning/Compressed Water at the same time.
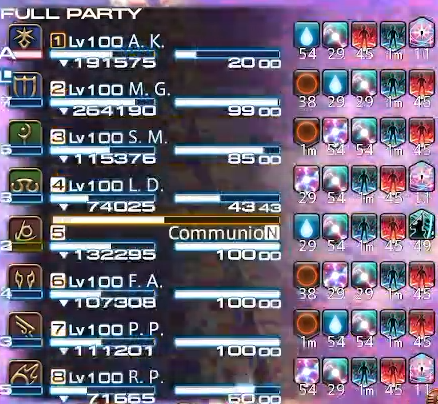
Finally, just like GC1, GC2 will inflict Cursed Shriek on another random support and random DPS who were not inflicted by Cursed Shriek before. You can see in the reference image below as to how the debuffs can stack up on each player.
Chaos
Right after every Grand Cross, Chaos will throw a raidwide of his own by casting either Inferno or Tsunami. And of course, his attacks can also be real or fake as well!
| Debuff | Description |
|---|---|
 | Once the timer on this debuff runs out, the player with this debuff will drop an AoE puddle, which will detonate after 5s, at where the player is standing. If this attack is fake, however, then this attack becomes a donut instead. This debuff always has a short timer and is applied to the whole party through Inferno. |
 | Upon the timer of this debuff running out, the player with this debuff will drop a donut at where they are standing, which will detonate after 5s. However, this attack becomes an AoE puddle instead if it is a fake. This debuff always has a long timer and is applied to the whole party through Tsunami. |
Chaos will throw two raidwides at you in total, which is always one Inferno and one Tsunami. However, the order in which he uses the two raidwides is completely random, so you have to proactively check what Chaos is doing.
Using the enemy list to see what Chaos is casting is the most straightforward approach to identify what Chaos is casting. Alternatively, you can also approach this more reactively by looking at the raidwide animation when the cast goes off or to look at which debuffs are applied when the raidwide happens.
Remember that no matter the order, Entropy will always resolve first, while Dynamic Fluid will only be triggered near the end of this phase.
Grand Cross 3
Unlike the first two, the third Grand Cross is a bit special because it will inflict a very different set of debuffs. This attack and the debuff it applies on the players are always real, no matter what telegraph you see on Neo Exdeath. So for the third Grand Cross attack, there's no need to look at him nor pay any attention to Kefka's pathetic attempt at trolling you again.
If melee LB3 has not been used yet, then this is the perfect time to do so now.
| Debuff | Description | Additional notes |
|---|---|---|
  | Taking a beam attack of the same element will instantly kill you. All players in the party will get one of the two debuffs. | 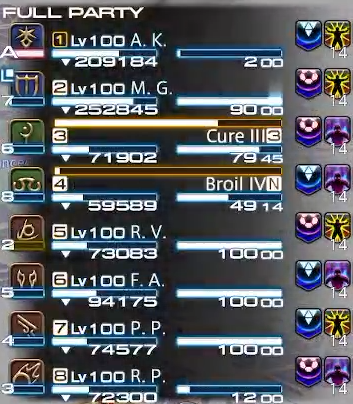 |
 | This debuff will convert all the damage that the player receives into a raidwide once the timer hits zero. If the player with this debuff ends up taking fatal damage, then the resulting raidwide will also oneshot the whole party. | |
 | Cleansing this debuff requires the player to experience a death from the beam attack, which will put the player at 1 HP if GC3 was real or roughly 70% of their max HP if GC3 was a fake. Failure to do so will cause this debuff to detonate the player, wiping the whole party on the spot. |
Flood of Naught
You will immediately get the chance to cleanse your Allagan Field or Beyond Death, because Neo Exdeath will now teleport to a random waymark and charge up Flood of Naught to beam your party. Keep in mind that this attack can be fake!
If you have Allagan Field, then you must get hit by the opposite element, and if you have Beyond Death, then you must get hit by the same element in order to die. If the attack turns out to be a fake, then the elements displayed are reversed, so you will also have to do the exact opposite of how you would've solved the mechanic normally.
In case someone has failed this mechanic and your party is left wondering what has happened, then keep the following in mind to troubleshoot this mechanic more easily: Your debuff color will change if you are hit by the opposite element, otherwise it remains the same. Corrolate that with whether the player has Allagan Field or Beyond Death, and you should be able to find out who has made the mistake.
Under no circumstances should anyone be standing directly in the middle, which will make both beams hit the player. This guarantees them an instant death regardless of the debuff they have, and likely a wipe of the entire party.
First set of debuffs
Your first set of debuffs will expire shortly after you've cleansed your Allagan Field or Beyond Death. Hopefully, you've already planned ahead as to whether you're stack or spread, and whether you have motion or stillness.
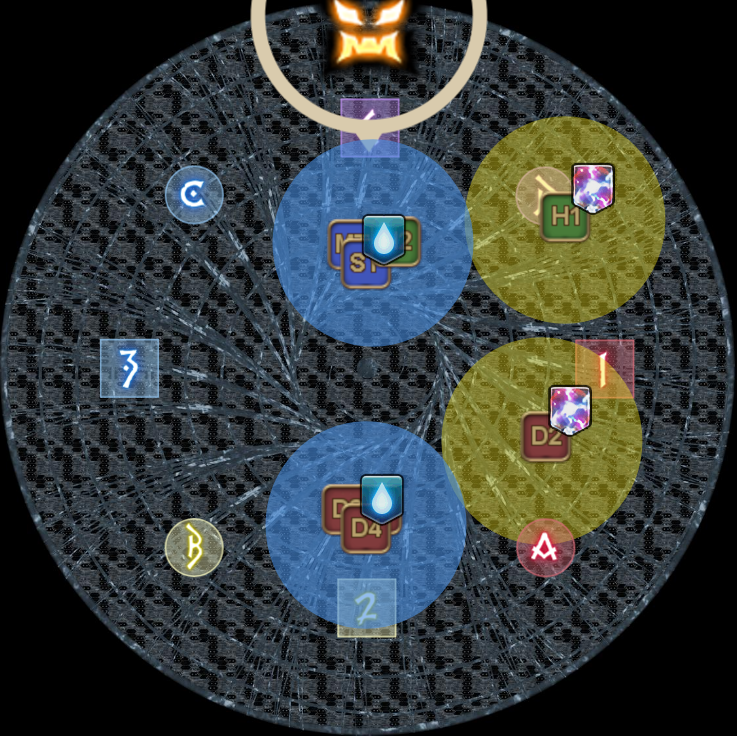
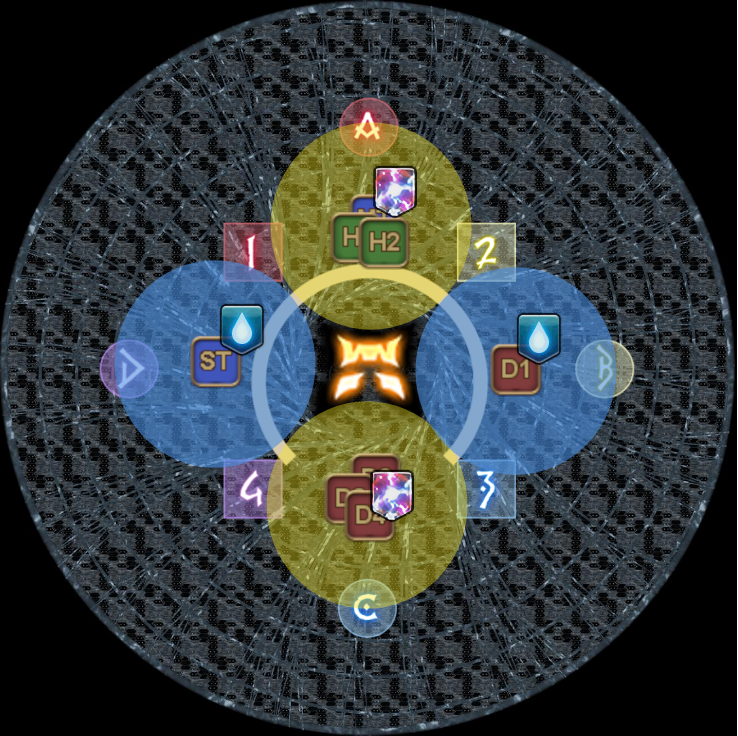
Now, where you're standing as stack or spread is heavily dependent on whether you're doing Yan or any of the pastebin strats in Elemental. Both Lisbin and Megabin enforces true north, while Yan uses Neo Exdeath's position during Flood of Naught as the relative north, with the spread players yoloing their positions on their respective halves.
This is the only difference in phase 4, the rest of this phase will be exactly the same no matter which strategy your PF decides to go with.
| Yan | Lisbin & Megabin |
|---|---|
 |  |
Once the first set of lightning and water have been resolved, Kefka will cast Thrumming Thunder III but not without first casting Mana Charge. This skill will allow Kefka to stockpile his next spell, so that he can unleash it later, effectively turning his spells into memory check. Remember whether the lightning is real or fake, it becomes relevant later!
The first set of Cursed Shriek that was applied from GC1 will expire at this point, so have both Cursed Shriek players stand inside Kefka, with the support standing at the northern side while the DPS stands at the southern side. This is done in order to avoid creating a scenario where both gazes ends up standing on the same spot. As for anyone else, they can choose to stand wherever they want, as long as they're not standing inside the boss's hitbox.
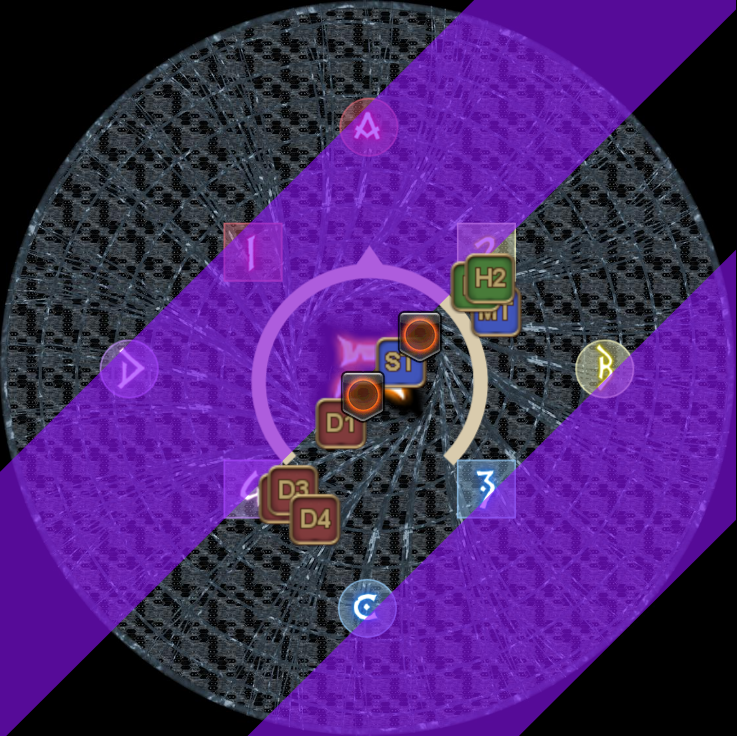 | 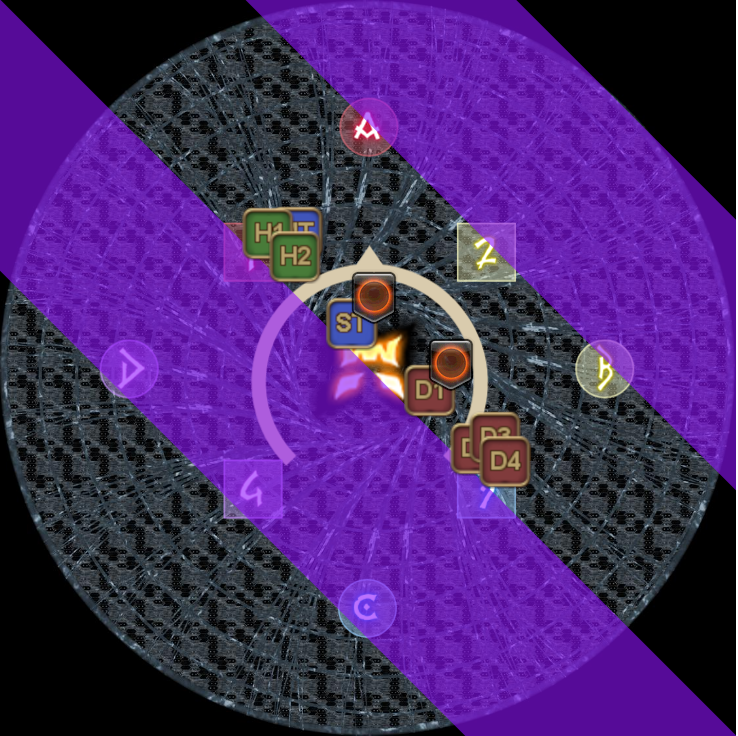 |
If the gaze is real, then turn away from the boss and look outside, untargeting the boss if necessary in order to prevent any auto attacks from happening. In case of a fake however, then you can keep attacking the boss as you will naturally look towards the middle by doing so. And finally, don't get hit by the lightning!
Second set of debuffs
Once you've successfully resolved the first set of gazes, you want to have everyone in the party to immediately run to the middle. The party's Entropy debuff is about to expire, and you absolutely do not want it to be placed anywhere except the middle, especially if its a donut.
| AoE puddle | Donut |
|---|---|
Entropy is by default a fire AoE puddle, so run out of the center immediately after dropping if the debuff was real. In case of a fake however, then the whole party should just stay in the middle and wait for the donut to arrive. No matter whether the attack is fake or real, Kefka will cast Ultimate Upsurge here, so mitigate the raidwide as necessary.
Your second set of debuffs will expire at this point, so its time to plan your next move. For this set, all strategies will use the true north stack and spread positions, similar to what was seen in Lisbin & Megabin for the first set, but with the difference now that Kefka will attack you with Blizzard III Blowout.
Just like thunder in the first set, Kefka will stockpile this blizzard attack and unleash it later, so do remember whether Blizzard III Blowout is fake or not!
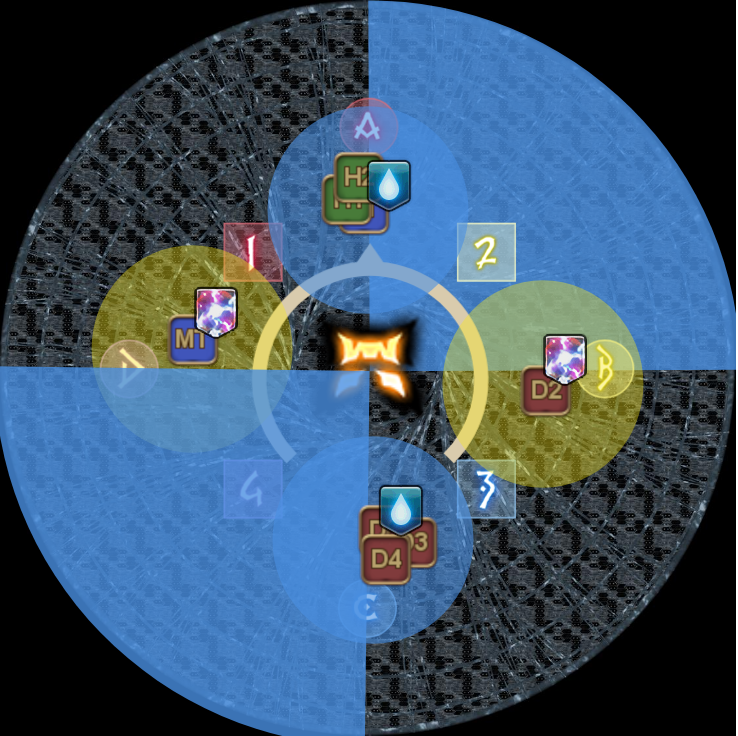
After having resolved the 2nd set of stacks and spreads, you want to have the 2nd set of gaze players move in to resolve the 2nd set of Cursed Shriek, which is also about to expire. Just like before, you want the support gaze to be up north, while the DPS gaze at the south, in order to prevent them from accidentally standing at the same spot.
Mana Release
Immediately after resolving the 2nd Cursed Shriek, have everyone stack at the center of the arena because Dynamic Fluid is about to resolve. Kefka, in the meantime, will cast Mana Release to finally unleash all the stockpiled magic that he has stored up throughout this phase.
| Donut | AoE puddle |
|---|---|
At a first glance, this attack from Kefka looks like a normal Mystery Magic, but things are not so simple. Throughout this phase, Kefka has been stockpiling a thunder and a blizzard, and you were told to remember whether it is fake or not. The properties of the stockpiled magic will be unleashed here, but the added twist here is that Kefka will apply another layer of real and fake on top of this!
| Stockpiled | Mana Release | Result |
|---|---|---|
| REAL | REAL | REAL |
| FAKE | REAL | FAKE |
| REAL | FAKE | FAKE |
| FAKE | FAKE | REAL |
If the attack was real, then it can become fake if Kefka decides to make it fake. If the attack was fake, then it might suddenly become real now if Kefka uses a fake on it, because two fakes cancels each other out, turning it back into real. Hopefully, you have been keeping track of all the things that were happening in this phase. And if not, you can try to follow your party members and hope for the best.
After resolving Mana Release, your party must have reduced Kefka's HP to 24.9% or lower in order to reach phase 5, after which Kefka will slowly cast Ultimate Upsurge to end this phase. If not, then Kefka will immediately become untargetable and wipe your party on the spot while laughing at you for not doing enough DPS.
Do not hold onto your 2 minute burst, because you will not be able to carry this over to phase 5 in order to get an extra usage. Phase 5 only allows two executions of two minute bursts no matter what, and not sending your 2 minutes here can become the reason as to why your party is failing to meet the DPS check in this phase.
Examples
Below are some more examples you can use to gain a better understanding of this phase.
| | | | | | |||
|---|---|---|---|---|---|---|---|---|
| | | | | | |||
| | | | | | |||