Black Hole
Once the tanks have resolved both Thunder III, Chaos will start this phase with Earthquake, which will reduce everyone's HP to 1.
This attack will also inflict debuffs on your party, which will become the core focus for the remainder of phase 3.
| Debuff | Description | Additional Notes |
|---|---|---|
 | Once the timer on this debuff runs out, the player will turn to stone and receive a damage down. To cleanse this debuff, the player must die, which will put the player's HP to 1 and trigger a small raidwide. The length of the timer varies from one minute to two minutes, which you can tell by the number debuff markers that the players are assigned with. | 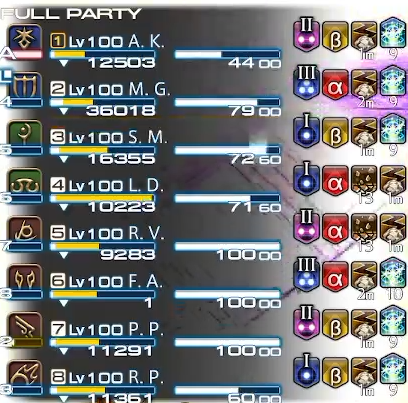 |
 | When the timer of this debuff expires, the player will turn to stone and receive a damage down. To cleanse this debuff, the player must be healed to full hp, which will also trigger a small raidwide. This raidwide is lethal if both players with accretions are cleansed at the same time, which is this mechanic's way of punishing the party for healing too much. One random healer and one random DPS will receive this debuff, and this debuff will never target the third set of Primordial Crust players. |
Accretion
Once Chaos has applied the debuffs, your healers now have 13 seconds to successfully cleanse both accretions. To succesfully coordinate this, the party must abide by some house rules to ensure that the party doesn't die prematurely from having healed too much.
- PF mainly focuses on cleansing healer first, but in theory, the healer can decide whoever he/she wants to cleanse first.
- Only the H1 is allowed to heal until the first accretion is cleansed, while the H2 should focus on mitigations and shielding instead to mitigate the raidwides.
- Do not use any personal healing like Second Wind, Bloodbath or RPR's Arcane Crest until the H1 has done his/her job.
- Earthquake does not affect shield, so it is recommended to apply all strong shields early.
- Once the first accretion is cleansed and the vulnerability has expired, the H2 should also contribute to healing the whole party to full hp.
- If possible, the DPS can also help cleanse the accretion by using their Second Wind or Bloodbath.
The approach is different for each healer as each healer's kits are different, but the general plan remains the same:
- Heal your party to a sufficient HP level so that they don't outright die instantly from literally anything.
- The first accretion should be cleansed with targeted spot healings.
- Use anything else you have to top up the party's HP to full, which should cleanse the 2nd accretion.
As WHM, you have two effective approaches: Either you use Lilybell to give yourself some extra healing when earthquake and the first cleanse occurs, or you use Plenary to make all your healings more powerful in general. Assylum is also another option to boost your healing potency if you're not scared of the regen it gives. Using Benediction will trivialize the first cleanse, but Solace/Cure II/Tetra will also do the job if you want to cleanse without Benediction.
In case of AST, your heal plan relies on the use of Essential Dignity early, then finishing it with a well timed Earthly Star and the use of Macrocosmos. First, use your Essential Dignity on one of your clenase targets, which has extra cure potency bonus if the target is at low hp. Then, you want to pop your Earthly Star, which you should've placed before Earthquake was cast, so that you can heal the party and cleanse the first accretion. The combination of earthquake and the raidwide will make your Macrocosmos stronger, which you can now utilize to fully top off your party's HP and also cleanse the 2nd accretion.
All in all, the above are ideas and there are multiple ways of approaching this, so choose what you are comfortable with and stick with it.
Slap Happy
While the healers are busy trying to cleanse the accretions, Kefka has turned himself into a giant and is now ready to slap your party.
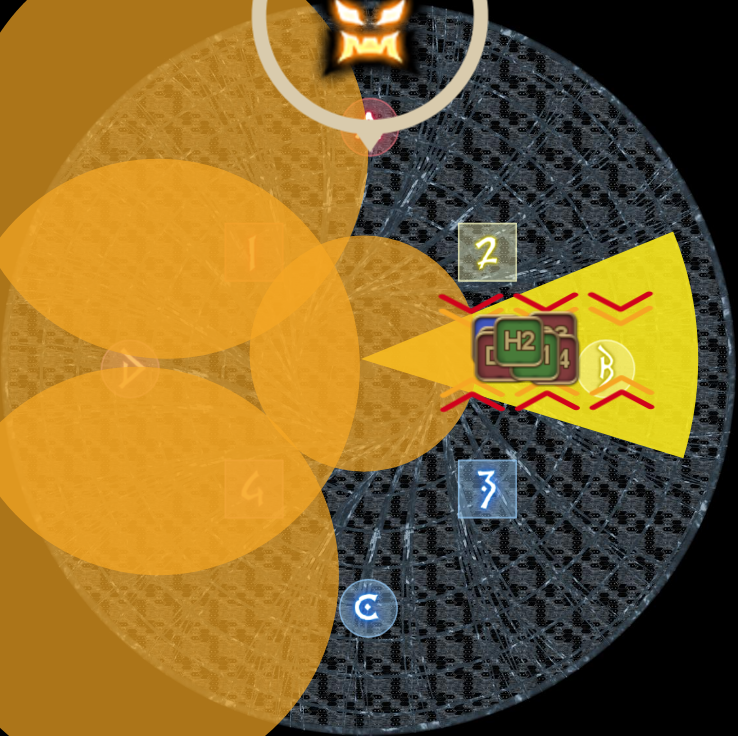
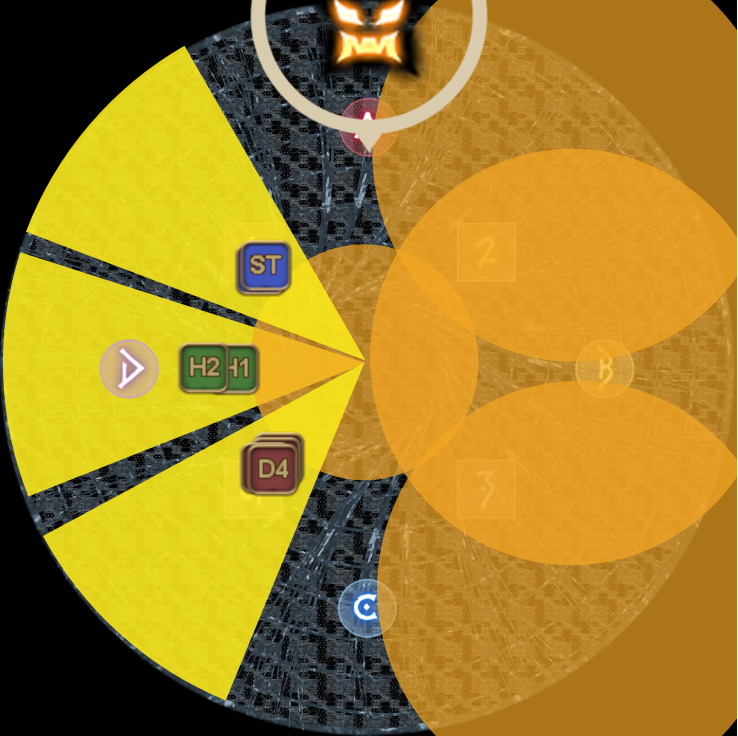
Kefka will periodically teleport to a random waymark, and raise either his left or right hand to telegraph which part of the arena he is going to slap. Whether he slaps with his left hand or his right hand is by itself also a mechanic, because that determines whether your party is doing with a full party stack or a role spread. This will be a reoccuring mechanic through this phase, so remember: Dodging left is role spread, dodging right is a stack!
| Left slap facing Kefka Stack | Right slap facing Kefka Role spread |
|---|---|
 |  |
Once you've gotten past this introductory, Exdeath will now cast Black Hole to cover the whole arena with black holes, which will be the main focus of this phase. Touching the black holes littered around the arena will inflict heavy damage and a damage down, so avoid touching them.
Black Hole
Cleansing Primordial Crust requires the player to die, but that doesn't mean that the player can just eat any fatal attack they want, like the tankbusters or the stray attacks from Kefka. The reason why immediately becomes clear when Exdeath summons Black Hole, which will also summon black holes that will shoot beams at players.
This beam deals little damage, but will instantly kill the player if they get hit by it more than twice. Exdeath will fire 24 void beams at your party in total, so that makes your goal clear: Each party member must soak the beam three times, without dying to anything else and without blasting the beam into the party, to cleanse their debuff.
Now, there are two strategies circulating for this mechanic: FFA selfmark or SDA. The table belows shows the whole timeline of this mechanic, including when it is your turn to grab the tether from the void in order to get beamed. No matter which strategy you go with, the logic behind this mechanic is the same.
- FFA Selfmark (Mana/Lisbin)
- SDA (Megabin)
The FFA approach has everyone press their macro to selfmark themselves with a marker. Players with 1 presses attack, players with 2 presses bind, while players with 3 will press ignore/stop. In case you have not set up your macros yet, you can go to the intro page of this fight to find the macros listed there.
As is stated at the intro, under no circumstances are you to manually mark yourself without the macro, which has the risk of stealing someone else's marker.
| 1st set | 2nd set | 3rd set | 4th set | |||||||
|---|---|---|---|---|---|---|---|---|---|---|
| Beam 1 |  | | |  | | |  | | | |
| Beam 2 |  | | |  | | |  | | | |
| Beam 3 |  | | |  | | | ||||
Megabin approaches this mechanic with a more traditional priority system:
- Support
- DPS
- Accretion
Some players in Elemental have a habit of using automarkers instead, but that doesn't change the fact that its marked using SDA priority.
| 1st set | 2nd set | 3rd set | 4th set | |||||||
|---|---|---|---|---|---|---|---|---|---|---|
| Beam 1 |  | | |  | | |  | | | |
| Beam 2 |  | | |  | | |  | | | |
| Beam 3 | 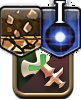 | | |  | | | ||||
The following applies no matter which strategy you're doing:
- The blackholes with tethers will always spawn on cardinals, which means at the waymarks A, B, C or D.
- Except for the first set, the priority in which the tethers are taken is always clockwise starting from Kefka.
- Except for the first set, once a player has grabbed their tether, they will stretch and rotate clockwise.
- You are expected to always stretch the tether in a way that allows other players to easily grab it from you, make sure to help each other!
1st set
The first set occurs immediately once Exdeath finishes casting Black Hole. Once the first tether appears, the first player in priority should grab the tether and rotate counterclockwise. Yes, you have heard it right, this is the only exception where you rotate counterclockwise, because the two blackhole tethers will always spawn in a fixed pattern for the first set.
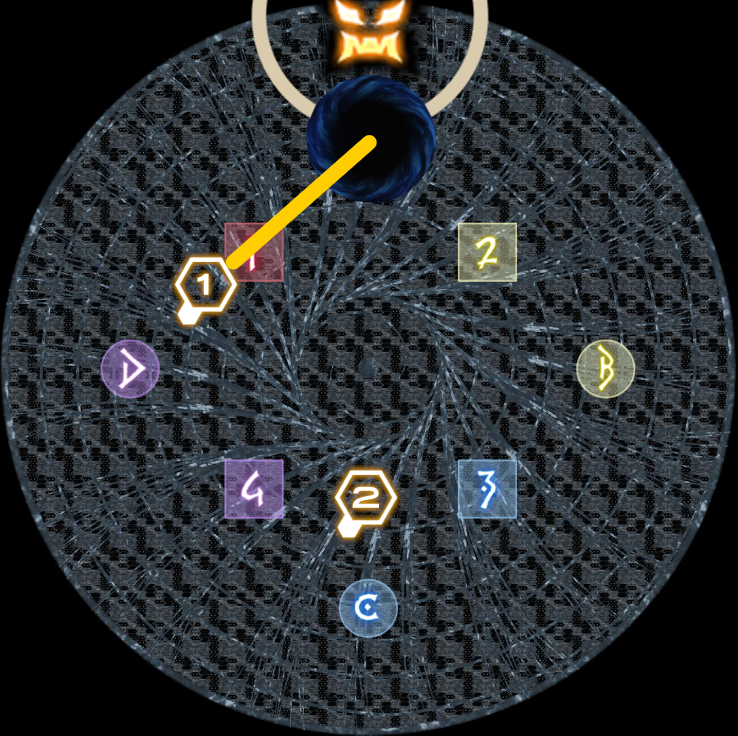 | > | 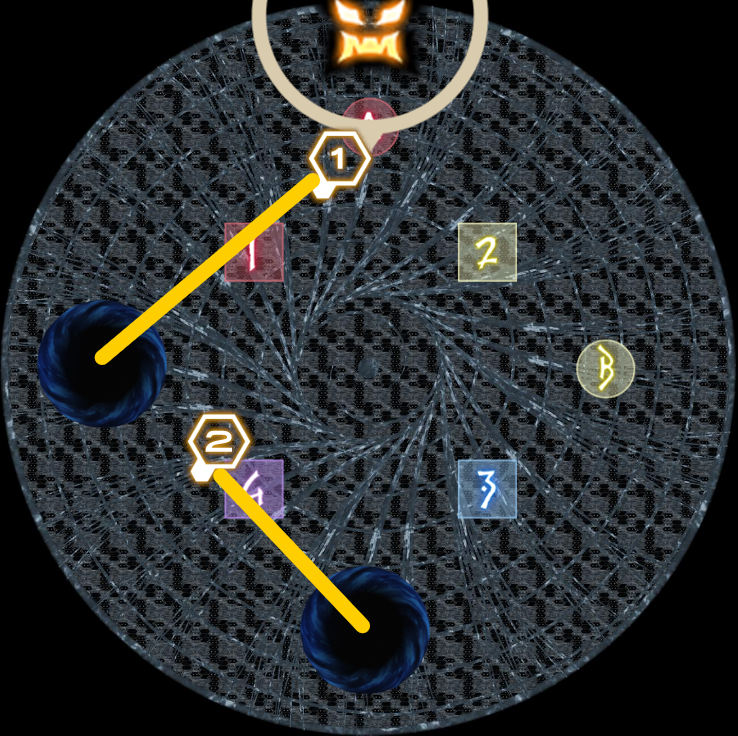 |
Attack 2 should immediately proposition themselves opposite of where the first black hole beam spawns, because once the first beam is fired, a black hole with a tether will spawn right behind you. For the second set, you are recommended to rotate your tethers clockwise, but practically, you are allowed to stretch your beam anywhere you want as long as you don't end up shooting anyone else with it.
Once the first sets of beams are over, immediately get away from Exdeath because he's charging up a Thunder III to do some more tankbustering. If the tanks agreed on ISSIS, then the Chaos tank will use their invuln to soak both hits. Otherwise, the tanks will do their tank swap magic and resolve it.
Once the tankbuster is dealt with, Chaos will face towards a random player and cast Damning Edict, which is a frontal cleave AoE attack. At the same time, Kefka will lift up his hands again, preparing for another attempt to slap your party. Always dodge the Damning Edict first by standing behind Chaos. Once the frontal cleave is dodged, you can dodge to the safe side and then resolve the stack or spread as normal.
2nd set
The black holes are back and this time, you're dealing with three of them trying to beam you. All attack markers need to grab their tethers and in order to divide it evenly so that each player gets a tether, a clockwise snake priority system will be used using Kefka as the new north.
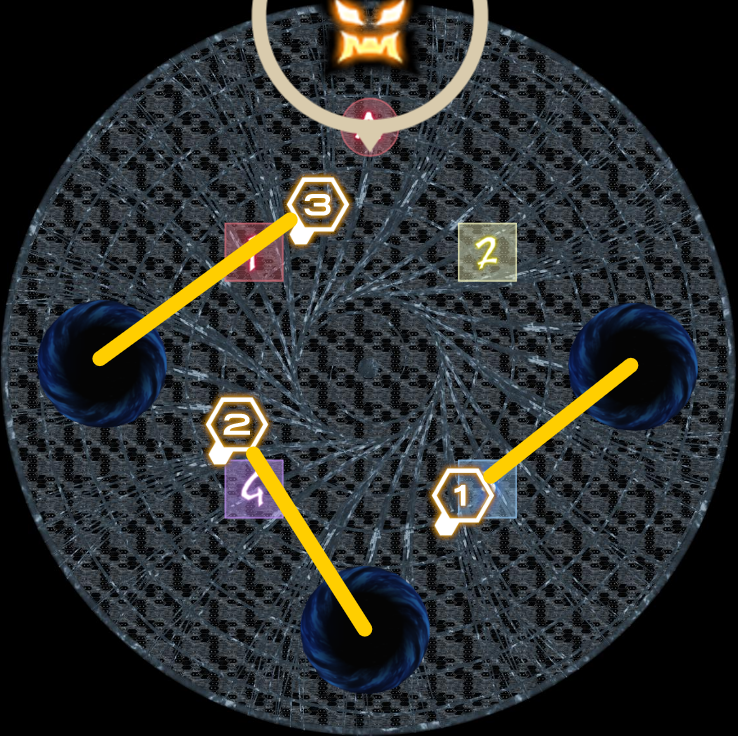 | > | 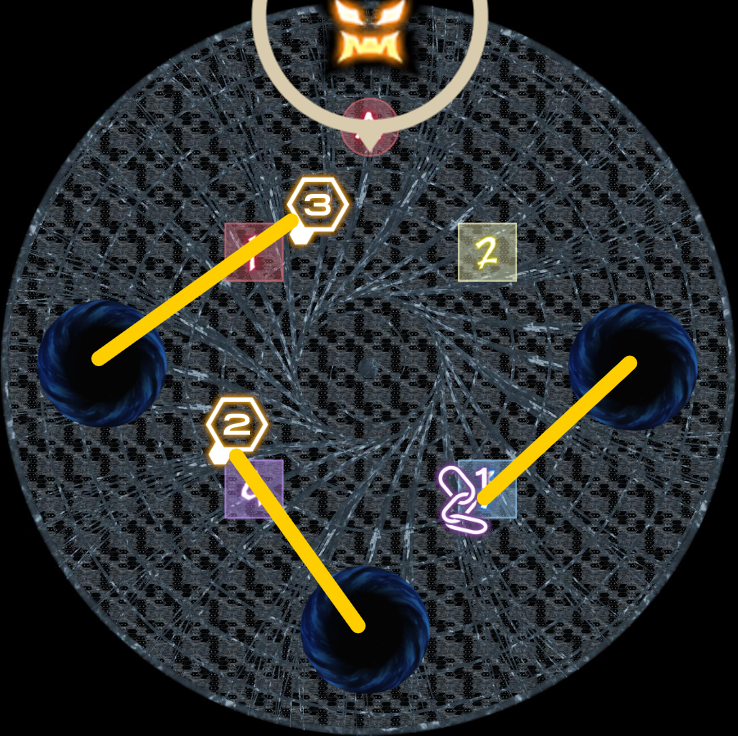 | > | 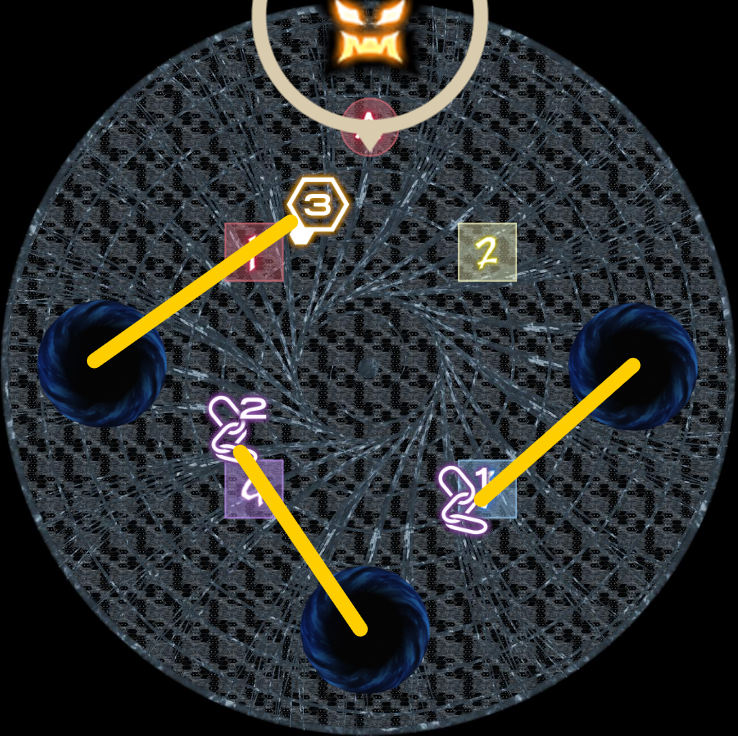 |
Once the players have grabbed their tethers, everyone should rotate clockwise and stretch their tethers as long as they can while staying relatively middle and without getting shot by other players. You will know that you're doing it right when the beams form an imaginary box around the center of the arena.
Bind 1 and 2, get ready because it is your turn to swap with the respective number once the attack players are cleansed. If you have trouble remembering whether you have to swap or not, then there are some things you can keep in mind that can help:
- A set will always start with all players with the same markers.
- Number 3 never swaps and thus, has the easiest job.
- You will always swap with the same number, e.g. as bind 2, you will always swap with attack 2.
Identify immediately where Kefka is while the beams are firing. Once the third beam has fired, which coincides with attack 3 being cleansed, Kefka will dive in the middle in an attempt to flatten your party. Once you've evaded the attack by dodging to the sides, Exdeath will cast Thunder III for the final time in order to tankbuster your party.
3rd set
For this set, its all the bind player's turn to soak the beam. Same as before: Use Kefka as the new north to assign a tether to each player using a clockwise snake prio. After that, the tethers are to be stretched clockwise so that all beamed are fired in a controlled manner. Ignore 1 and 2, get ready as it is your turn to swap once the bind players are cleansed.
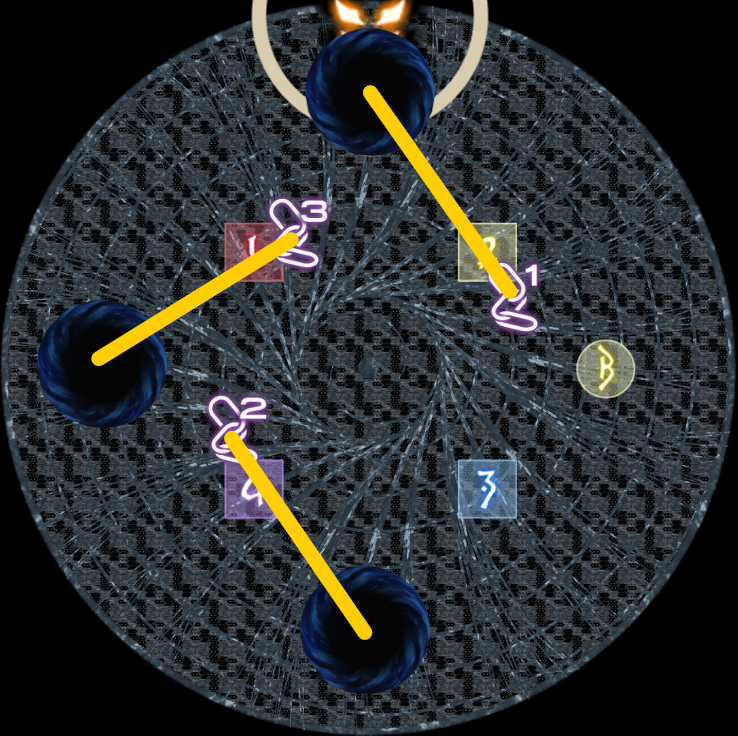 | > | 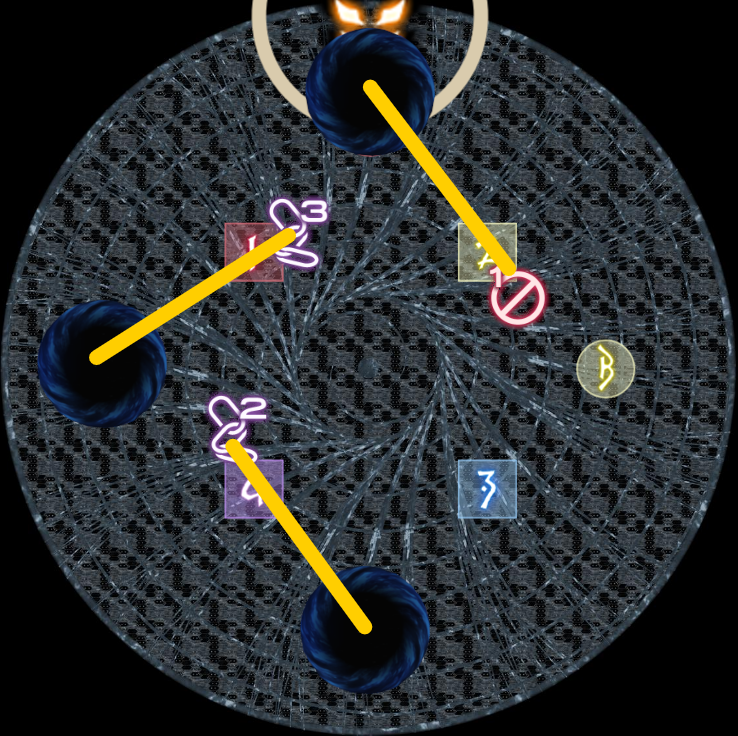 | > | 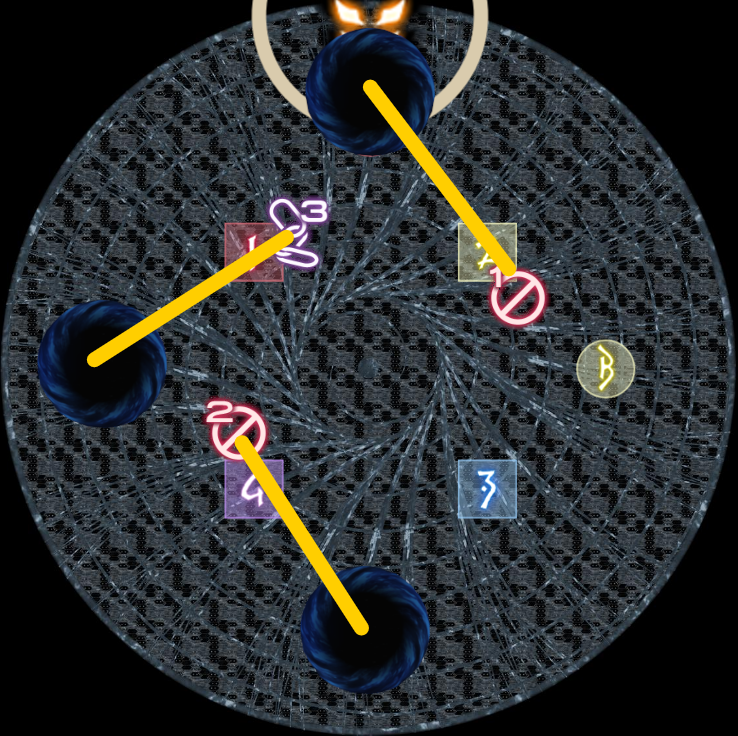 |
Once the third beam is fired, the black holes will disappear and Kefka will teleport to a new location. Now, three things will happen: First, Exdeath will cast White Hole, which is an attack that is lethal to anyone who is not full HP. Second, Chaos will cast either Longitudinal Implosion or Latitudinal Implosion to do his 90 degrees front/back or sides cleave again, which you've seen before in the last major mechanic. And third, Kefka will try to slap you again at the same time as when Chaos is doing his cleaves.
Exdeath's attack can be countered by simply healing everyone to full HP, so there's that. The more interesting one is Chaos's mechanic, because this happens in combination with Kefka's Slap Happy. As tank, you want to make the mechanic as easy as possible to resolve, so try to point Chaos in an optimal way that makes the cone cleaves visually logical.
| Example 1 | Example 2 |
|---|---|
The official PF strategy has the tank point Chaos intercardinally by using Kefka as the new north. Which intercard direction doesn't matter, as long as you point Chaos at one of the four intercardinal directions. Some unofficial strategies that circulates in Elemental PF will request the tank to point Chaos at Kefka instead. No matter the approach, you should be able to do the dodge, even if the tank makes a mistake and points it in the wrong direction.
For the players targeting Exdeath, you can look at the purple smokes instead to identify the cleaves instead without having to manually target Chaos.
4th set
The final set only has two black holes that will fire a beam, so assign ignore 1 and ignore 2 to the tethers using the usual priority system, and rotate clockwise. Unlike the other sets, Kefka will try to attack you before all beams have been fired, unlike the last few sets where the bosses have kinda ignored you while you're busy soaking the beams.
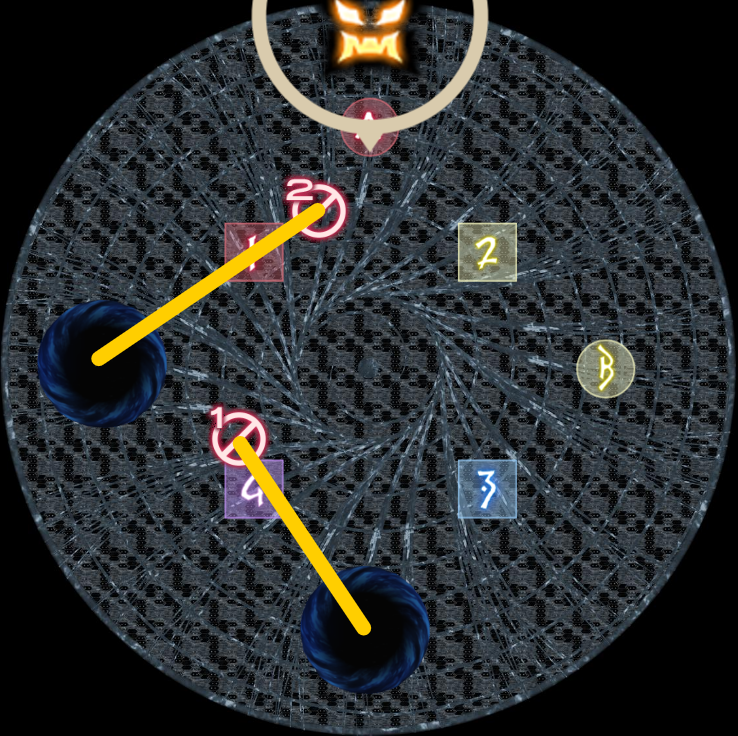 | > | 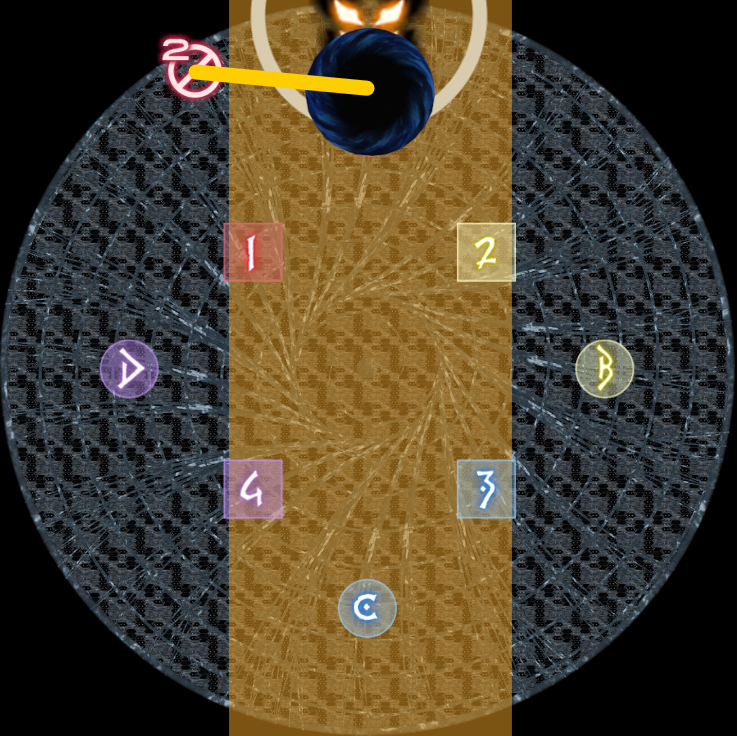 |
Identify immediately where Kefka is, because he will get ready to dive the middle again after the first beam has been fired. As ignore 2, your final black hole tether will always appear behind you assuming that everyone has rotated clockwise, so grab your tether as fast as you can and then stretch it in a way that it doesn't shoot anyone else while also allowing you to dodge Kefka's attempt to dive on you.
Using Sprint as ignore 2 is recommended here, because the tether can sometimes behave weirdly and snap onto a far player, forcing you to chase after them to take the tether off them.
Once the final beam has been resolved, have everyone gather in the middle of the arena.
Stomp-a-Mole
You might notice that he's floating above the arena instead of being around the edges. That's because Kefka is intending to stomp your party to death, with Chaos and Exdeath tag teaming you. For this mechanic, there is a slight difference in the strategies, which will be further elaborated below.
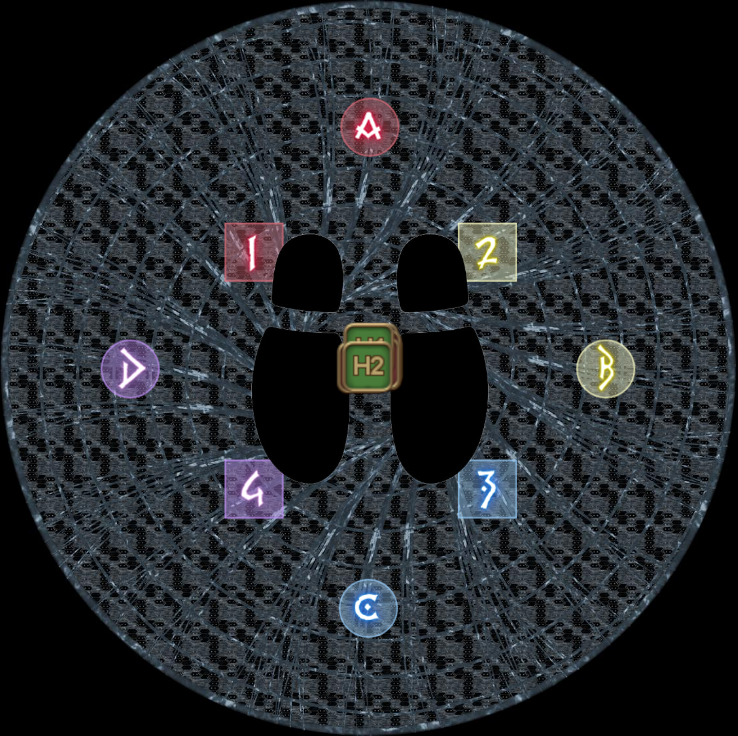
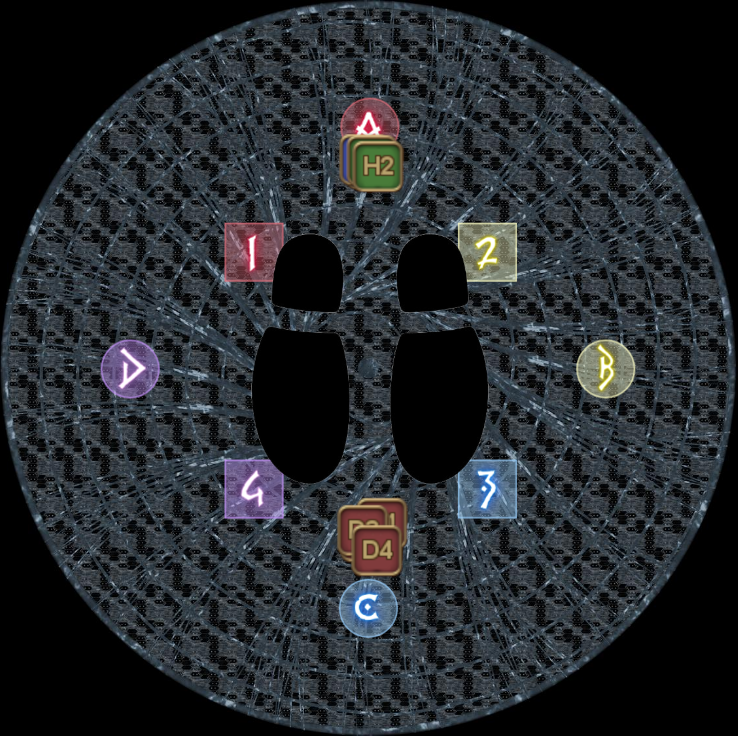
| 1 | Exdeath will make his first move by casting Blizzard III, which will drop an AoE puddle under the players. As a spoiler for what is to come, Kefka will create multiple two-man towers soon and you do not want your AoE puddles to be covering the towers. First, identify in which way Kefka's feet are pointed at, which is the new south. Alternatively, if you remember in which direction Kefka dived from, that is still the new north. Once you've determined the new north, the party should get to their starting positions. Yan and Lisbin positions the party directly under Kefka in the middle, while Megabin splits the role groups north and south. | Yan & Lisbin | Megabin |
|---|---|---|---|
 |  | ||
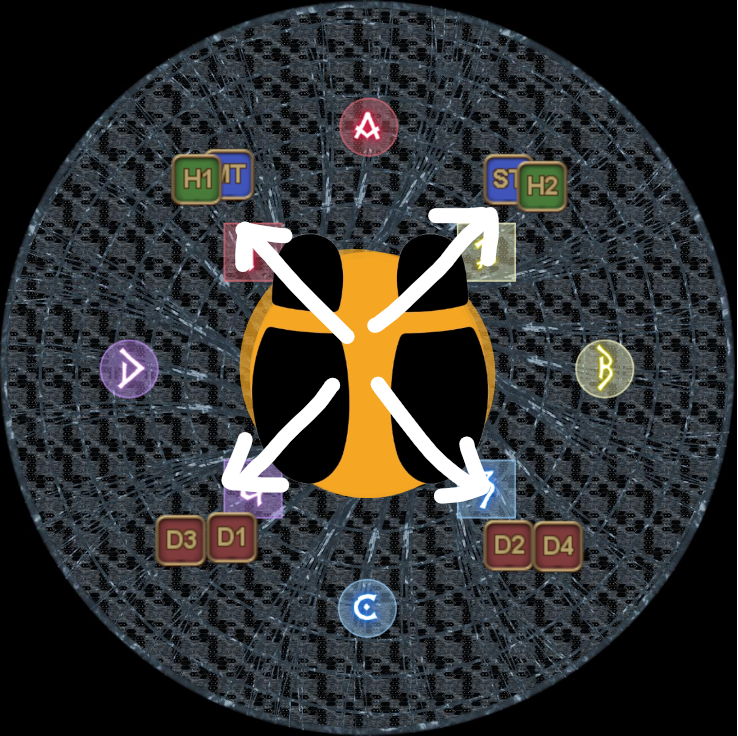
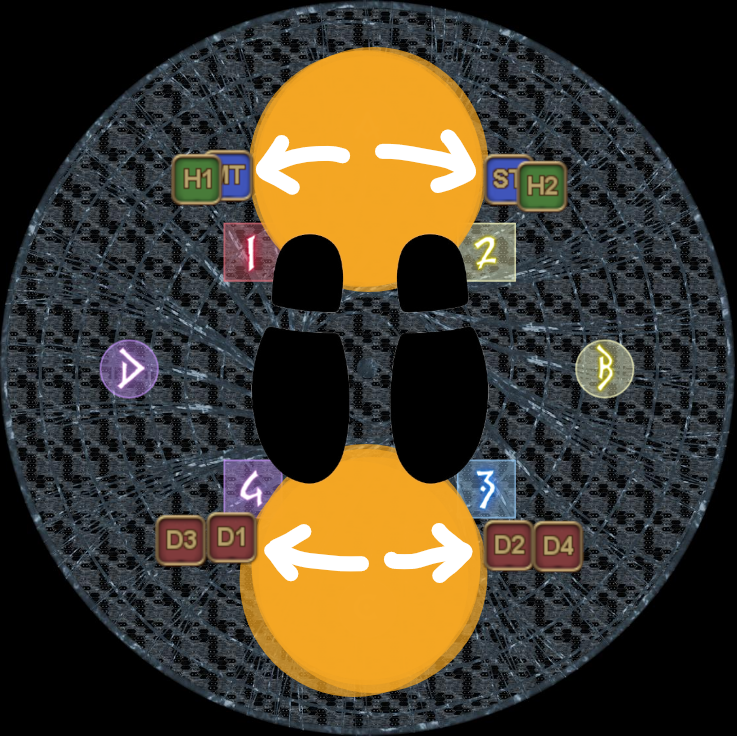
| 2 | Once Exdeath finishes casting, immediately split off as pairs to each intercardinal direction of the arena. Each melee and ranged form a pair, and you want each of them to split up like that because that allows them to get to their respective two-man tower smoothly. | Yan & Lisbin | Megabin |
 |  | ||
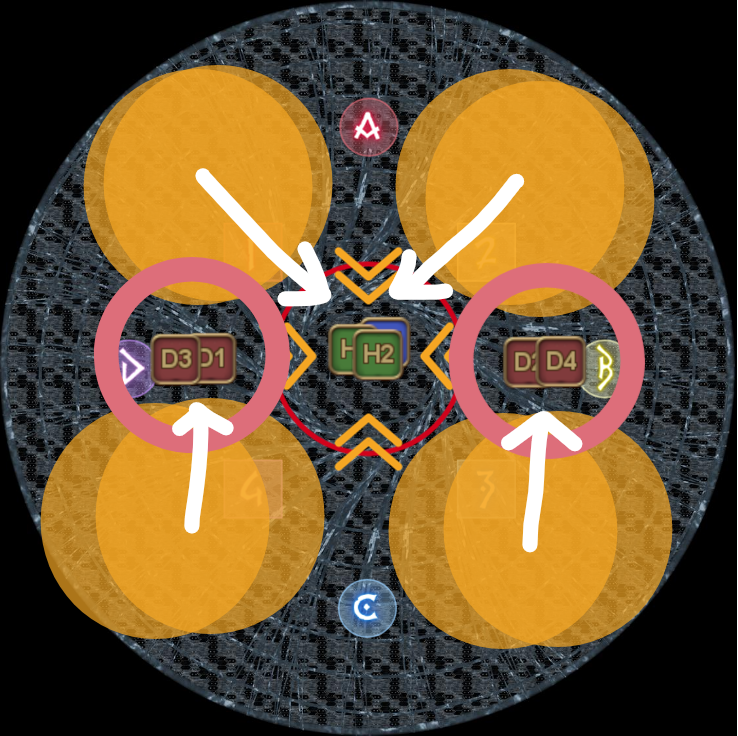
| 3 | The approach is the same for both strategies from hereon. Once everyone has run to their intercardinal spots, Kefka will cast Stomp-a-Mole to summon two sets of 2 two-man towers near his feet. Chaos, on the other hand, will use Knock Down to cast a stack marker on a random role group. The role group that received the stack marker must go to the middle to resolve the stack marker, while the other role group will go to the towers as pairs to resolve them. Immediately after soaking the first set, the other role group will now get the stack marker, so swap places with your other role group: Go to the towers if you were the first stack group and go to the middle if you were the first tower group. | Support stack first | DPS stack first |
 | 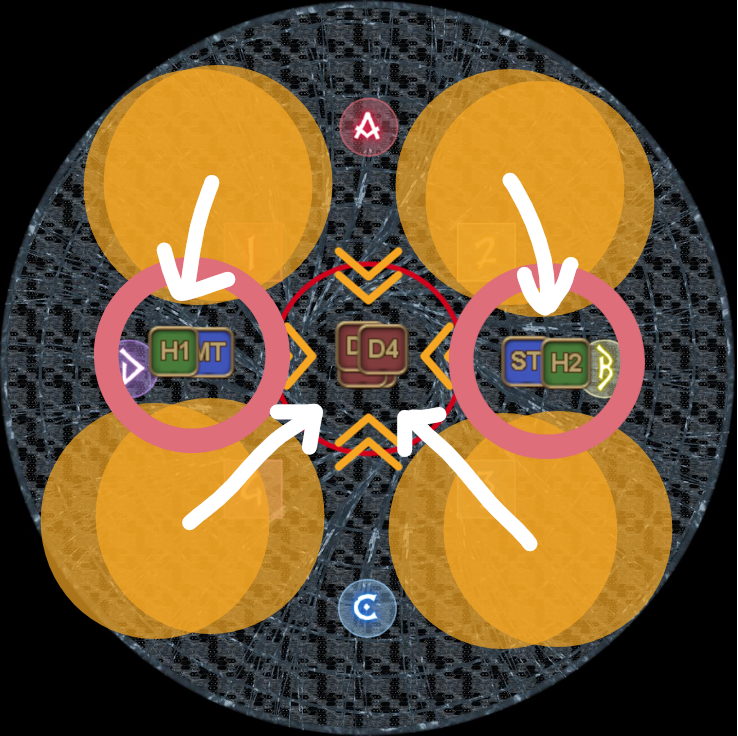 | ||
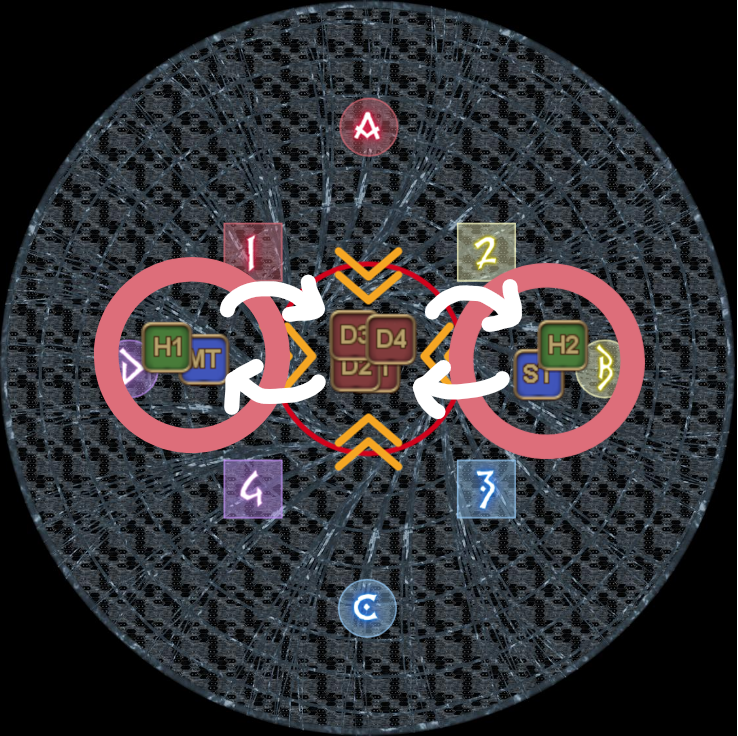 | 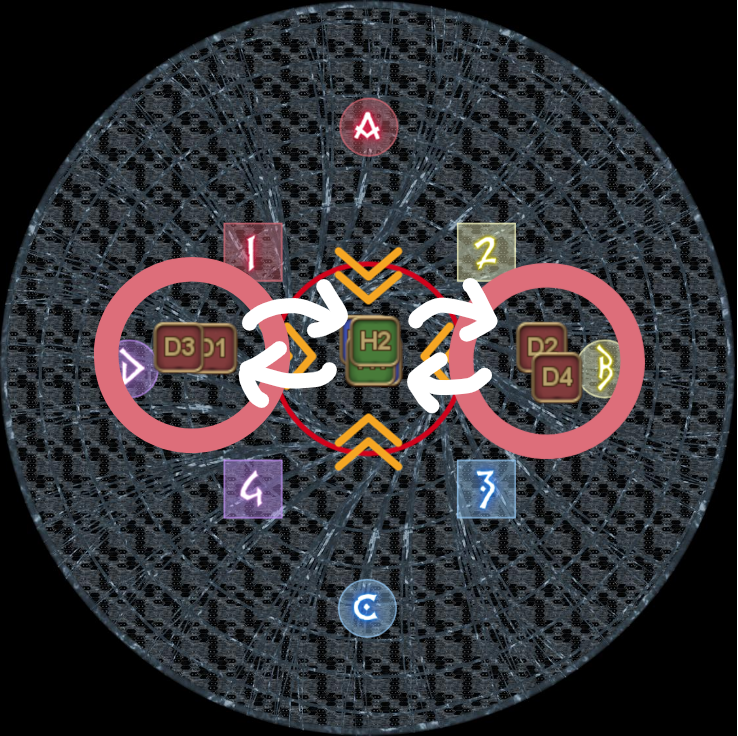 | ||
| 4 | The mechanic is not over yet! Once the 2nd stack marker has been resolved, immediately get out of the center and make sure that you keep moving! Exdeath will now cast Blizzard III while tethered to the void, while will turn anyone into a popsicle if they were caught standing still. Chaos, on the other hand, will cast Big Bang to detonate the area where the two stack markers were resolved. This should be the middle of the arena, which is why you have to immediately get out of the center once the 2nd stack marker was resolved. Once the dust has settled, you have 3 auto attacks worth of time to defeat either Exdeath or Chaos. Failing to do so will cause both of them to become untargetable, after which they will your wipe party. Defeating either of the bosses will cause the other boss to start casting his enrage, but at the very least, the boss will still be targetable while that happens. Defeat both Exdeath and Chaos to finish this phase! If possible, try sending your 2m burst while doing so and if possible, try to smuggle as many resources as you can to the start of phase 4. | ||