Forsaken
"Intriguing. This clearly isn't your first time..."
As you progress into phase 2, Kefka is starting to get suspicious as to how you did all mechanics flawlessly in phase 1. Almost as if your party has wiped hundreds of times to his attacks before... almost as if the fight simply restarts whenever everyone in the party dies...
"This is meant to be our ultimate encounter..."
As soon as Kefka becomes targetable, the MT should immediately establish the main aggro on the boss because he will cast Ultimate Embrace soon, which is a two-man tankbuster. Unless the party has a WAR and has volunteered to invuln this one, both tanks needs to kitchen sink all their mitigations to survive this attack. Ultimate Embrace is a physical attack, so feint this attack if you can and help your tanks!
"Crafty little bastards, aren't you?"
After dealing with the tankbusters, Kefka will do a few more auto attacks before he starts casting Forsaken, which will initiate a major mechanic that will span across the majority of phase 2. This cast is also a very strong raidwide that can hit up to 560k, which is more than twice the max HP of the majority of your party members, so make sure that everyone in the party contributes to mitigating this attack!
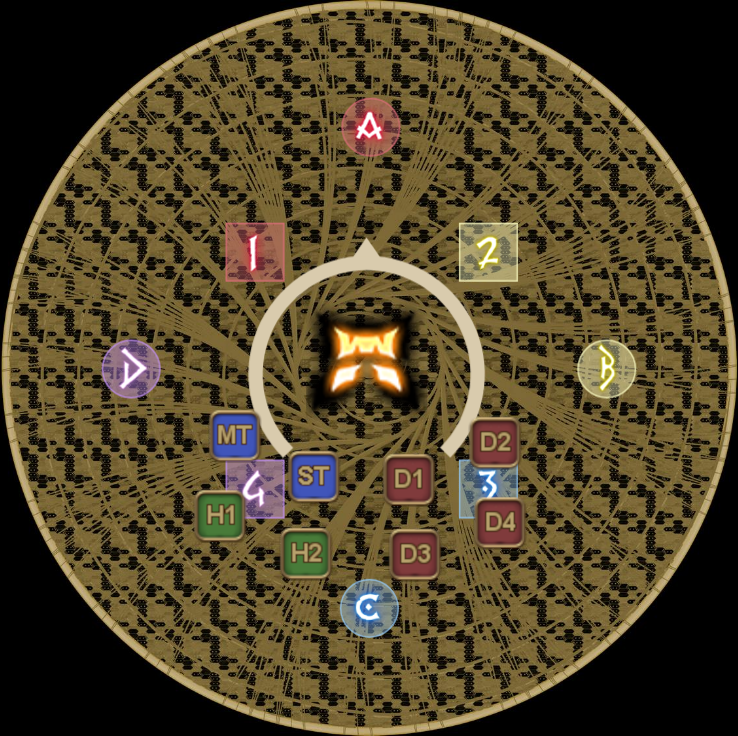
Use your mitigations and head down south of the boss in order to line up in preparation as to what is to come in the next mechanic. The purpose of this line up will be further elaborated later.
 |
Forsaken
Once Kefka finishes his cast, all players will be inflicted with a new debuff that is specific to this mechanic, as well as a spell marker above their heads.
| Debuff | Description | Additional Notes |
|---|---|---|
 | All players starts with four stacks of this debuff once Kefka casts Forsaken. Each stack of this debuff represents a spell marker that Kefka has imprinted on you. In order to cleanse this debuff, you have to soak the tower, which in turn will also trigger the spell that you're imprinted with. Your goal is to cleanse all four stacks of this debuff before this mechanic ends. Failure to do so will cause you to die instantly from the raidwide that comes at the end of this mechanic. | 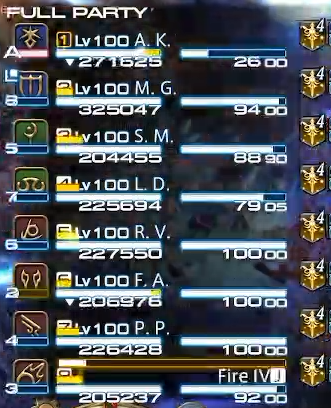 |
Now the next question is, what does each spell do?
| Icon | Description | PoV |
|---|---|---|
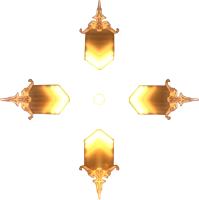 | A stack marker that must be soaked with three people. Deals lethal damage if there are not enough people in the stack. | |
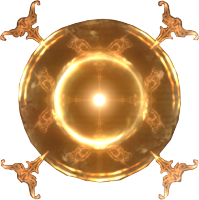 | A spread AoE marker, which forces you to isolate yourself from other players. Clipping any other players with this attack will kill them. In the English speaking communities, this is also commonly referred to as a defamation, even though the AoE size isn't that particularly large. | |
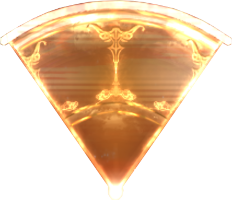 | A cone marker, which will fire a cone AoE towards the player closest to you. The player with the cone marker will not take any damage during the process and thus, will not receive any vulnerability, which is an important detail to keep in mind. |
Now with the debuff and spells explained, we now have to understand what Kefka will do throughout this mechanic.
Towers and All Things Ending
Kefka will repeatedly spawn two towers, 90 degrees away from each other, that needs to be soaked by two players each. This happens eight times, which is enough times for your party to get rid of all the debuff stacks. Soaking a tower will rotate the tower 45 degrees clockwise or counterclockwise. You will not know which direction the towers rotate at the start, but once you've soaked the first tower, the towers will always rotate in the same direction throughout this mechanic.
Upon soaking a tower, the spell that you were imprinted will be resolved. Unless your debuff stacks has reached 0, you will always be given a new spell once you resolve one. Which spell you will get is decided by the following factors:
- The towers will always randomly re-assign the players with either a cone or a circle AoE, ensuring that there's always an equal amount of cones and AoE circles.
- Upon resolving the stack markers, the stack markers will be re-assigned on the next tower set if possible.
- This means that the stack markers will reappear on every odd-numbered sets or even-numbered sets, depending on where the party resolves the stack markers first.
- If the players has no debuff stacks anymore upon soaking the tower, then the re-assignment of stack markers will be skipped to the next set instead.
Now regarding Kefka himself, during every even-numbered sets, Kefka will use an attack which will target the four closest players with an AoE attack that spawns a clone of himself, which is Future's End or Past's End.
With the exception of the first set, every odd-numbered sets will have Kefka use All Things Ending, which is a halfroom cleave at the front or behind Kefka. Whether it is front or behind Kefka is dependent on whether Kefka used Future's End (front) or Past's End (behind).
The direction of Kefka and it clones are baited through proximity, and they will lock into the direction they're facing once you see All Things Ending being cast by Kefka. Keep in mind that Future's End or Past's End is a memory check, so either remember which attack it is by paying attention, or change your log settings so that you can read Kefka's last cast in the chatbox.
| Future's End Bait away from the towers! | Past's End Bait towards the towers! |
|---|---|
So far, this is the information we've gathered:
- Each tower must be soaked by two players.
- Each cone must be baited by one player who is not in a tower.
- Each stack must be soaked by three players.
- Soaking the tower and having a cone marker will not give you a vulnerability, anything else will.
- You cannot resolve stacks on even-numbered sets, because of Future's End or Past's End.
Now, how are we going to apply this knowledge into solving the mechanic?
Kroxy-Rinon 341 strategy
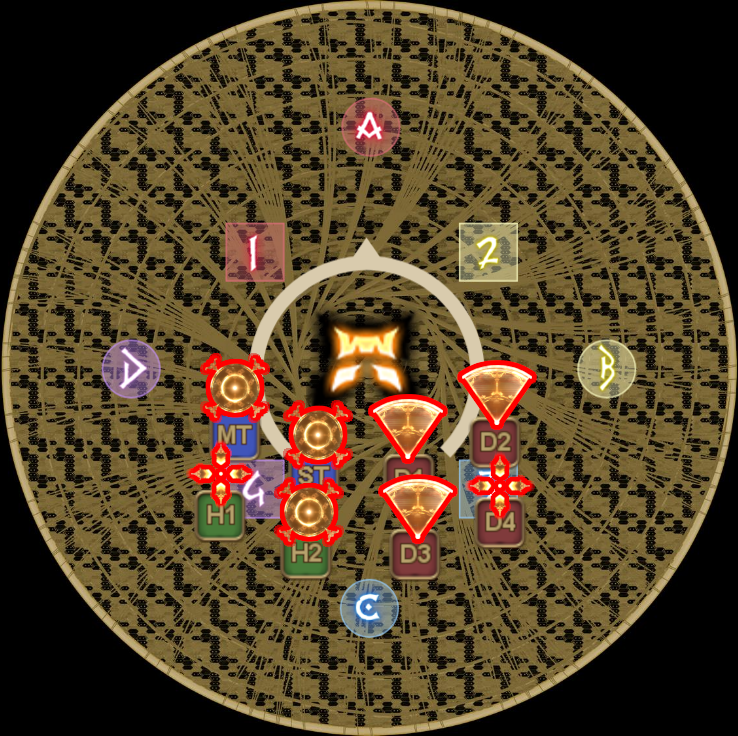
In the early weeks, Kroxy came up with an idea to split the role groups between west and east after it was discovered that each role group will always get:
- One stack marker
- All cones or all AoE circles
Rinon further perfected this system by:
- Creating a partner system, which is helpful for melee players during even-numbered sets for knowing whether they have to flex to the other tower or not.
- Making the positions static for odd-numbered sets and partially eliminating the need for a prio system.
- By resolving one cone and one AoE circle respectively during odd-numbered sets, you can fix the positions based on what spells they have, compared to when you try to solve two cones or two AoE circles at once.
| Setup | |||
|---|---|---|---|
 | |||
| Support | DPS | ||
| Tower group | Helper group | Tower group | Helper group |
  |   |   |   |
Now it suddenly makes sense as to why the party needs to line up at the south, because each pair needs to identify whether their group has the stack marker or not. To further explain how this strategy works, we will be using two terms here: tower group and the helper group. The groups with stack markers will start as the tower group, while the groups with two cones or two AoE circles will be the helper group.
And finally, there are differences between the strategies used in Mana and Elemental, which will be further elaborated below on this page. They are minor, but relevant enough that it can cause wipes if the players are unaware of the differences.
Odd-numbered sets
During odd-numbered sets, the party will resolve two stack markers, one cone and one AoE circle. The cone and AoE circle are fixed, whereas for stacks, the tower priority is support left and DPS right. If both stacks end up in the same role group, then the melee player has to adjust to the other tower.
| Mana (Yan) | Elemental (Raidplan) |
|---|---|
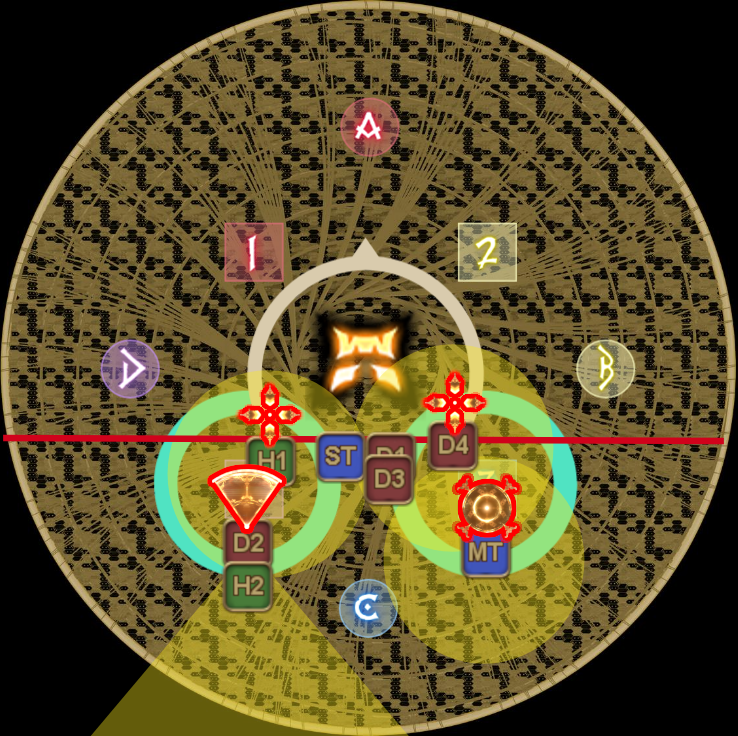 | 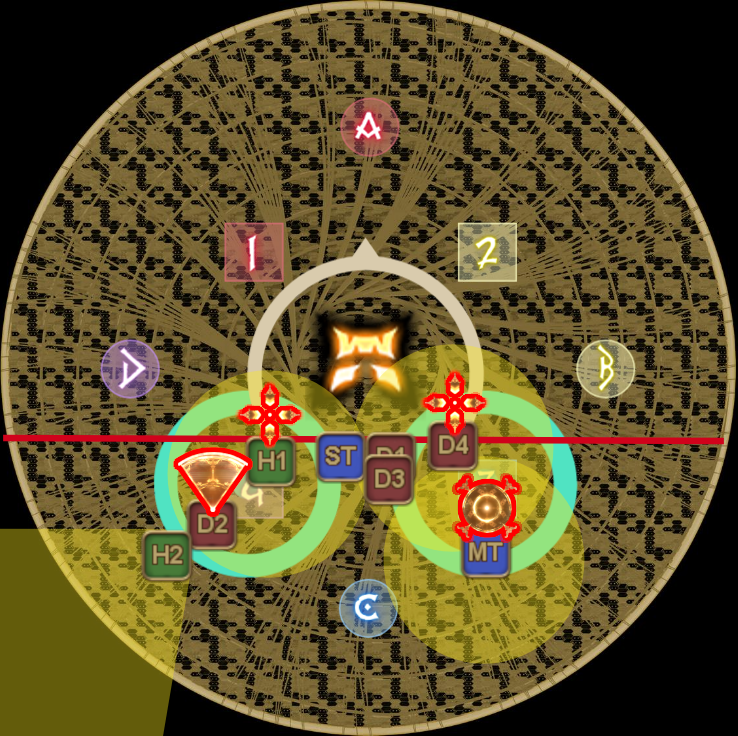 |
You might notice an imaginary red line being drawn in the diagram above. With the exception of the very first set, All Things Ending will occur during the odd-numbered sets. You are recommended to not cross that imaginary red line as that might cause you to get kicked by Kefka, inflicting a damage down in the process if you survive. For reference, standing slightly above the boss's ring is generally safe.
| Left stack | Right stack |
|---|---|
As left stack, you are to stand in between the dot of the tower and Kefka's boss circle. Your stack must reach the cone player at the south but not clip the cone baiter by accident, so your positioning must be precise.
For the right stack, you want to keep your distance by moving a bit more to the right, so that you don't accidentally clip the tank helper in the middle. Stand on the boss's ring and don't be too close to the center, and you'll be fine.
Below are some references you can use to find your stack position. In the references, an imaginary red line has been drawn from the boss's center to the center of the tower.
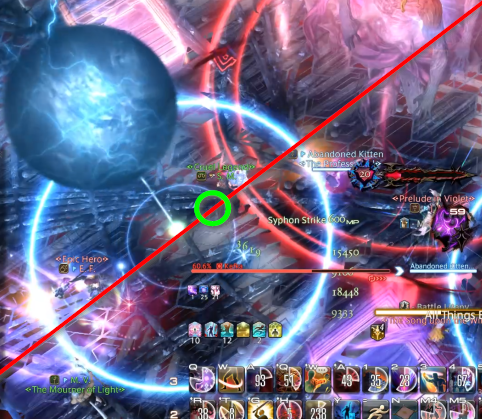 | 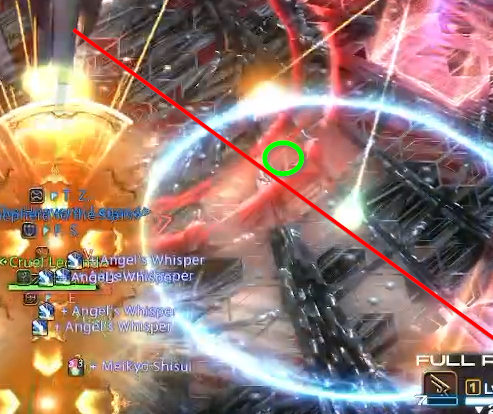 |
Now regarding the cone player, the cone player should position themself directly south or diagonal of the tower, on the outer edge. Both the cone player and the cone baiter, the cone baiter being always a healer, do not need to worry about the stack player, so focus only on making sure that the cone is baited outwards properly.
Finally, the AoE circle player has the easiest job, because your job is to literally get away from everyone else by moving as south as you can while still being inside the tower. Uptime at your own risk and if you do end up killing other players, then thats your own fault.
| Cone | AoE circle |
|---|---|
Even-numbered sets
On even-numbered sets, you will resolve two cones and two AoE circles. Kefka will perform either Future's End or Past's End in these sets, which requires four players to bait the AoE attacks. This attack will be baited by the two cone players and the two melee helpers.
As a reminder as to how the priority system works, support is always left side and DPS is always right side. If both players in the role group has the same spell, then the melee adjusts to the other side!
| Mana (Yan) | Elemental (Raidplan) |
|---|---|
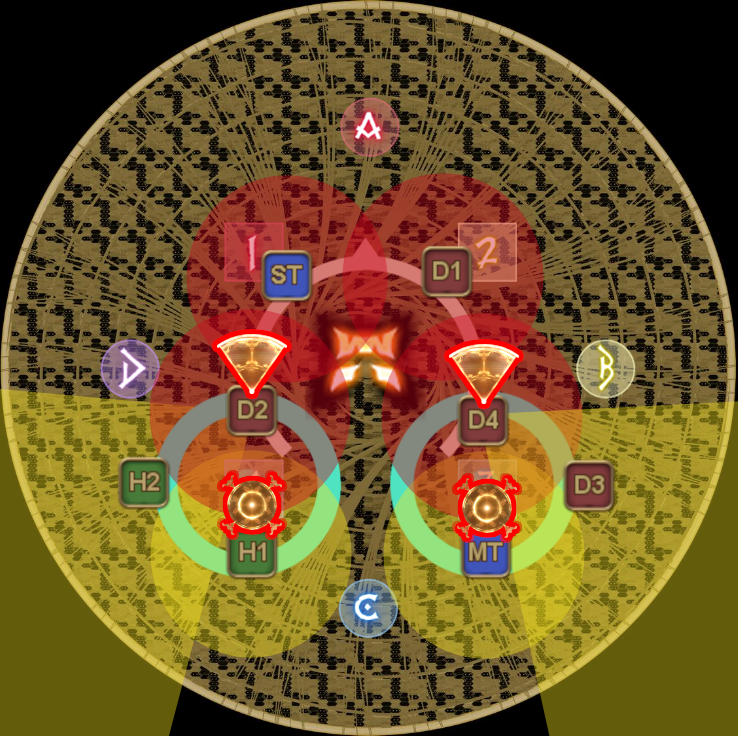 | 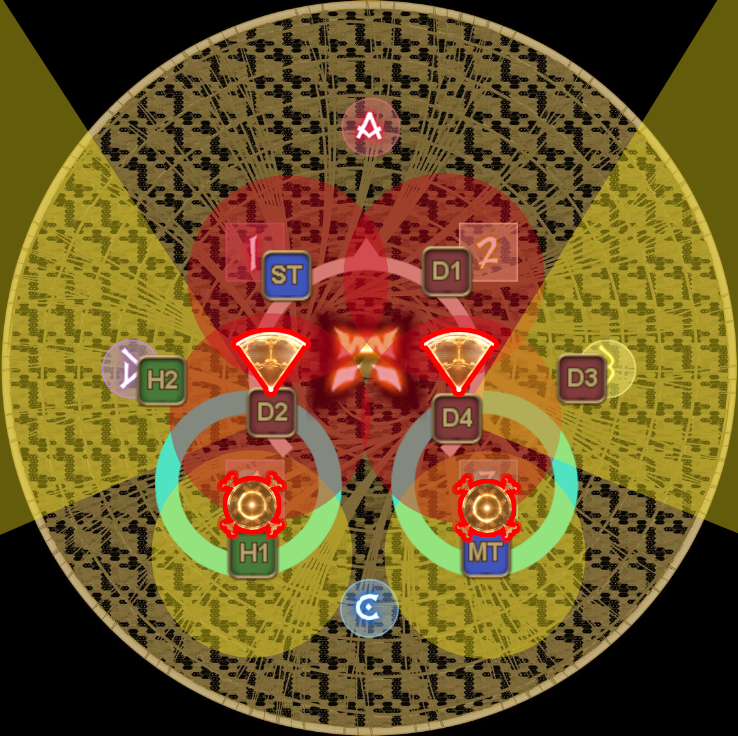 |
Now, the cones are a bit trickier during the even-numbered sets, mainly because the cone players will be attacked by an AoE, which forces the cone baiter to keep their distance. Yet at the same time, they must be close enough in order to bait the cone.
Each datacenter has found their own method that allows players to consistently resolve the cone: Elemental follows Kroxy-Rinon raidplan to the letter, while Mana uses math to solve it, which is known as Piren.
- Mana
- Elemental
Piren
The cone AoE shot from the players are not exactly 90°, but are closer to around 70° instead. Knowing this, you can bait the cone without getting hit by an AoE and without it hitting someone else by mistake, which is achieved by standing 90 degrees away from where the cone player is standing, using the circle of the tower as your reference.
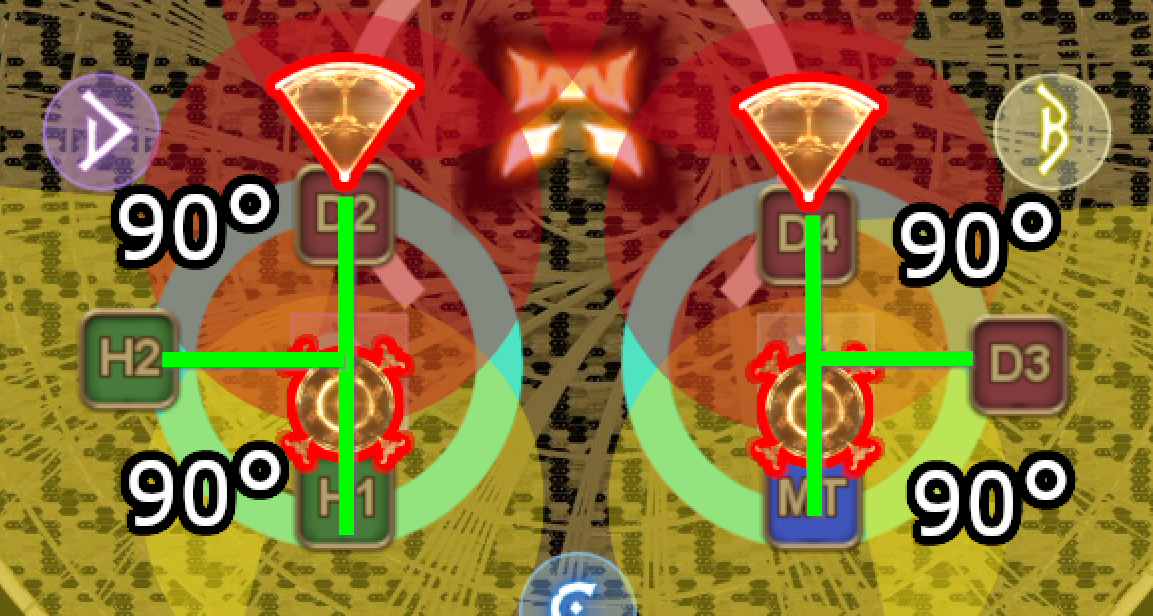 | 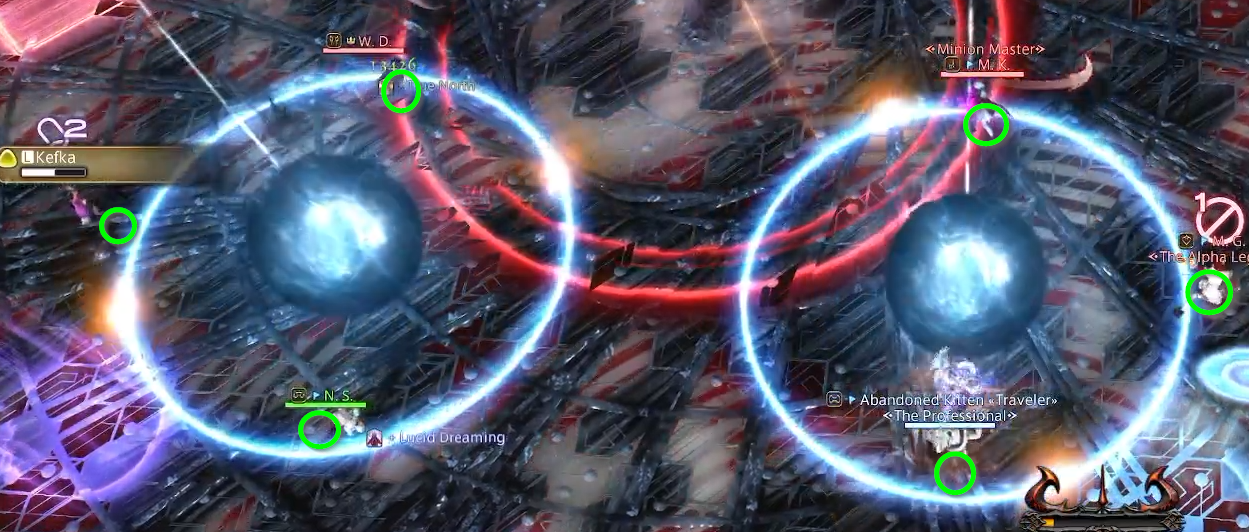 |
The positioning is rather precise, but luckily, the references you can use to get to your spots are obvious as well. For the cone players, you want to stand exactly on the spot where the outer ring if the boss's hitbox and the tower circle intersects. The AoE player should then be directly opposite of where the cone player is standing.
| Cone | Cone baiter | AoE circle |
|---|---|---|
Kroxy-Rinon
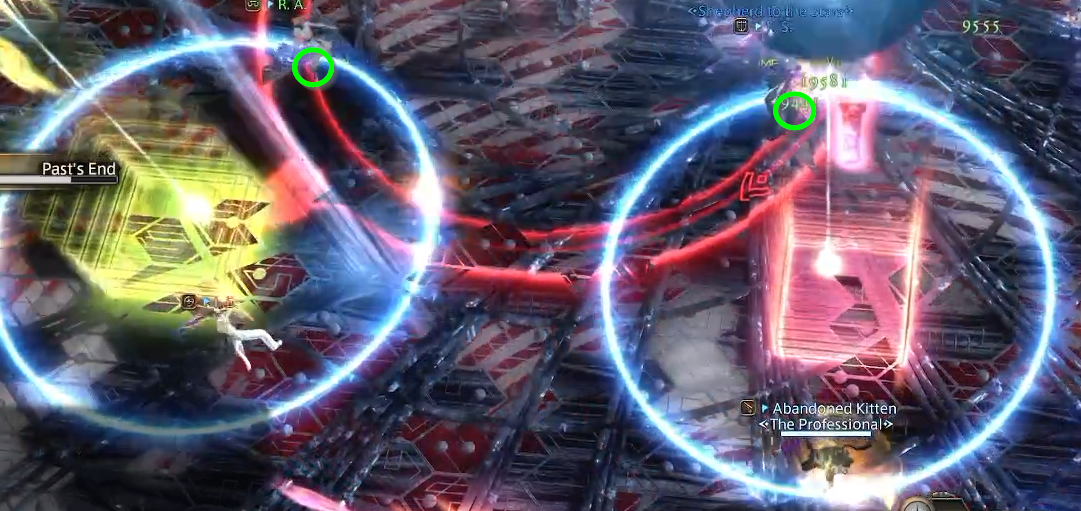
Elemental approaches the cone bait with the use of waymarks as reference points instead. The waymark used as reference could either be a circle or a square, depending on where the towers started.
| Stand at the intersection of the inner side of the boss's circle and the tower's circle | |
|---|---|
 | |
| Numbered waymark | Letter waymark |
Although this way of baiting the cone is definitely possible in Mana, keep in mind that the waymarks used in Mana are different compared to the ones used in Elemental.
Regardless of which strategy your PF picks, the Kefka bait done by the melee helpers up north is the same no matter what. Remember, support west and DPS east, using the towers as the new south.
Do you remember whether it is Future's End or Past's End? Depending on which one Kefka casts, the party should immediately get into position once this set resolves, in order to bait Kefka and all his clones in a way so that he doesn't cleave the towers.
| Future's End Bait away from the towers! | Past's End Bait towards the towers! |
|---|---|
The minimum distance that all players should be is max melee range, as being too close to Kefka may cause the clones to curve into the tower when cleaving due to where the clone are spawned.
As for the ranged players, make the extra effort to walk all the way to the back so that the melee players can identify whether you're stack or not. Visibility is poor, so as a ranged player, it is your partial responsibility to signal the melee players that they have to swap, which you can achieve by making yourself more visible.
341
After the third set, the helper and the tower group must swap roles, so that the initial helper group can do sets 4 to 7. The reason why this is a must is because when a player runs out of debuff stacks, they will no longer get any new spells after soaking the tower. This is normally a good thing, but not when doing so will cause the helper group to end up getting stack markers on the 6th set, which will wipe the party.
The initial tower group must remember the spell they have for the final set, or alternatively, mark themselves with either chain 1/2 (cone) or ignore 1/2 (AoE circle), with the latter being the Mana strategy. You are expected to follow the normal priority system in Elemental for the final set, but in Mana, the chain and ignore markers will override the priority system, so keep that in mind.
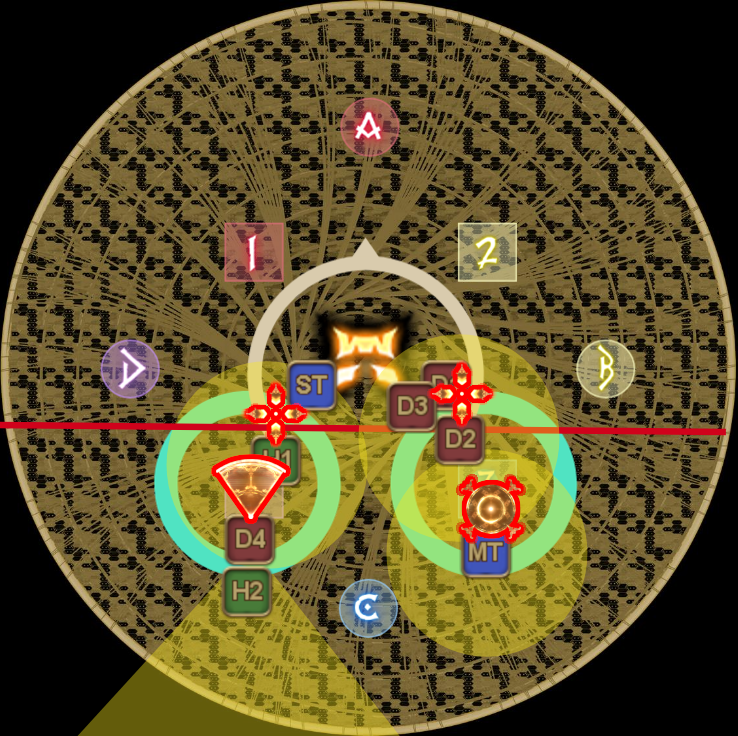
With the swap included, the resolution of this mechanic should look something like below.
| 1 | 2 | 3 | 4 Swap! |
|---|---|---|---|
 | 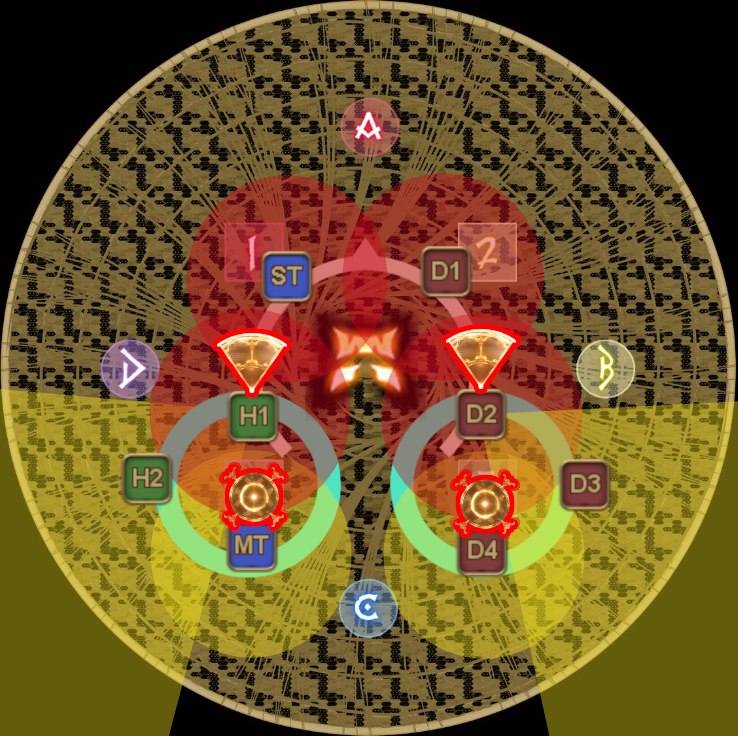 | 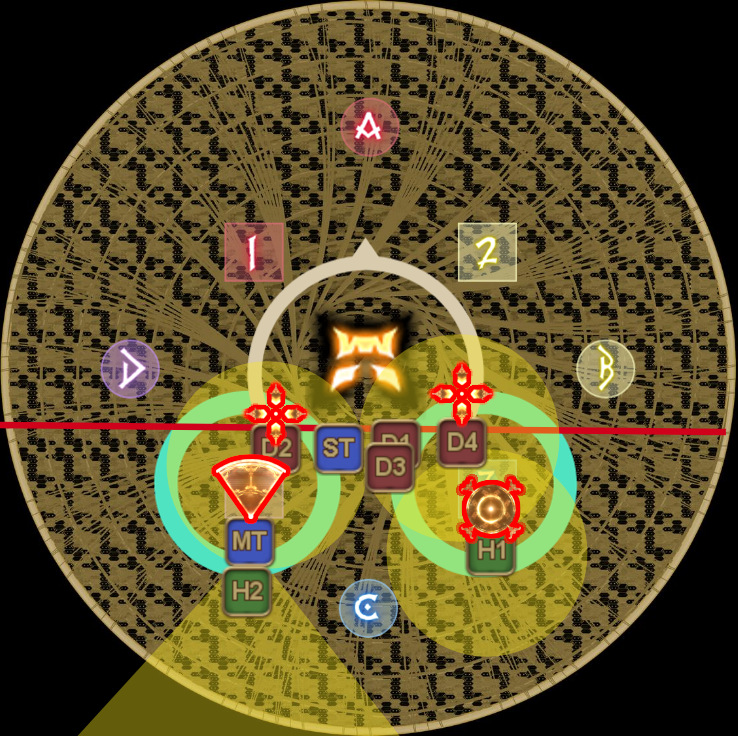 | 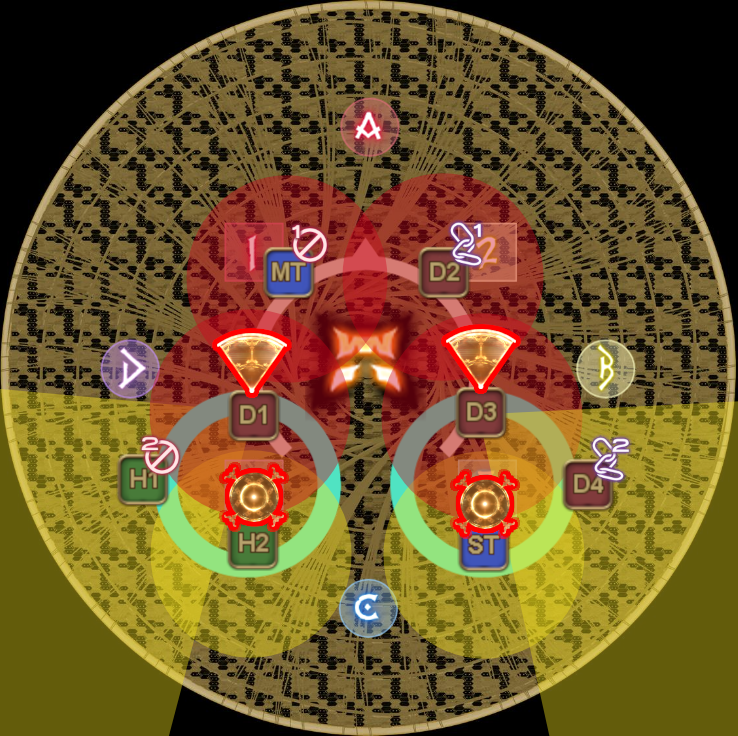 |
| 5 | 6 | 7 | 8 Swap! |
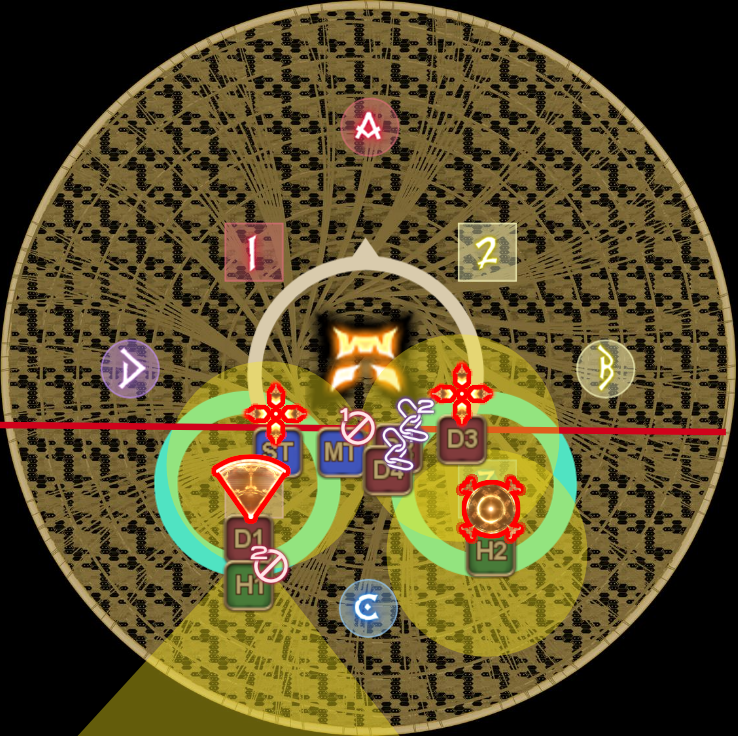 | 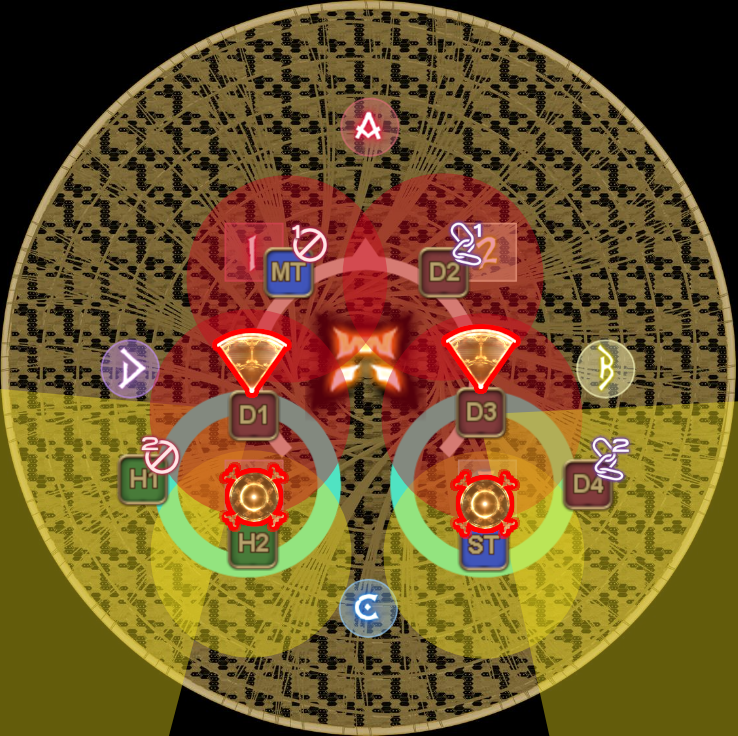 | 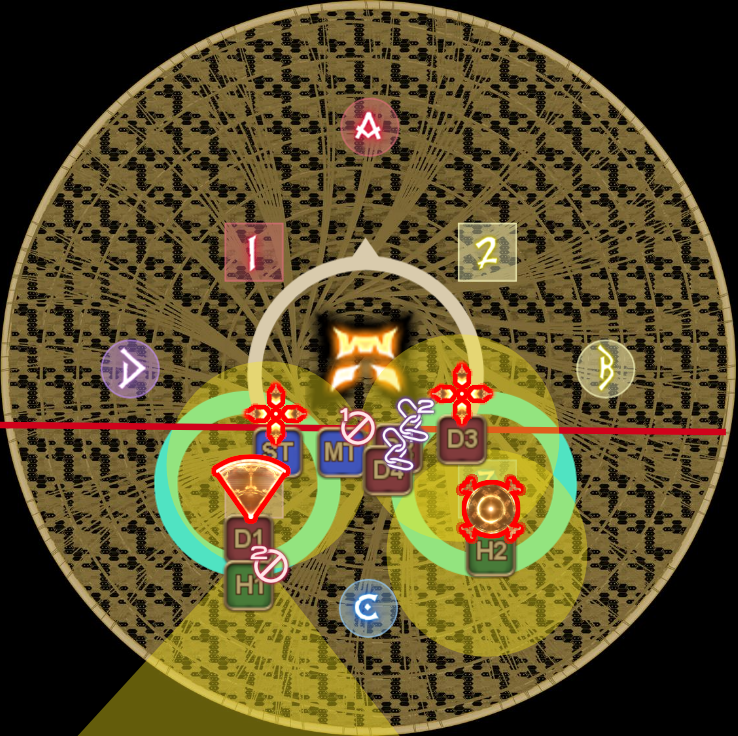 | 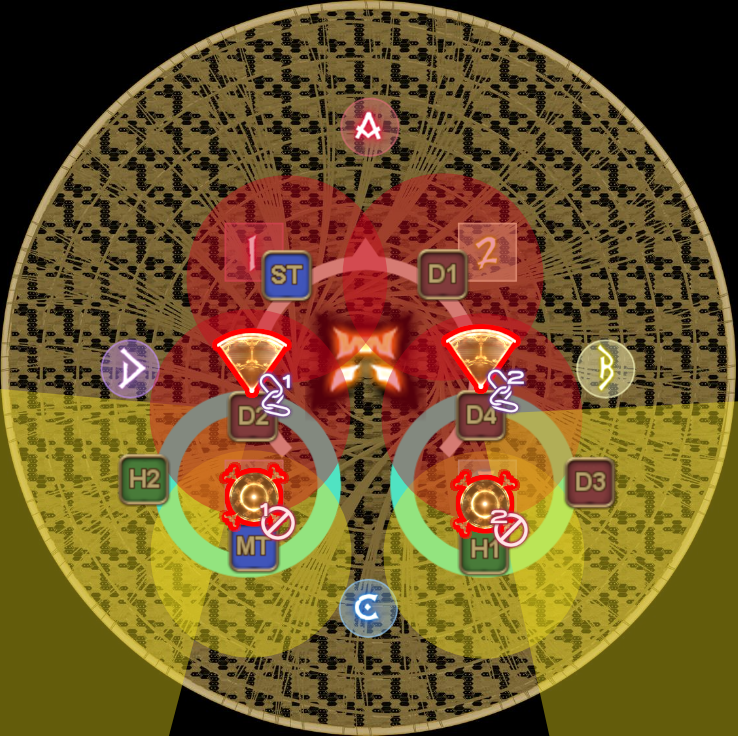 |
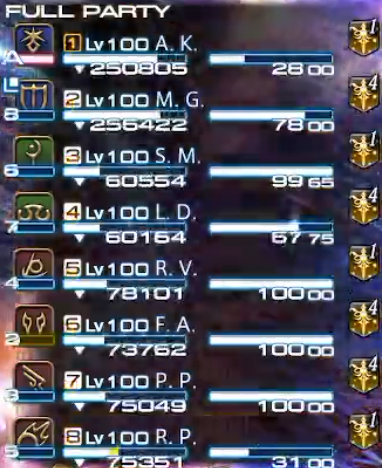
There are two moments where the tower and helper groups have to swap, which you can identify by using your party list in order to track how many debuff stacks everyone has. There are alternatives, like using the BGM to track where you are in this mechanic, so pick whatever you feel is the most consistent.
| First swap | Second swap |
|---|---|
 | 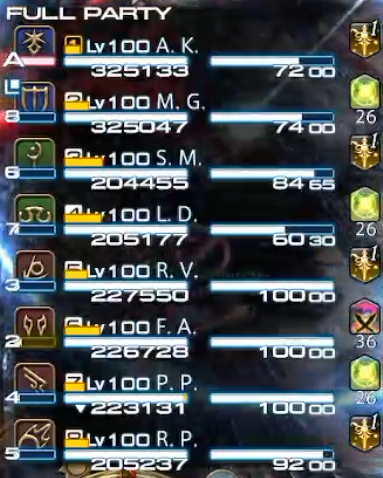 |
Here's a full PoV of Forsaken as reference.
Where does the party bait the final All Things Ending?
Mana will always bait the final attack at north, no matter what. Elemental instead opts to bait the last set inbetween where the final set of towers was resolved.
| Mana Always bait at true north | Elemental Bait inbetween where the final tower set was resolved |
|---|---|
Once you bait the final set and dodged the last cleaves accordingly, either by walking through Kefka to the opposite or standing still, Kefka will cast Light of Judgement to end this mechanic. This raidwide hits pretty hard (up to 445k), so heal up and mitigate as required!