Bowels of Agony
Kefka now realizes what is going on and is now issuing a direct challenge to you, the player, for ruining his ultimate encounter.
Once the cutscene finishes, Kefka will summon Chaos and Exdeath into the arena. Both of the bosses will cast The Decisive Battle to inflict a debuff on the four closest players to them. These debuffs will prevent you from attacking the other boss: Epic Hero (A) will only allow you to attack Chaos, while Fated Hero (B) only allows you to attack Exdeath.
Each boss requires four players, so your party needs to assign four players to each bosses each:
- D1 and D2 should always be assigned to Chaos, while D3 and D4 shoudl always be assigned to Exdeath.
- Each boss should be assigned one healer and it does not matter who goes where, as long as the healers can agree on something.
- The tank who is going to take Exdeath must be able to invuln his first tankbuster, the other tank can take Chaos.
If there are no discussions in between, then the default setup for each boss is as follows.
| Chaos | Exdeath |
|---|---|
    |     |
Take note though that this default setup is impossible in certain tank comps, so you will have to be proactive in communicating what your intentions are if that is the case.
Which tank should take which boss?
The options you have as a tank is heavily dependent on two factors:
- What tank you're playing, because you have to take into account the tank invuln cooldown.
- Whether you are MT or ST, because of how tankbusters in P1 are resolved.
Here's a chart which explains your options depending on what setup you have in your party and how you handle the tankbusters in phase 1.
| MT | ST | Revolting Ruin III | Hyperdrive | Hyperdrive | Revolting Ruin III | Chaos | Exdeath |
|---|---|---|---|---|---|---|---|
 | |||||||
 | |||||||
  | |||||||
This table takes into account of both ISISS and ISSIS. The invuln timing for PLD in ISISS is much tighter though, so for the truly safe option in ISISS, make sure that you send PLD to Chaos so that you don't have to worry about invuln timings.
For PLD and GNB, there are ways to handle phase 1 if you want to be MT and also want to be the one to take Exdeath no matter what. Keep in mind that it does break the conventional way of how phase 1 is normally handled, so go with the assumption that most players will not agree with your plan.
A word of note before we continue exploring this phase: The auto attacks from both Chaos and Exdeath hits like a truck (70k-80k damage per strike), and they will keep attacking both tanks nonstop throughout phase 3. As healers, it is your responsibility to keep both of them alive. The tanks need their mitigations for the tankbusters, so there are times that they are unable to spare mitigations for the auto attacks.
Bowels of Agony
Once your party has sorted out who wants to take which boss, drag both bosses to the center once the debuffs are assigned. After a few auto attacks, Chaos will cast Bowels of Agony to summon some elemental orbs onto the arena while also inflicting some debuffs on the party. This attack is also a raidwide, albeit a weak one, so it will not oneshot you even if you have no mitigations up.
Debuffs
First, let's explore what the individual debuffs do.
| Debuff | Description | Additional Notes |
|---|---|---|
 | When the timer of this debuff expires, a small fire AoE will detonate on the player affected with this debuff. One random support and one random DPS will be inflicted with this debuff at the start. |  |
 | When the timer of this debuff expires, a donut will go off around the player affected with this debuff. One random support and one random DPS will be inflicted with this debuff at the start. | |
 | The knockback power of an attack will be doubled if received from the front, which will effectively throw you off the arena and kill you. To cleanse this debuff, the source of a knockback attack must hit your character's back instead. Failing to cleanse this debuff, because you used anti-knockback, will cause you to die instantly instead. | |
 | The knockback power of an attack will be doubled if received from the back, which will effectively throw you off the arena and kill you. To cleanse this debuff, the source of a knockback attack must hit your character's front instead. Failing to cleanse this debuff, because you used anti-knockback, will cause you to die instantly instead. |
Orbs
Aside from the debuffs, you might also notice that some orbs have been spawned after Bowels of Agony.
 | This orb will shoot a donut towards the nearest players once the timer of Entropy expires. The amount of players it will shoot a donut towards at corresponds with the amount of Entropy debuffs that has expired, which should be two in normal circumstances. Getting hit by this attack will induce a knockback effect, which can be used to cleanse Tailwind and Headwind |
 | This orb will shoot an AoE towards the nearest players once the timer of Dynamic Fluid expires. The amount of players it will shoot a donut towards at corresponds with the amount of Dynamic Fluid debuffs that has expired, which should be two in normal circumstances. Any others players, aside from the one that are directly targeted by the orb, will receive a knockback effect if hit by this attack, which can be used to cleanse Tailwind and Headwind |
 | This orb will shoot a two-man stack towards the nearest player every time Tailwind or Headwind gets cleansed. Although intended to be a two-man stack, this attack can be resolved with different methods by using a lot of mitigations to negate the damage. |
The wind orb will randomly spawn in one of the intercardinal locations. The fire and water spawn locations are random as well, but they are always 90 degrees from where the wind orb is spawned. Below are some examples to illustrate the orb spawn patterns.
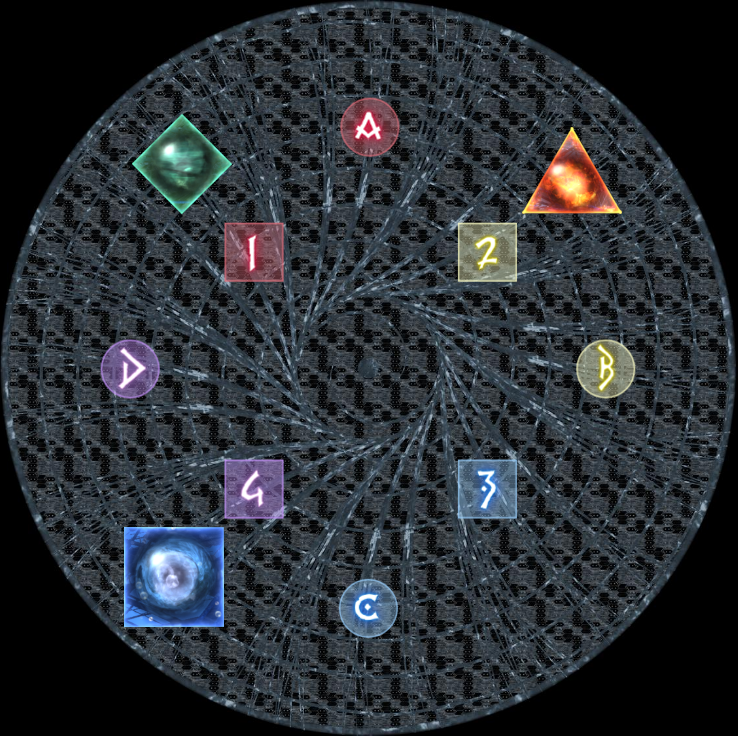 | 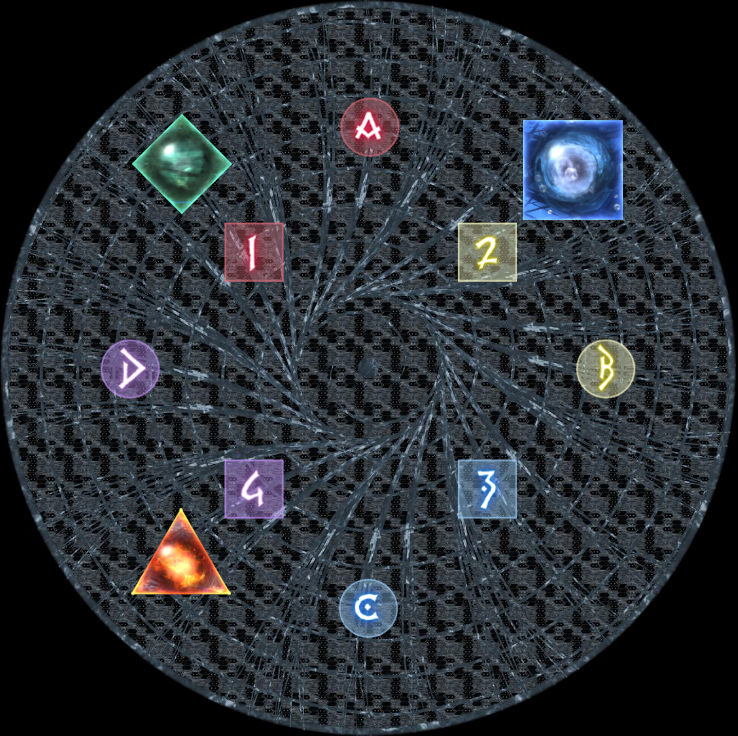 | 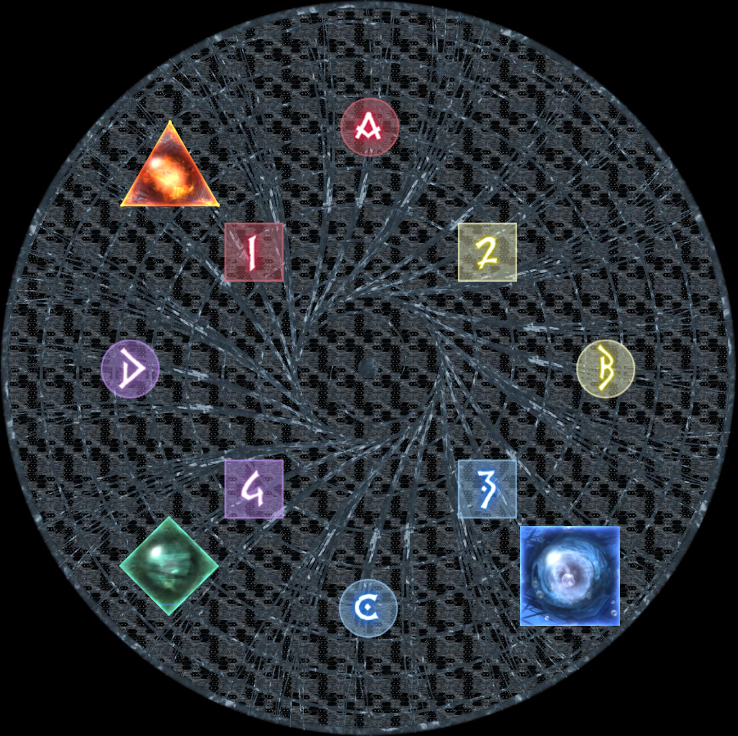 | 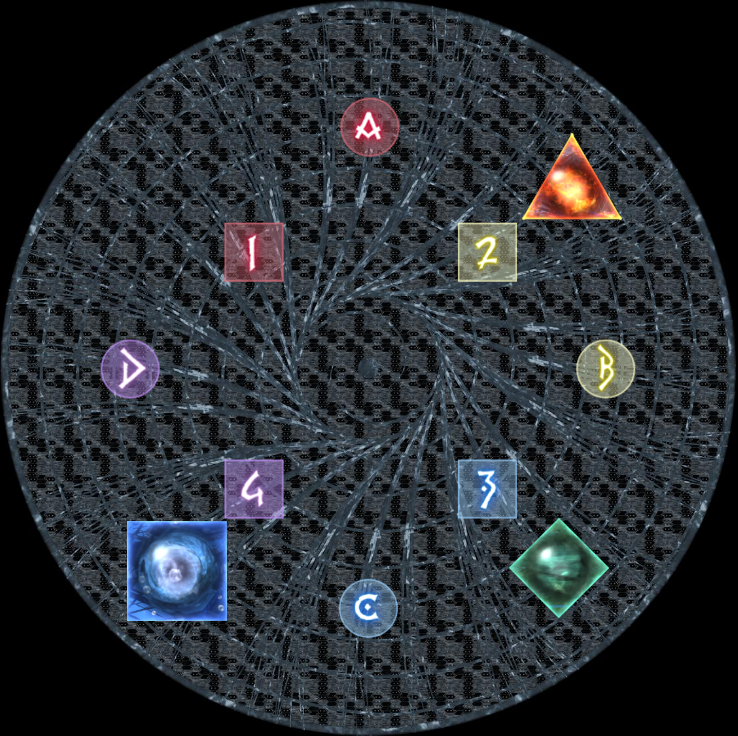 |
Now with the mechanics dissected, the goal of your party is as follows: Every member must cleanse their Tailwind or Headwind. The intended way for your party to resolve this is to cleanse two player each using the fire and water orb. At the end of the sequence, Exdeath will do a knockback attack which allows you to cleanse the remaining four players.
However, the PF scene has a very different idea in mind: What if we just make Exdeath cleanse all eight players at the same time and also somehow make it work...?
Tank LB3 Strategy
Cleansing all eight at once is normally suicide, because that would unleash eight 2-man stack attacks from the wind orb which would slaughter your party. But people found out that this attack doesn't inflict any vulnerabilities, which opens up opportunities to cheese it with mitigations. And what better to use then a tank LB3 to mitigate all the damage?
| 1 | Once Bowels of Agony is cast, the tanks will have to get to work. First, pull Chaos towards where the wind orb is. Exdeath, on the other hand, should be pulled opposite of where the wind orb is. Both bosses should be pulled to the edge as much as possible. D3 and D4 are responsible for baiting the water orbs, so they should position themselves near the water orb. The party will wipe if the water orb is not baited by D3 and D4, so avoid making the mistake of positioning yourself at the fire orb instead. As for the rest of the players, they can follow the Chaos tank to where the wind orb is. | 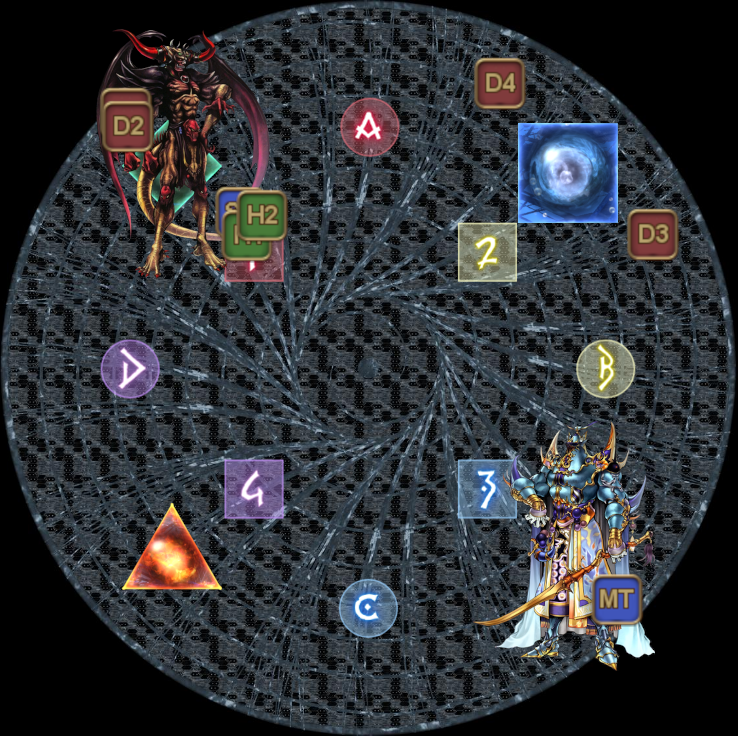 |
|---|---|---|
| 2 | Once in position, the Chaos tank can spin the boss around and stand on the ring of the boss's hitbox. D1 and D2 should stand at the edge of the arena, while H1 and H2 should stack together with the Chaos tank. As for the Exdeath tank, once you see Exdeath cast Thunder III, the tank should join and stack together with the support group at Chaos. The A/B debuffs will disappear at this point, so feel free to attack whichever boss you like. The first set of debuffs will expire at this point once Exdeath finishes his cast, so make sure that you are at your correct positions. No matter whether it is Entropy or Dynamic Fluid, you can use the same static positions to resolve both mechanics. | |
| 3 | After resolving the first set of debuffs, Exdeath will cast Thunder III. He is not tethering to the void this time, so you're now dealing with a proximity tankbuster instead that hits two times consecutively. Each tankbuster inflicts a vulnerability, so a tank cannot soak both hits in a row without an invuln. Fortunately, assuming everything was planned correctly, the invuln for the Exdeath tank should be up at this point, so send him/her to Exdeath and have that tank soak both busters. Once both busters are soaked, pull Exdeath to Chaos and make sure that he is moved into the middle of Chaos. This can be achieved by moving to the edge and not stopping your pull at where the support group are stacking. | |
| 4 | Hopefully, the Chaos tank pointed Chaos towards the center of the arena properly, because it will determine the difficulty of this next mechanic. Chaos will now randomly do either Longitudinal Implosion or Latitudinal Implosion, which is a 90 degrees cone AoE cone attack that is fired at both front/back or sides. Longitudinal Implosion will cause Chaos to shoot front/back first, before shooting the sides, while Latitudinal Implosion does the opposite. If you have trouble remembering this, then another way to identify which directions are cleaved first is by looking at the purple smoke that is emitted by Chaos when he is casting the attack. The second set of debuffs will resolve shortly after the cone cleaves, so make sure to get back to your positions once you're done dodging the cone cleaves. | |
| 5 | Once the 2nd set of debuffs has resolved, the D3 must now run off all the way to the opposite of the arena to bait Umbra Smash, which is a proximity attack that targets the farthest player from him. Once Chaos has locked in, which you know if you see the castbar starting, then your job as D3 is to run back to support stack near Chaos. Meanwhile, while Chaos is doing his Umbra Smash, Exdeath is charging up his Vacuum Wave, which is a knockback attack that originates from Exdeath. This is your only opportunity to cleanse your Tailwind/Headwind debuff, so have everyone position themselves at where the support group is stacking, and expose your front or back towards Exdeath in order to cleanse this debuff. If possible, try to change your target to Exdeath so that you won't accidentally turn the wrong way when Chaos jumps over you. To survive the attack from the wind orb that comes after, you will need tank LB3, a shield and two additional mitigations. Using your D3 mitigation here is recommended, while the healers can cover the rest. |
There are two references that tanks can use to time their tank LB3. Either they press the LB3 when the castbar hits V of Vacuum Wave on Exdeath or they press it the moment they see the 2nd Kefka dash appear on the map.
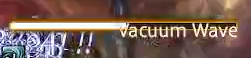
Wait, what's with Kefka dashing around?
While executing the last few mechanics, you might notice that Kefka was turning purple and dashing around the arena. This is part of a limit cut mechanic that immediately occurs right after you resolve you Tailwind/Headwind debuffs.
First, identify which direction Kefka's first dash is. Second, identify whether Kefka is diving clockwise or in a counterclockwise motion. This must be done at the same time as when you're getting ready to receive the knockback from Exdeath, or worse as D3, at the same time as when you're running back to the support group after you bait Chaos's Umbra Smash. You will not get a second chance to identify where you have to go for this limit cut, so keep your eyes peeled while making sure that you resolve your Tailwind/Headwind properly.
Once you've identified where Kefka dashed first and in which direction he is making his dashes, your party will now have to position themselves in between each telegraphed dashes. This must be done in a numbered order in the same direction as Kefka was dashing, but in a descending order starting from 8. Logically, people will think that you will start from 1 and ascend, but that's just another one of Kefka's attempt at trolling you.
| Clockwise | Counterclockwise |
|---|---|
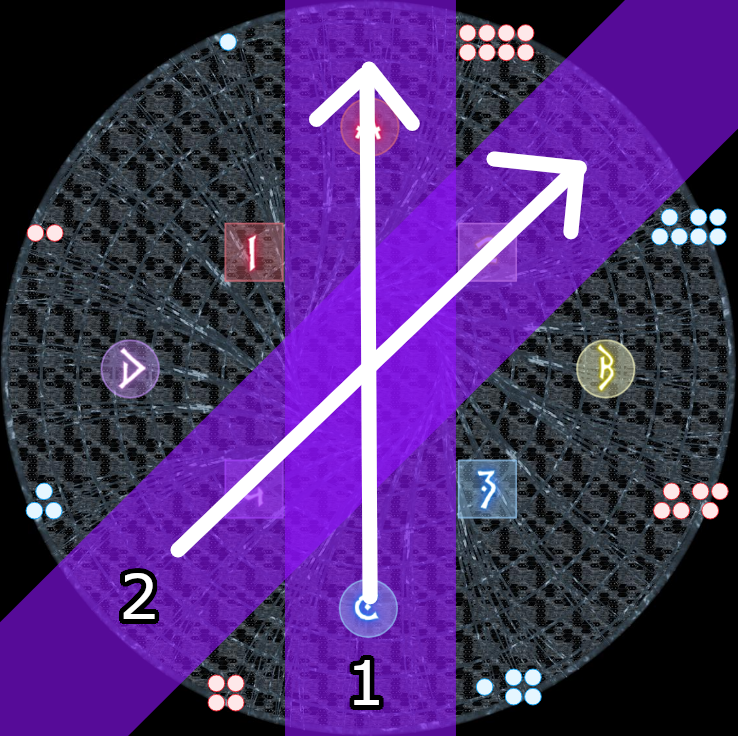 | 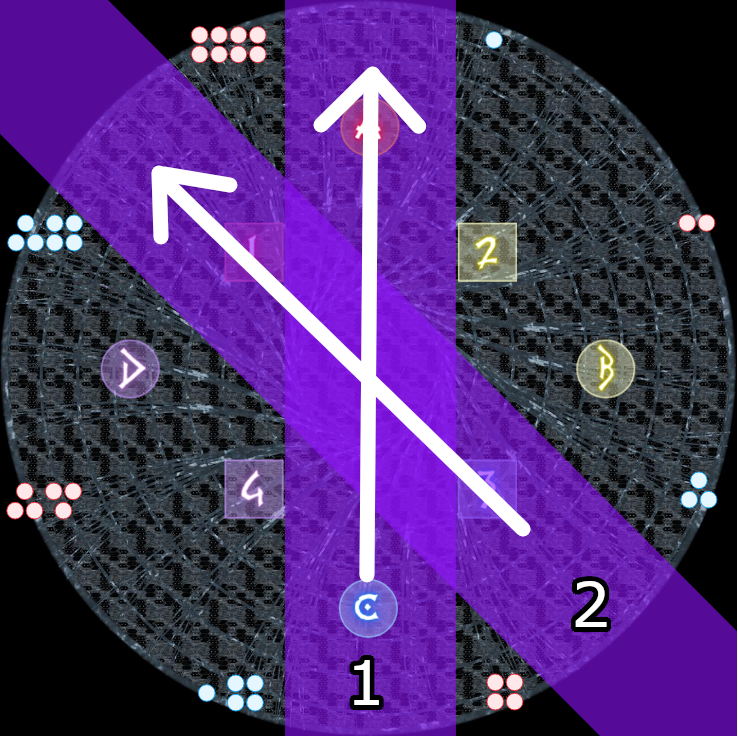 |
Once you've identified your spot, you can use the lines on the floor as reference to find out where you can stand safely. There is some error margin, but deviating from this reference point can potentially cause accidents, which is preferably avoided if possible.
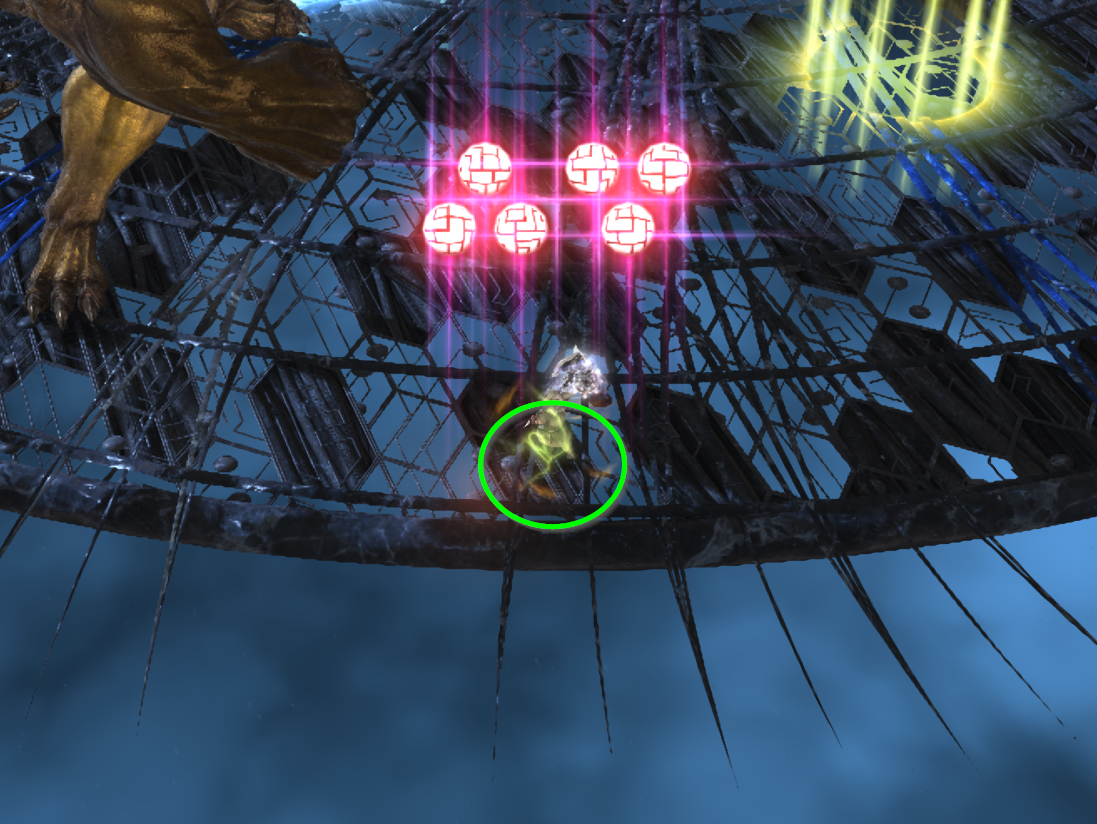
This mechanic can be quite tricky, so here are some examples that can be used as reference material.
| Example 1 3 clockwise | Example 2 1 counterclockwise |
|---|---|
Post Limit-Cut
Once the limit cut is resolved, Exdeath will prepare two Thunder III to tankbuster both tanks again, twice. As a reminder, this attack is proximity based, so everyone except the tank receiving the buster should not be anywhere near the tank or inside the boss's hitbox.
After the first set of Thunder III, both Chaos and Exdeath will reapply the debuffs again using The Decisive Battle, so make sure that all players are standing near their respective boss to get the correct debuff. Alternatively, the ranged players that need the Exdeath debuff can also choose to stand very far away instead, as long as all four Chaos players are standing near Chaos in order to receive his A debuff.
Tankbuster strategy
If your party is doing ISISS, then the Chaos tank will use their invuln to deal with the 2nd tankbuster that Exdeath is sending. However, if you're doing ISSIS, which is the default in Mana, then you will be swapping for both busters. No matter which strategy you're using, the Exdeath tank will always take the first hit, while the Chaos tank will take the 2nd hit.
ISSIS is especially dangerous for WAR and GNB, because they cannot utilize their short mitigation on both busters due to their cooldown. The tankbuster is estimated to be around 580k damage on a high roll, so its impossible for a tank to survive this attack if they are missing their short mitigation, assuming they didn't receive any extra help from healers, casters or phys ranged.
To work around this problem, the tanks need to time their rampart so that it covers both tankbusters. There is 17 seconds between the first and the second Thunder III, so you have a short window to press your rampart in a way that it covers both attacks. As such, the recommended tank mitigation plan is as follows:
- Secondary, Short and Rampart, in that order, to deal with the first tankbuster.
- After that, you use your 40% in combination with your rampart to deal with the second tankbuster.
Note that no matter whether you're going for ISISS or ISSIS, you must use Rampart + Secondary + Short for the first tankbuster after the limit cut. If not, then your mitigations will not be up for the final tankbuster during Black Hole, which can lead to a wipe.
To make the attacks safer to deal with, the Chaos tank should use their reprisal on the first Thunder III while the Exdeath uses their reprisal on the second cast of Thunder III. Targeted mitigations like feint, addle and dismantle are welcomed, because they will be useless for any other mechanic during this phase.
Finally, healers should assume at all times that the tanks will die if they don't help them. Even assuming the tanks will survive the busters, their HP might be so low that they might die from the next auto attack, so the healers should try to help them as much as they can.
Examples
Here are some PoVs as references that showcases everything from the beginning of phase 3 until the resolutions of both tankbusters.
| Example 1 | Example 2 | Example 3 |
|---|---|---|