P12S - Caloric Theory 1
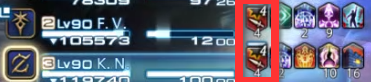
Athena will cast Crush Helm, which is a five-hitting tankbuster that targets the two players with the highest enmity. The tankbuster will first deal four small strikes which inflicts a stack of vulnerability debuff each. After the initial four strikes, the 5th strike will be the actual tankbuster that deals a high amount of damage that is fatal to anyone that isn't a tank. The vulnerability debuff stacks can be cleansed with either Esuna (healers) or The Warden's Paean (BRD). If the vulnerabilities are not cleansed in time, then the resulting tankbuster will be fatal to the tanks.
The standard method of dealing with this mechanic is to assign one healer to each tank and cleanse the debuff before the 5th strike happens, but there are some other non-standard ways of dealing with this mechanic if the party contains certain roles:
- If the party has a WAR, then the other tank can opt to just use his invuln instead.
- Keep in mind that the tank cannot use his/her invuln again for the rest of the fight.
- A PLD can soak all the debuff stacks by using Cover on his/her co-tank, which means only one person is required to cleanse the PLD.
- The PLD can go even a step further by having everyone in the party hyper mitigate the PLD, which allows the PLD to take both tankbusters alone.
- Otherwise, both tanks needs to start running in opposite directions after the third hit in order to break the Cover.
- BRD have The Warden's Paean, which is basically an instant cast Esuna.
- The BRD can effectively replace one of the healers in the cleansing duty.
- If the party has both a BRD and a PLD, then the mechanic can be resolved without involving any healers.
For reference regarding the Esuna cast timing, the healers must start casting Esuna on the 3rd stack or the cleanse will not happen on time.
Caloric Theory 1
Once the tankbuster has been resolved, Athena will now start casting Caloric Theory to signal the start of the next major mechanic. During the cast, one random support and one random DPS will have a fire beacon glowing above their heads.
The fire beacon does two things. First, it guarantees that this player will get the Atmosfaction debuff, which will be explained in the next section below. Second, one of the two fire beacons will take a two-man stack attack once Athena finishes casting Caloric Theory. Taking this attack alone is fatal and will cause Caloric Theory 1 to become unresolvable before it even begins.
Once Caloric Theory goes off, Athena will inflict a numerous of debuffs on all players:
- All players will get Close Caloric.
- Four players will receive Atmosfaction with a 23 seconds timer.
- The players with a fire beacon are guaranteed to receive Atmosfaction.
- Four players will receive Pyrefaction with 12 seconds timer.
- After the first Pyrefaction goes off, two random players will be selected again for Pyrefaction.
- A player can never get both Pyrefaction and Atmosfaction at the same time.
| Debuff | Description | Additional notes |
|---|---|---|
 | For reference as to how much 9 yalms is, check the image to the right. | 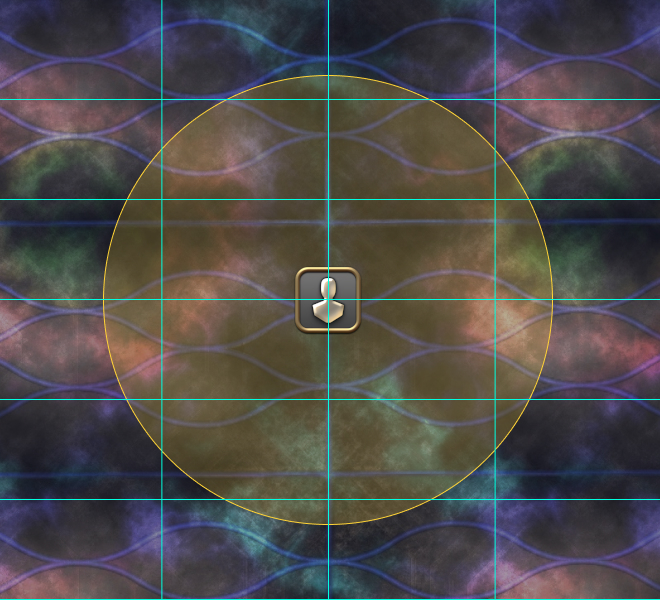 |
 | Although a non-Pyrefaction player can soak multiple Pyrefaction blasts and survive, it will still cause a wipe later on due to the player having accumulated too many Close Caloric stacks. |  |
 | The image on the right shows you roughly how big the aero AoE is. |  |
In order to resolve this mechanic correctly, each player with Pyrefaction needs to stack together with someone who does not have a Pyrefaction debuff. The players with Atmosfaction in the meantime must make sure that their aero does not hit anyone once it goes off. Resolving Pyrefaction will inevitably increase your Close Caloric stacks due to the fire damage taken, so each player will only have 9 yalms worth of movement at most to resolve Caloric Theory 1. As a general rule, avoid unnecessary movements and walk in a straight line without doing any weird movements. If you mess up by moving wrongly, then there's no turning back!
This mechanic would be fairly straightforward, if it weren't for the fact that the movements are limited due to Close Caloric. Thus, in order for the party to deal with this situation effectively, the party needs to quickly preposition themselves in a way that allows them to resolve all the incoming mechanics with the least amount of movements as possible. How the party should preposition is dependent on the strategy used to resolve Caloric Theory 1.
- Role-based Papan (Elemental)
- Mochibe (Mana)
- Light Party-based Papan (Aether)
Elemental uses the role-based papan. This version of Papan fixes all ranged players on the waymarks as part of the initial setup. Everyone else stacks in the center. The two-man stack on the fire beacon is resolved by making use of its large explosion range, which allows the party in the center to help stack it. The west waymark is reserved for the support fire beacon while the east waymark is reserved for the DPS fire beacon.
| H1, H2, D3 and D4 prepositions themselves on their respective waymarks. Everyone spreads out in order to make it easier to see the player with the fire beacon. |  |
| In this example, H1 and D2 are chosen as fire beacons. The H1 can stay, while D2 goes to east and swaps with D4. D4 is no longer on a waymark as a result. |  |
| Everyone who are not inside a waymark must stack directly in the center. The fire beacon players should not stand exactly at the center of their waymarks, but they should stand closer to the group of people at the center instead. This should ensure their survival if a two-man stack goes off on one of the fire beacons. In this example, the two-man stack explosion goes off on the DPS fire beacon. | 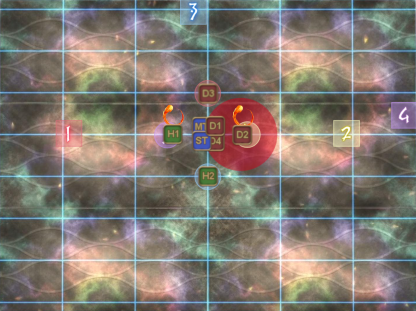 |
| Here is an example if everything went well. Make sure to heal up once the cast goes off. | |
| Pyrefaction and Atmosfaction are now assigned to the players. The goal here is to pair every Pyrefaction with an Atmosfaction. The following priority system is used for the assignment: CCW from West: H1 > MT > ST CW from North: D4 > D1 > D2 Keep in mind that ranged players starts first! The priority system here does not follow the usual JP convention. |  |
In this example, D1 and D4 has Atmosfaction, while MT and ST have the Pyrefaction debuff. Using the priority system, the assignment would be as follows:
|  |
| Wait until the first set of Pyrefaction goes off. Once the first set of Pyrefaction is resolved, heal up. The party will take a lot of damage during this mechanic. | |
| All players with Atmosfaction need to run away from the center. Players on north and south should move to the next intersection, players on west and east should touch just the edge of the outside waymarks. Amongst the four players who initially had Pyrefaction, two random players will now be inflicted with Pyrefaction again. These players must now resolve the two-man stacks on the west and east waymarks. Always prioritize clockwise rotation unless rotating clockwise matches you with the wrong partner. | 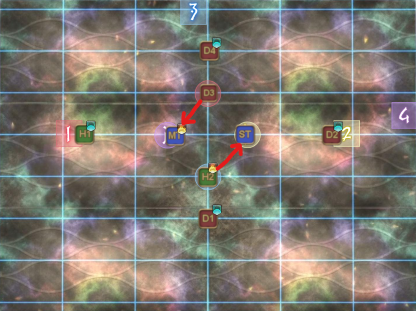 |
| Atmosfaction and the 2nd set of Pyrefaction will now resolve. |  |
| Make absolutely sure that your debuffs have expired first before you start moving. |
Mana uses the Mochibe strategy to resolve Caloric 1. This strategy is exclusively used in Japanese parties and it follows a traditional JP priority system in order to properly resolve the fire stacks.
| Everyone spreads out in order to make it easier to see the player with the fire beacon. In this example, ST and D4 have the fire beacons. | 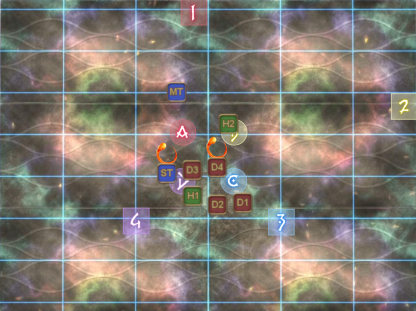 |
| The fire beacon stack loosely together on the intersection of the blue lines, above the A and B waymarks, in order to deal with the incoming two-man stack. The player with the lowest priority can stand on waymark D. This is normally D4, but because D4 in this example is the fire beacon, the lowest priority now defaults to D3. Everyone else stacks in between waymark D and C. |  |
| Here is an example if everything went well. Make sure to heal up once the cast goes off. | |
Pyrefaction and Atmosfaction are now assigned to the players and the goal here is to pair every Pyrefaction with an Atmosfaction. Each player starts at waymark A and rotates clockwise until they find a waymark that they can go to. The priority from highest to lowest is as follows:         Players with Atmosfaction only need to check C or D, because A and B are already taken by the fire beacons. | 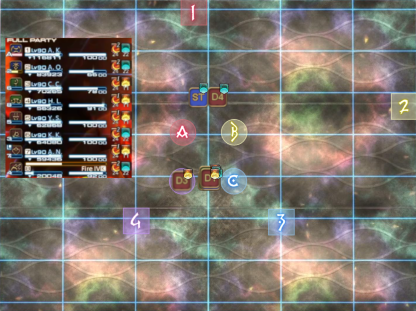 |
Using the priority system, the assignment would be as follows:
|  |
| Wait until the first set of Pyrefaction goes off. Once the first set of Pyrefaction is resolved, heal up. The party will take a lot of damage during this mechanic. | |
| All players with Atmosfaction need to run away diagonally from the center. The players at A and B should not move. The players at C and D need to move to up to resolve the 2nd set of Pyrefaction. Depending on who gets the Pyrefaction debuff, it is possible that you might have to move diagonally in order to resolve the stacks! |  |
| Atmosfaction and the 2nd set of Pyrefaction will now resolve. | 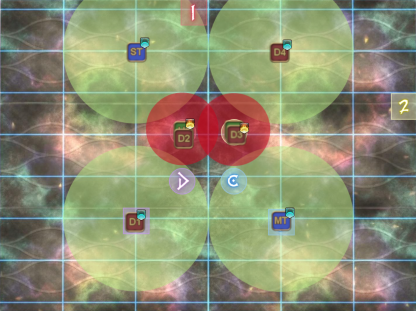 |
| Make absolutely sure that your debuffs have expired first before you start moving. |
Aether uses the light party-based Papan. This version of Papan assigns players on the waymarks based on the role of the player with a fire beacons. The two-man stack on the fire beacon is resolved by making use of its large explosion range, which allows the party in the center to help stack it. As a general rule during the prepositioning, north and east are reserved for DPS while west and south are reserved for the support. Fire beacons are always west and east.
| Everyone spreads out in order to make it easier to see the player with the fire beacon. In this example, H1 and D4 have the fire beacons. This means both healers and both ranged DPS have to move in into the waymarks. |  |
| The fire beacons should move into west and east. The role partner of the fire beacon should go to north and south. The fire beacon players should not stand exactly at the center of their waymarks, but they should stand closer to the group of people at the center instead. This should ensure their survival if a two-man stack goes off on one of the fire beacons. In this example, the two-man stack explosion goes off on the DPS fire beacon. | 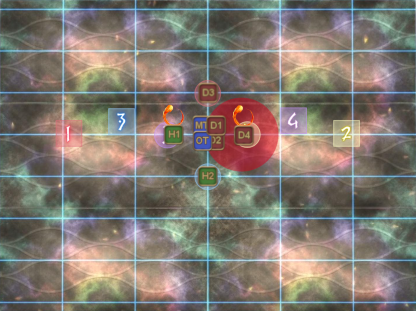 |
| Here is an example if everything went well. Make sure to heal up once the cast goes off. | |
| Pyrefaction and Atmosfaction are now assigned to the players. The goal here is to pair every Pyrefaction with an Atmosfaction. The following priority system is used for the assignment: Group 1: CCW from West Group 2: CW from North Keep in mind that support starts first! | 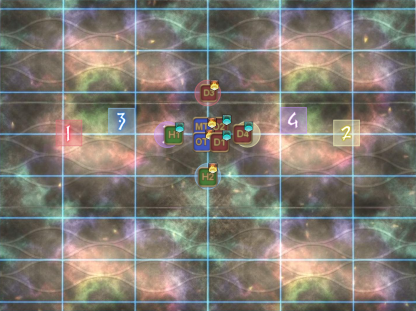 |
In this example, both tanks have Pyrefaction, while both melee DPS have the Atmosfaction debuff. Using the priority system, the assignment would be as follows:
|  |
| Wait until the first set of Pyrefaction goes off. Once the first set of Pyrefaction is resolved, heal up. The party will take a lot of damage during this mechanic. | |
| All players with Atmosfaction need to run away from the center. Players on north and south should move to the next intersection, players on west and east should touch just the edge of the outside waymarks. Amongst the four players who initially had Pyrefaction, two random players will now be inflicted with Pyrefaction again. These players must now resolve the two-man stacks on the west and east waymarks. Always prioritize clockwise rotation unless rotating clockwise matches you with the wrong partner. |  |
| Atmosfaction and the 2nd set of Pyrefaction will now resolve. |  |
| Make absolutely sure that your debuffs have expired first before you start moving. |
Some general tips to keep in mind while doing Caloric 1:
- It is not necessary to be exactly on top of your partner when resolving Pyrefaction. Simply being close to them is sufficient.
- Take your time. You have more than 10 seconds before each Pyrefaction stack goes off.
- You can preemptively move to your correct spot by looking at the debuffs of other players in order to calculate ahead.
- Players with Pyrefaction have a giant flame above their head. Use that to your advantage.