Forsaken
Kefka has finally had enough of you, deeming you to be no fun at all, and is ready to erase your existence. This phase is mostly a mitigation and healing check, but there is some precise movement involved that is mandatory in order for your party to get through this mechanic.
Kefka will start this phase off by casting Forsaken, which is a very strong raidwide by itself, which will summon three void holes and a stack marker on your party. This attack is repeated three more times after that, after which the attack comes without warning or any castbar whatsoever.
One of the void holes will always appear under the party, which is an AoE that will disperse immediately once the attack resolves. The two other void holes, however, are created in "random" locations and will persist on the floor even after detonation.
The first set of persistent void holes will always spawn under Kefka, with the later ones appearing at the outer edge of the arena first before it starts spawning at the inner side of the arena as well. If you notice that Kefka has been displaced from the center, then be careful on using any gap closer skills as you might end up dashing straight into the void hole in the center instead.
The void holes must be avoided at all costs and you must absolutely never touch the void holes that persists on the floor. Getting hit by the AoE or touching the void hole will result in you being banished instantly to the shadow realm, which means you are permanently dead for the rest of this run with no possibility of getting revived if this happens.
This final mechanic has two strategies: Lisbin and Megabin are in agreement over the same strategy, while Mana JP have their own approach in dealing with this mechanic.
- Yan (JP)
- Lisbin & Megabin
Mana approaches this mechanic by having everyone run a 90 degrees lap every time Forsaken is triggered. The downside is that you will have to run pretty far every time, but in return, your movement will always be the same no matter what.
The official Yan strategy has everyone start at northeast, which is where waymark 2 is. However, some PF will put in their description that they want to start at waymark 3 instead, which is southeast.
| Start at 2 | Start at 3 |
|---|---|
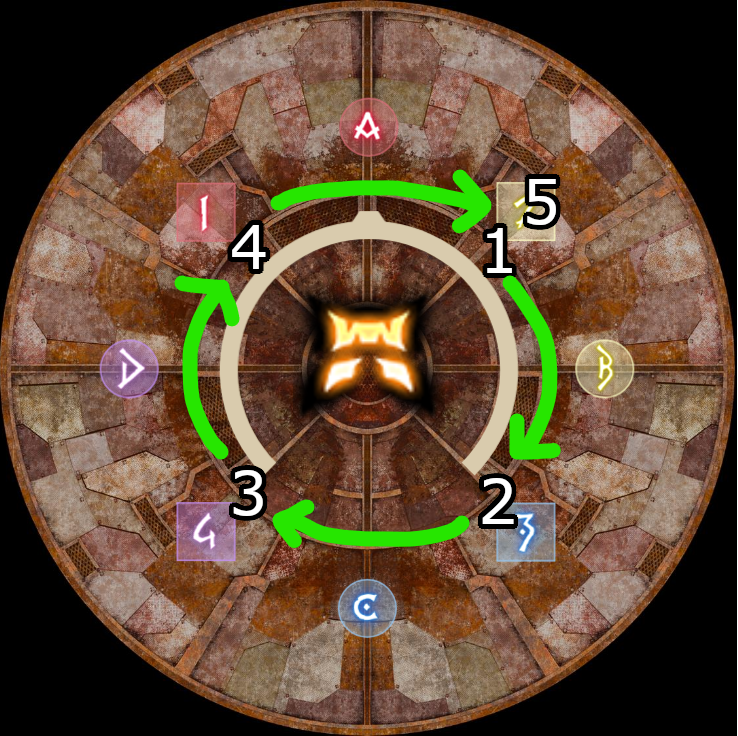 | 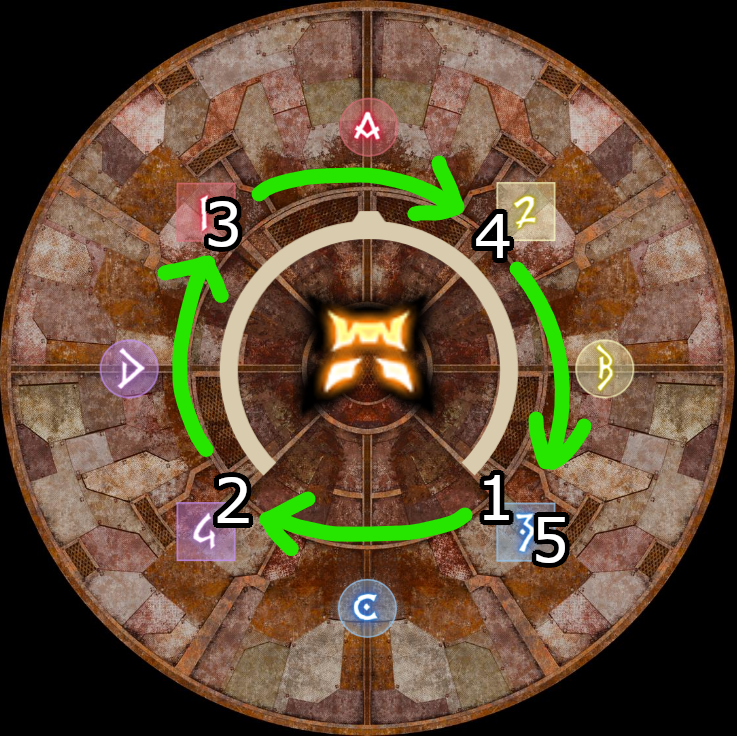 |
The way this strategy approaches this mechanic is straightforward: You keep running to the next numbered waymark every time Kefka triggers a raidwide and puts a stack marker on your party. You can freely run through the red telegraphed AoEs, but under no circumstances should your party ever touch the black holes.
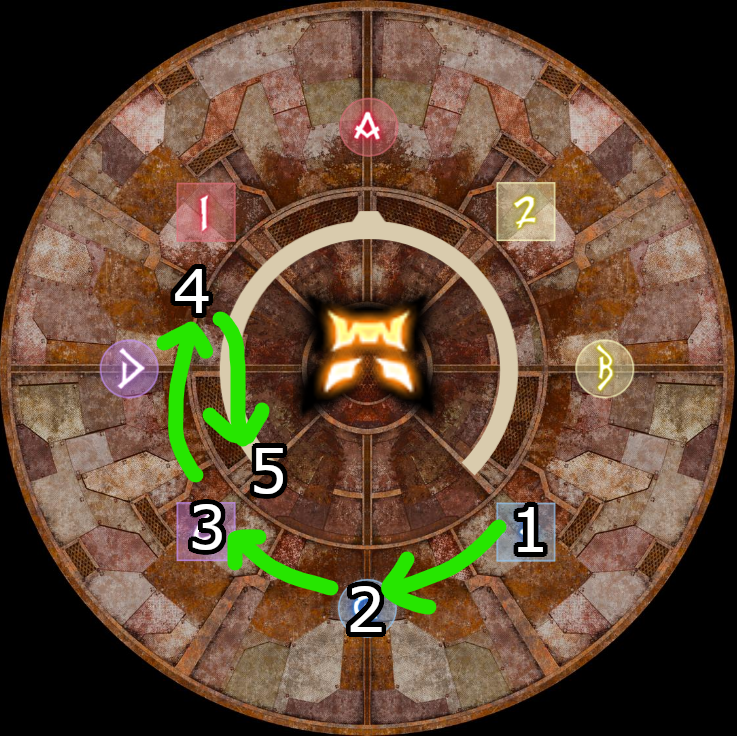
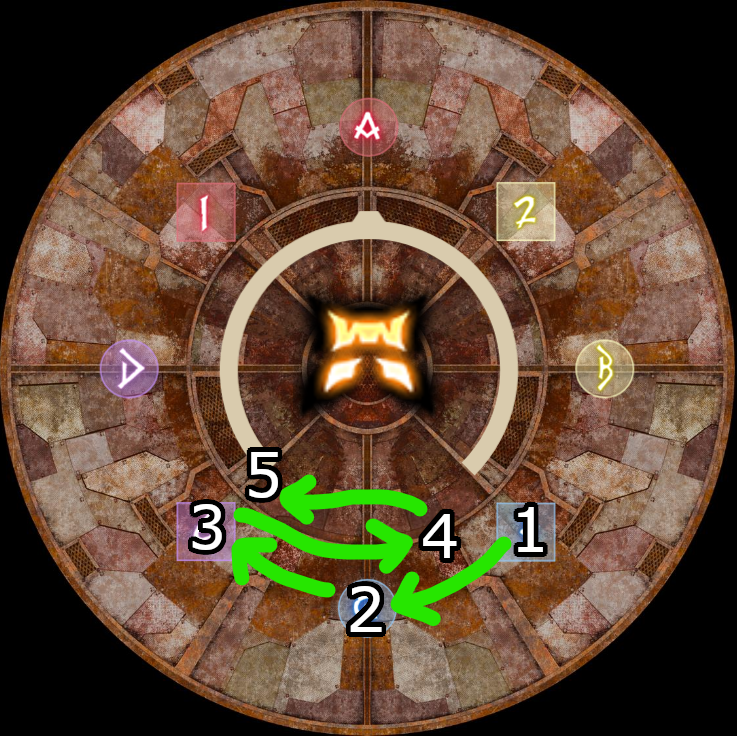
The Elemental DC pastebin strategies prefers an approach that minimizes the movement. This however, comes with the downside that your movement is not fixed, which means that you must pay attention as to whether your party has to strafe left or right for the third set. No matter which pattern you get though, you will always end up at waymark 4, which is southwest of the arena.
Your starting position is always at southeast where waymark 3 is, so there's no possibility of any confusion happening on where to start.
| 3 > C > 4 > D1 > 4 | 3 > C > 4 > C3 > 4 |
|---|---|
 |  |
No matter which strategy you go with, your party has to press their mitigations and heal, because you will be hit by four Forsaken raidwides and four stack markers (Forsaken Bonds) in total while you're running your marathon. The very first Forsaken, the one which Kefka is taking forever to cast, hits up to 450k damage, while any other subsequent attacks will deal roughly 330k or lower. Four mitigations and feint plus a shield is required as a bare minimum for the first Forsaken.
The attacks happen back to back in a short time span, so your 20s mitigations will be able to cover 5 hits, your 15s mitigations can cover 4 hits while 10s mitigations can cover 3 at most with good timing. The attack hits hard, so you need every mitigation that you can muster. Assuming you've been pressing your 90s early at the start of this phase until now, your 90s should be available to cover the last four hits.
Once you've finished running your marathon, Kefka will start casting his enrage, which is Forsaken Null. Immediately fire the melee LB3 if your party still has their limit break, and send your 2 minute burst once its back up. You will still have time for two gcds when Kefka fully finishes his casting before he actually wipes your party.