M8S - Elemental Purge
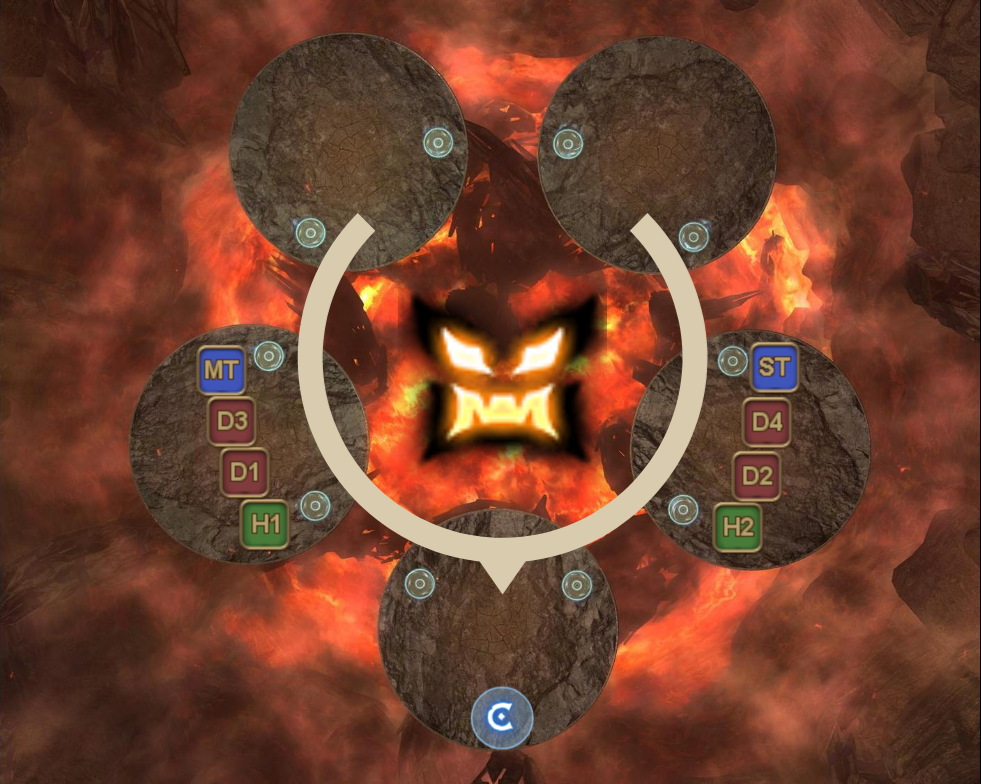
Welcome in phase 2 of the fight, in which Howling Blade is now an omnidirectional boss that is surrounded by five islands that you can teleport around. The boss will now auto attack two targets, so make sure that both tanks have their stance enabled at all times! Remember, there are no checkpoints, so if you die here, you will be sent back to phase 1.
There are quite a few mechanics which gets repeated throughout this fight, so treat this page as a tutorial as to what you can expect later.
Quake III
The first mechanic that the boss introduces you to is Quake III, which is a stack marker that targets both healers. Unlike the regular stack markers that you're used to, this stack marker is an enumeration, which means that the stack must contain four people, or everyone inside the stack marker will die instantly, no matter how many mitigations you have stacked up.
Have light party 1 go to the southwestern island, while light party 2 go to the southeastern island. Even though the stack marker hits the whole island, you want to edge the island as much as you can, so that both parties can reach each other with heals, mitigations and buffs.
Ultraviolent Ray
Immediately after Quake III, the second mechanic that you will be introduced to is Ultraviolent Ray. This attack will target four players of a random role group and one random player from the other role group, totaling five players, with a blue beacon above their head.
The boss will fire two types of lasers during this mechanic. The first laser comes from a drone behind you, which will cleave half of the island you're on. The second laser comes from the boss himself, who will fire an unavoidable laser beam on every player with a blue beacon. If there are multiple players with a blue beacon on the same platform, then that platform will be beamed multiple times by the boss, killing everyone on it.
So in order to solve this mechanic, you want to split everyone up so that each player with a blue beacon occupies one island. The players without any beacon can stand wherever they want.
Solving this mechanic relies on sight, so lineup on your quake islands in the following order:
Now, your light party will either be targeted with two or three beacons. If your party gets two beacons, then the topmost player will teleport up while the other player stays. In a three beacon situation, the middle player will stay, while the bottom and top players will adjust to the other islands.
| Two beacons | Three beacons |
|---|---|
Don't forget about the drone laser that is going to be fired from behind you. The drone is pretty big, but if you're having trouble identifying where it is shooting, then one easy way to tell where the drone is aiming at is by looking at the small red laser indicator when it is about to fire. Keep this motif in mind, because these drones will reappear throughout the fight in other mechanics.
Twinbite
Once the lasers are resolved, all the non-tanks should immediately retreat to the southern island, while the tanks should stay on the quake islands of their respective light party. Howling Blade will use Twinbite, which will tankbuster the two players with the highest enmity, which is hopefully the tanks. The tankbuster hits the whole island, so the tanks must be separated and any non-tanks may not be on the same island as the tanks.
 |  |
|---|---|
Keep in mind that Twinbite can hit up to 600k magical damage, so the tanks must be helped by the party or they will likely not survive this attack. As for the tanks, press all your personal mitigations except Rampart. There is another tankbuster coming up soon in Elemental Purge, so you want to have Rampart available for the next one. If you have a WAR, then it is recommended that they use their holmgang here to cheese this one.
Once the tankbuster is resolved, have everyone retreat to south in preparation for the next mechanic.
Hero's Blow
The last recurring mechanic that your party have to deal with is the Hero's Blow. The boss will target one random player and prepare to do a halfroom cleave, which is then combined with a donut or chariot, depending on which direction the spinning drones are aiming at. As for the halfroom cleave, you can tell which side the boss is cleaving from the way he is holding his sword.
| Example 1 Left dodge, Donut | Example 2 Right dodge, Chariot |
|---|---|
Now, the first Hero's Blow will be easy because everyone was at south to bait the boss to face south. However, the 2nd Hero's Blow that comes later in this fight is completely random, so use this moment to get some practice in, because the 2nd one requires your reaction speed to be on point.
Mooncleaver
After dodging the Hero's Blow, immediately teleport back to your quake island, because you will now have to deal with another set of Ultraviolent Ray, which is then followed by Quake III. For reference, PF will delay their 2 minutes up to this Quake III, so once you see the stack marker appear, you should get as close to the boss as possible for the buff range, after which you can happily burst away.
After resolving Quake III, don't fiddle your thumbs and immediately teleport back to the south island as soon as possible. The boss will soon target a random player with Mooncleaver, which will completely destroy the island, and we want that attack to be targeting the southern island as part of the PF strategy.
Once you see the boss cast Mooncleaver, that is your cue to run for it. The non-tanks can go wherever they want, but as for the tanks, the MT must go west and the ST must go east. Failure to do so will likely cause a wipe, so do not take the wrong teleporter if you're a tank!
Elemental Purge
Once the platform is destroyed, the boss will quickly follow this up with a cast of Elemental Purge, which will inflict a debuff on one random tank and one random non-tank. The players who are targeted for the debuffs will have a giant red arrow above their heads, which you can use to identify what you have to do to solve this mechanic.
Now, three things will happen at once during this mechanic:
- Howling Blade will do a halfmoon cleave (Hunter's Harvest), an attack that is at least three islands wide, on the player with the highest aggro.
- The tank who got inflicted with a debuff will be attacked by Aerotemporal Blast, which is a giant tankbuster AoE that covers the whole island that the tank is standing on.
- Finally, the non-tank who got inflicted with a debuff will be attacked by Geotemporal Blast, which is a stack that needs to be soaked by 6 players.
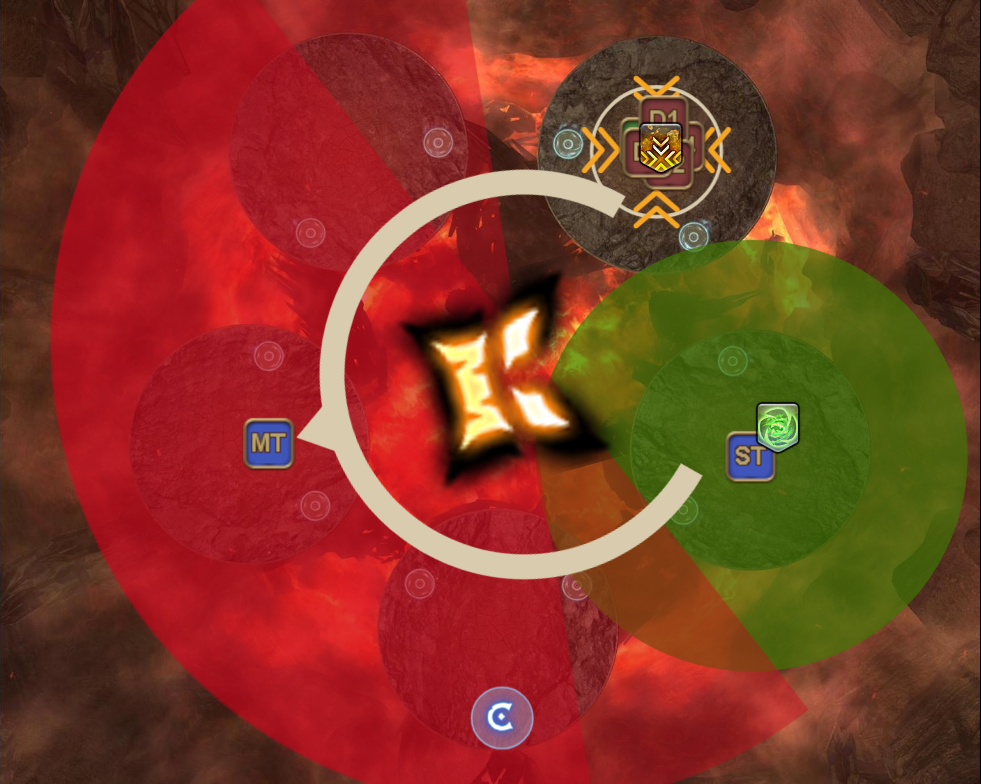 | 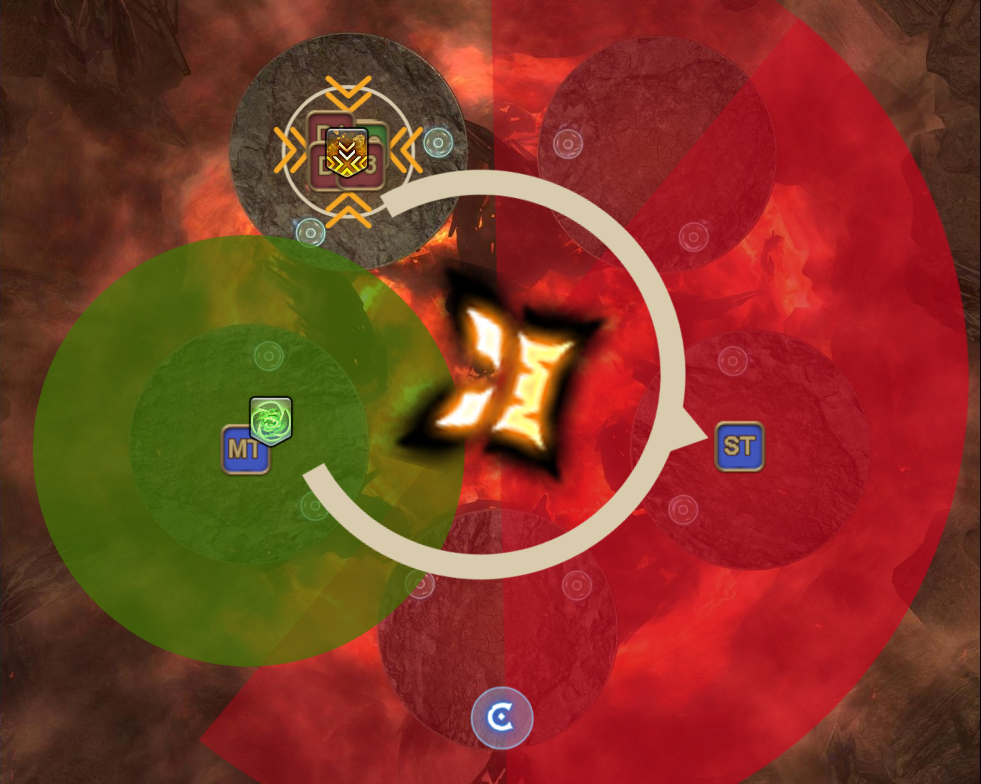 |
The tank who did not get the debuff must provoke as soon as possible to prevent one tank from accidentally eating both tankbusters. The tank who did get the debuff should go to the southern edge, away from the other islands, as much as he/she can in order to minimize the chance of his/her AoE clipping other players. The damage of the tankbusters is roughly 300k, which is nothing compared to the 600k from Twinbite, so using Rampart + short cd should be more than enough to cover those attacks once you're in position.
The non-tanks on the other hand, must identify quickly which of the tanks has the debuff. Once identified, the party should then go to the topmost island that is nearest to the tank with the debuff. This should allow the party to safely soak the stack without getting hit by either of the tankbusters. Make sure to mitigate this attack, as the stack can be fatal if you take it raw.
Below are some PoVs in a scenario where the ST gets the debuff.
| Non-tank | |
|---|---|---|