M6S - Sugarscape (Riverscape)
Pull Sugar Riot up north to minimize melee downtime, as she will teleport up north soon once again for her Sugarscape. While this phase is by far easier than the adds phase, any mistakes can still easily cascade into a wipe, so do be careful and respect the mechanics.
Sugarscape
Sugar Riot will randomly use one of the attacks that was used in normal mode, but will this time use Double Style to combine this attack with the arrow line AoEs, which will limit the safe tiles the party can use to resolve their mechanics. Luckily, there only exists two patterns for the arrows, which limits the variables that you have to deal with.
Similarly to normal mode, touching water is fatal if you get electrocuted, but you must be standing in water if the boss uses a fire attack. Identify whether the boss uses lightning or fire, and adjust accordingly to your correct positions. Keep in mind that you will be forced to go downtime as melee if you get the lightning pattern, but respect the mechanic nonetheless.
| Fire | Lightning |
|---|---|
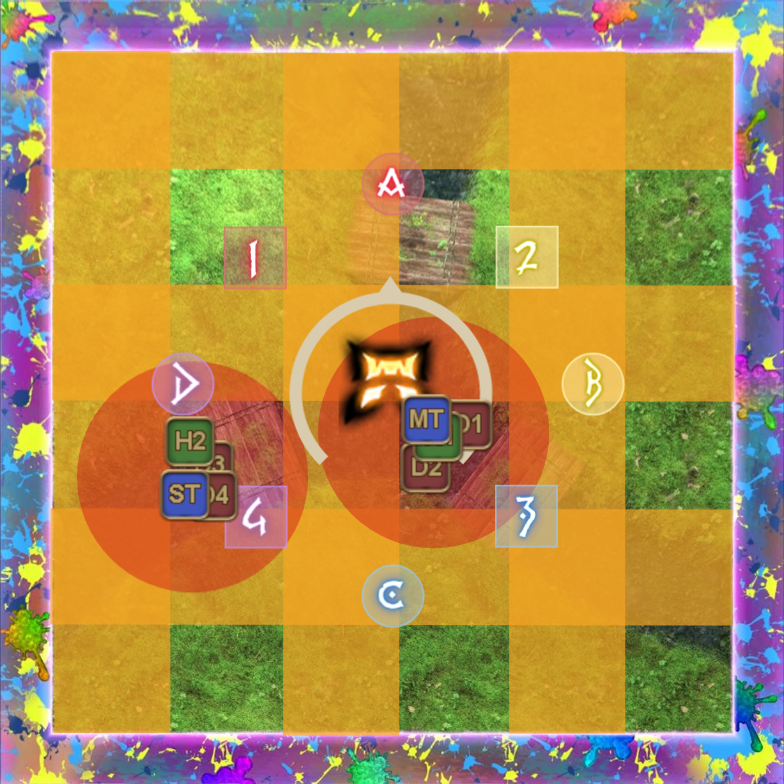 | 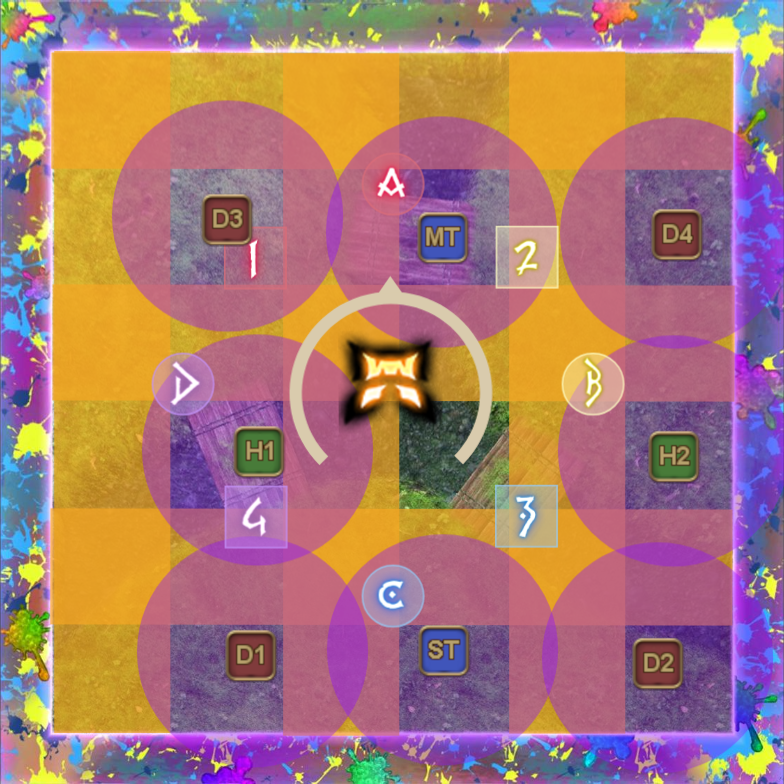 |
 |  |
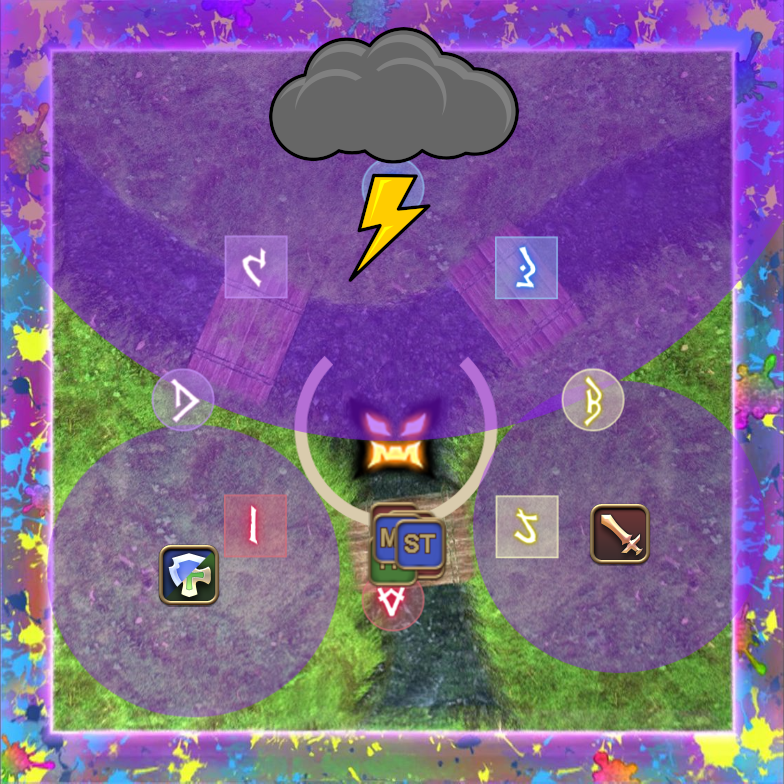
Thunderstorm
Sugar Riot does not like how the scenery is peaceful as it is. To fix the issue, she will cast Layer and create a thunderstorm inside the painting. The river is now dangerous to touch due to it becoming muddy and the landscape is now riddled with random lightning strikes which you, unfortunately, have to deal with now.
Immediately head over to the northern bridge, because a baited lightning will strike exactly where you are, which is vaguely telegraphed by your screen flashing purple for a moment. You might recognize this as the infamous twister from UCOB or the Akh Rhai mechanic from E8S/FRU. Upon seeing your screen flash, that is your cue to immediately run from where you're standing, away from the giant thundercloud that is now looming above your heads. The AoE of the thundercloud is gigantic, so do keep your distance from that as well.
After dodging the initial lightning strike, the thunderstorm will now randomly pick 1 support and 1 DPS for a lightning strike, signaled by a purple arrow above the player's head. This lightning strike will electrocute the whole island the player is standing on, so there can only be one player per island.
The giant thundercloud occupies one island, so the support and DPS need to split up among the remaining two islands to safely soak the lightning without killing each other. Using the thundercloud as the new north, the support goes west while the DPS goes east. The rest of the party can safely stand on the wooden bridge that is at the opposite of the thundercloud, which doesn't seem to conduct electricity for whatever reason.
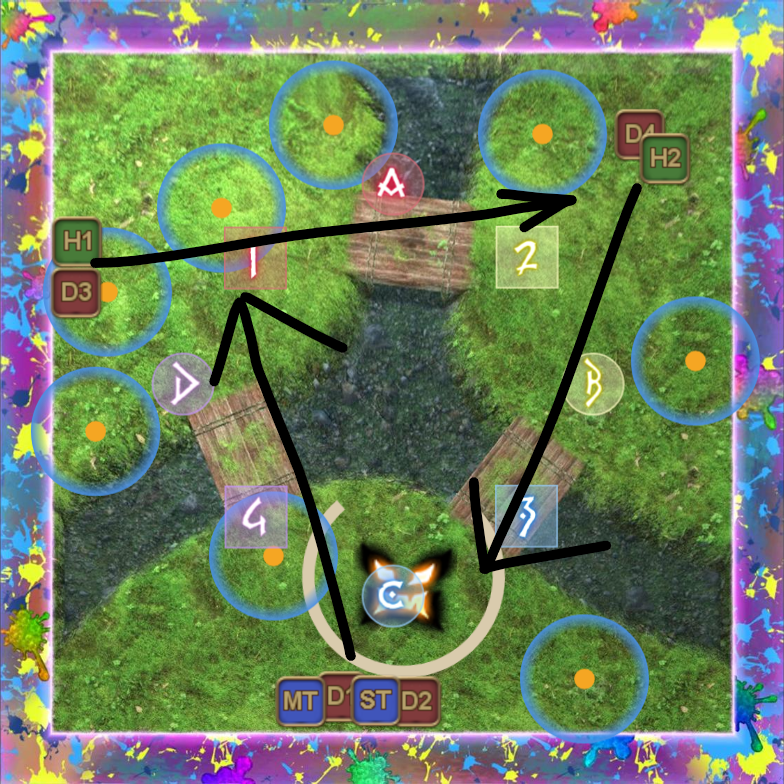
Just like normal mode, the thundercloud will move to a random island after every lightning strike. Identify which way the cloud is going and go either clockwise or counterclockwise. Unless there were deaths, each player will only get selected once for the lightning, so that should also give you some anticipation whether it is your turn or not.
Once you're done with the thundercloud, Sugar Riot will wrap it up with Pudding Party, which is a multi-hit stack marker. Your 2 minute should be back up around this moment if you have delayed your burst during the adds phase, so feel free to burst once you see the stack marker appear.
Magma
Unfortunately, the thunderstorm wasn't destructive enough, so as a final touch, Sugar Riot uses Layer to cover the landscape in lava, which effectively also destroys all the bridges. Before she manages to get her cast off, immediately preposition yourself on the correct islands, because the next mechanic becomes unresolvable if you are too late.
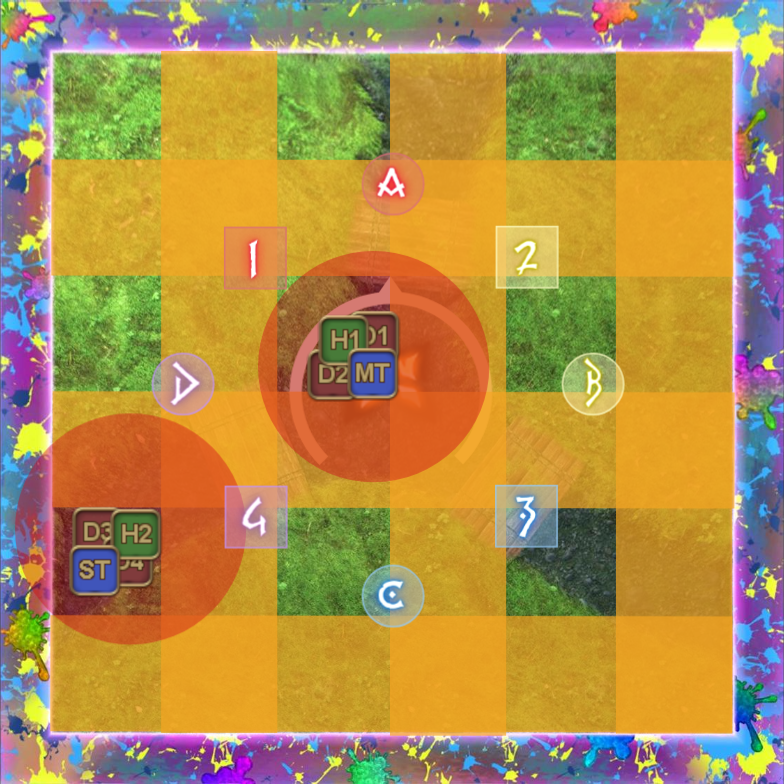
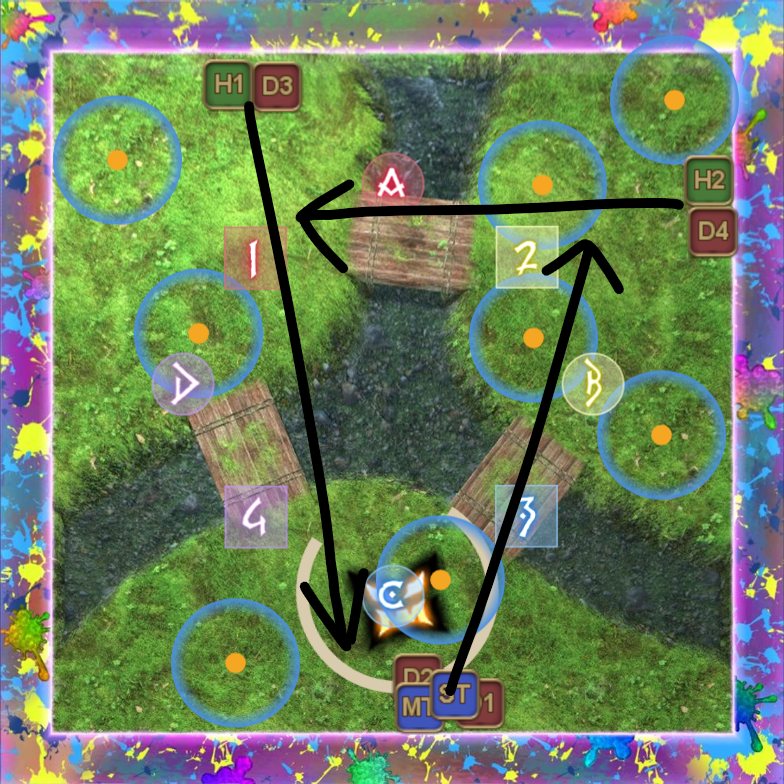
The lava are effectively death walls, so under no circumstances are you to touch it. After the lava has appeared, your position should be something like the following.
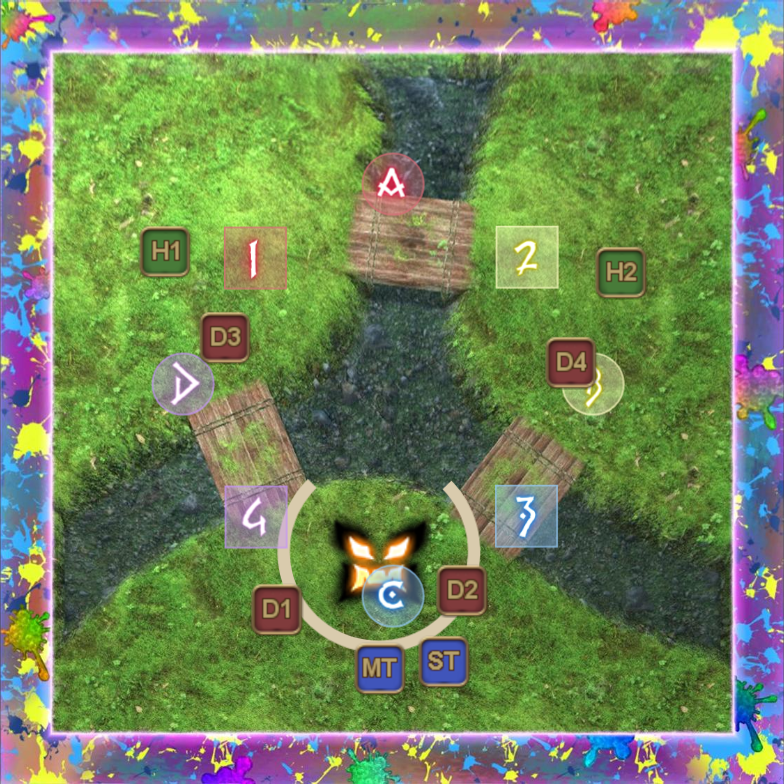
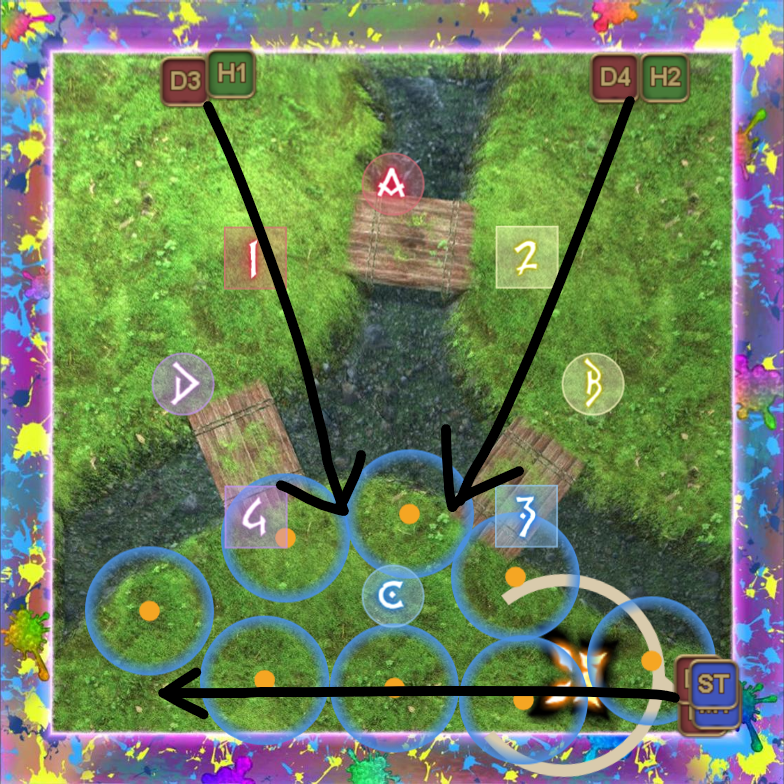
Towers - Round 1
The first major mechanic of the magma phase is Mousse Drip, which Sugar Riot will cast immediately once the environment has changed. This cast does two things: First, it will spawn 8 towers all over the map, two on each northern islands, four on south. This is why it is important that your party immediately prepositions before the landscape turns lava, because it would be impossible to soak the towers otherwise.
The second thing that Mousse Drip does, is apply a multi-hit stack marker on two farthest players from the boss. This marker can be soaked by two players and will leave goop behind every time, which means you should not be near the towers when resolving this stack marker. The marker is normally baited by healers, but feel free to discuss amongst yourselves if you wish to adjust the strategy, as long as both stack marker don't end up getting baited on the same island, which can and will cause a wipe.
| 1. | Upon seeing the boss cast Mousse Drip, both healers should get as far as they can, while all the other players should get as close as they can without touching the lava. The lava hitbox is janky, so try to avoid getting too close to it if you can help it. | 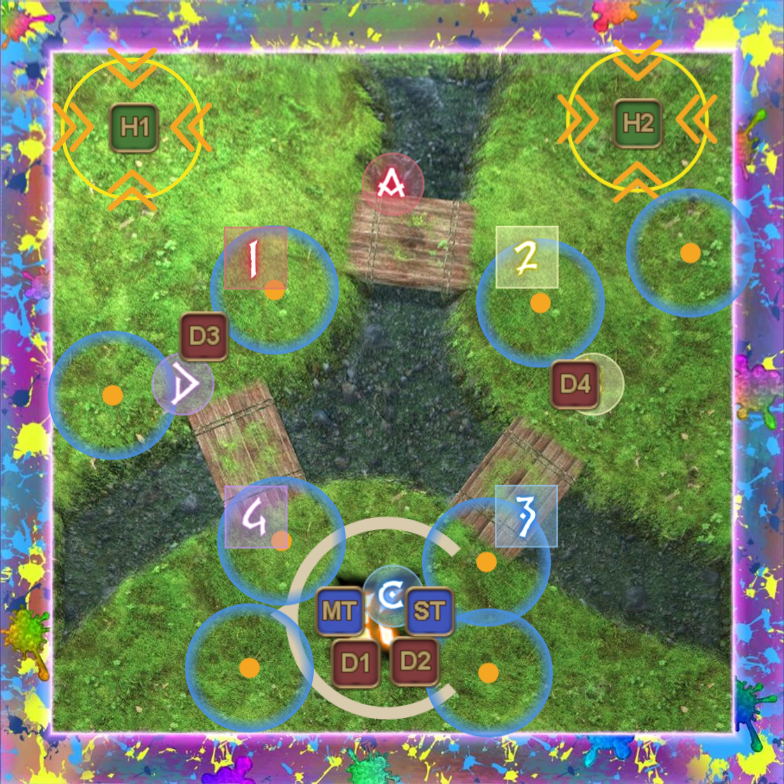 |
| 2. | The stack markers each hit four times, so make sure to plan out a path that doesn't cover the tower in goop. You have to coordinate this with your partner, so what is recommended is to trace along the walls away from the towers. This will avoid any confusion, compared to doing weird sudden movements. At the same time, Sugar Riot will cast Moussacre, which is a protean attack that targets the four closest players. Do not aim these proteans at the ranged players! | 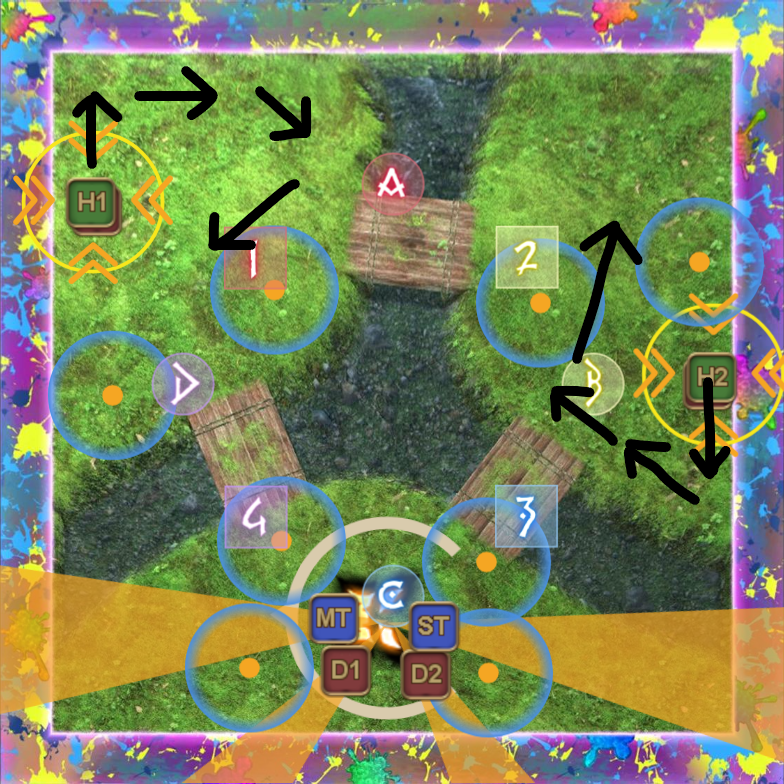 |
| 3. | Do not enter your tower yet! The untelegraphed lightning strike is back, so wait outside the tower until you see your screen flash, before going into your tower. The ranged players have a priority system to decide who takes which tower, which is DPS left and healer right while looking at the boss, but do keep in mind that its not always respected. So be always prepared to adjust when necessary, which shouldn't be hard if you preposition near your tower early. | 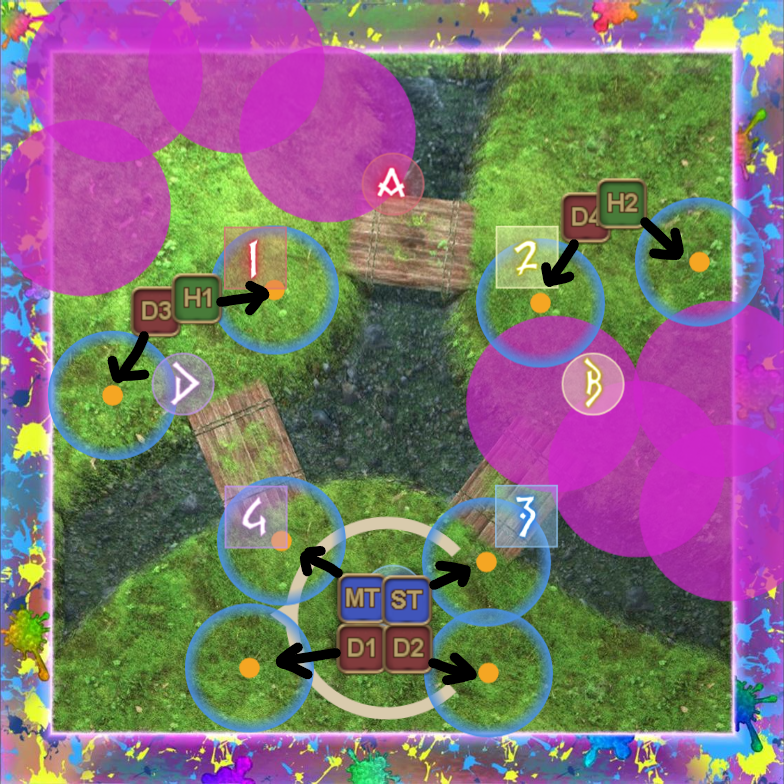 |
Take into account that this mechanic is a body check, which means all players must survive to do the mechanic. If a tower cannot be soaked for whatever reason, then your only hope of survival is using a tank LB3 to minimize the damage.
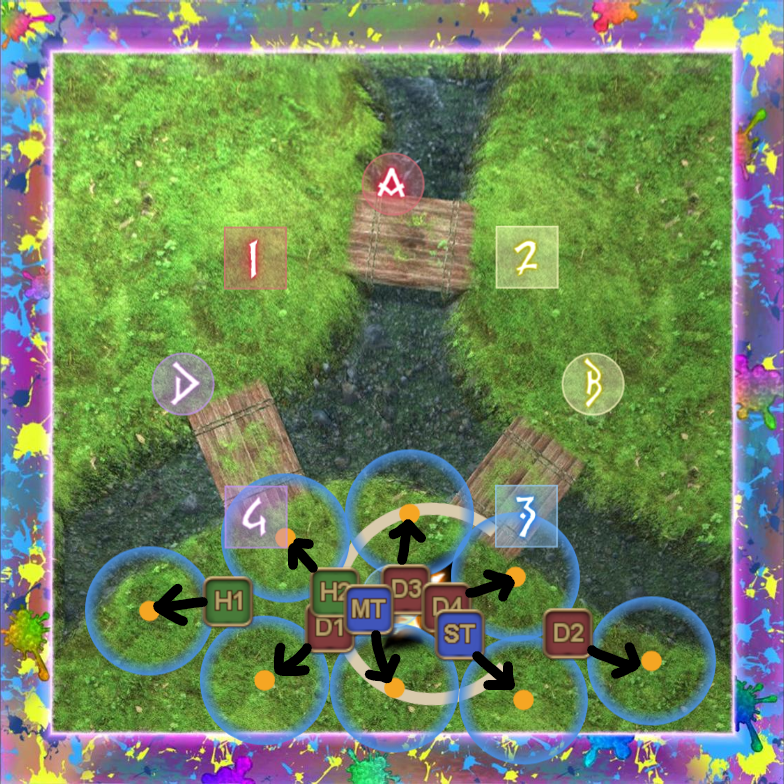
Towers - Round 2
After successfully resolving the first set of towers, Sugar Riot will now cast Wingmark and grant everyone wings. Shortly after, another set of 8 towers spawn and the pattern you get will decide which island you're hopping off to next. While the islands with only two towers are pretty yolo'able, do respect the static positions on islands where there are either 4 or 8 towers in place.
As a reminder, the wingmark distance is roughly 3/4th of the arena width, which cannot be underestimated. Its over if you wall or die in any other way, so do try and respect the jump by keeping your distance and/or dropping uptime. And finally, do not enter the tower immediately! Wait for the lightning flash on your screen, after which you can safely enter your tower without getting hit by a stray bolt.
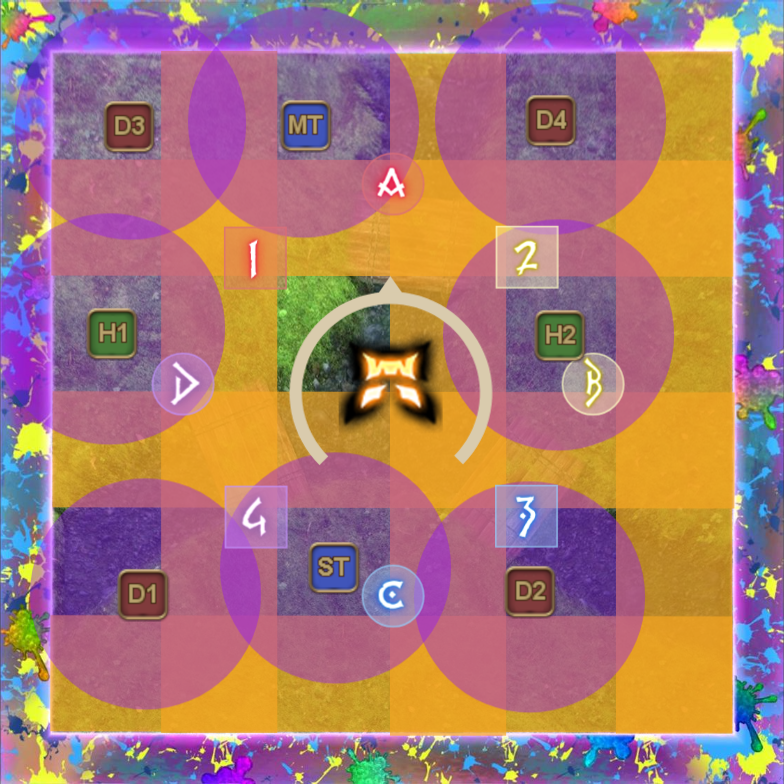
| 4 towers on northwest island Rotate clockwise | ||
|---|---|---|
 | > | 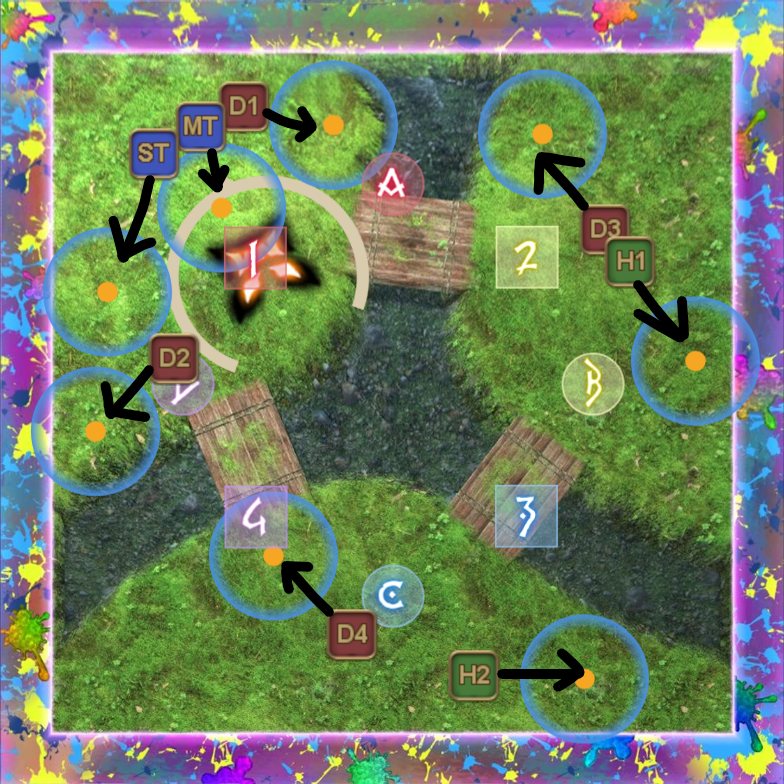 |
| 4 towers on northeast island Rotate counterclockwise | ||
 | > |  |
| All towers at south Everyone go south! | ||
 | > |  |
Once you've succesfully resolved the mechanic, Sugar Riot will cast Mousse Mural and end this phase. As the raidwide is being cast, try to get close to each other for the necessary heals and mitigations. As the MT, do try to drag the boss to the middle once you see the landscape dissipate.
Post Magma
From here on, its mainly repeat mechanics. First, you will get the Sticky Mousse, which is the usual spread to stack mechanic. However, the placement of the boss can be awkward if the tank didn't drag the boss to the center, so what is also commonly seen in this final Sticky Mousse is a yolo spread. As long as you spread out and refrain from moving erratically, you will be generally fine and people should be able to naturally resolve the stacks.
After resolving the mousse, Sugar Riot will use Color Riot. If the tanks didn't cause a wipe here, then she will follow up with the Color Clash mechanic, which is no different from the first one you saw at the start of this fight.
If the boss is still alive at this point, then she will cast Artistic Anarchy, which will cover the whole arena with artwork. With no possibility of dodging any of the attacks and any attacks dealing infinite damage, this is essentially the enrage and the end of this fight.