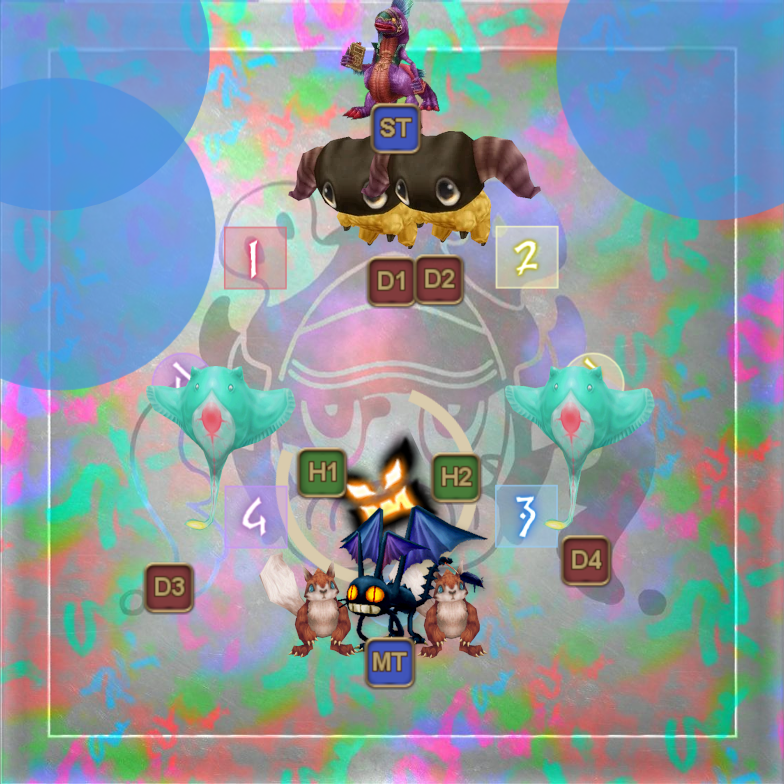
M6S - Soul Sugar
Sugar Riot will begin this phase by casting Soul Sugar, which will create a few flans on the map. This is immediately followed up by Live Painting, turning them into various creatures that you now have to deal with. This phase is brutal, almost on the level of an ultimate, so make sure that you understand what you're doing as one mistake from anyone can easily cascade into a wipe.
The adds explained
Each of the adds have their own gimmick and understanding their mechanics is key to successfully understanding how you can pass the adds phase.
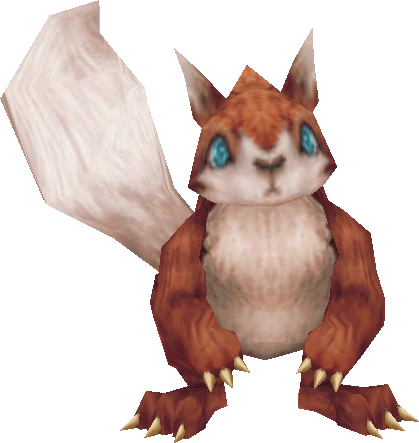 | These innocent looking squirrels have a high amount of HP, but are not threatening at all and thus has the lowest target priority. However, they will cast a raidwide which will inflict heavy damage on your party if Sugar Riot casts Ready Ore Not while they are still alive. This is usually a wipe if multiple Mu's manage to get their cast off, and an obvious sign that your DPS or MT might be underperforming. |
 | A deadly sheep that looks deceivingly cute. Its auto attacks easily deal up to 60-70k per hit, which means only a tank can effectively tank them for a prolonged time. This sheep will immediately enrage if a Mu gets too close to it, effectively turning auto attacks into instant deaths. The tanks must work together to make sure that the Yan and Mu remain separated from each other. |
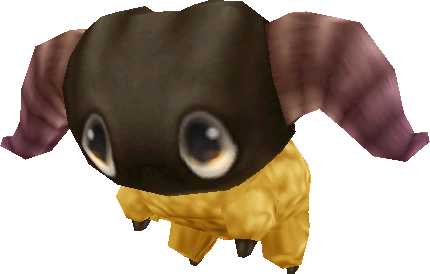
 | Drains all your LB gauge upon spawning. This cat will then annoy your party by jumping randomly around the arena, occasionally jumping on a random party member to cast a small AoE. This cat gains a stack of buff for every AoE cast that does not hit any players. Once the stack reaches 3, this cat will then enrage and summon a meteor that wipes the party on the spot. 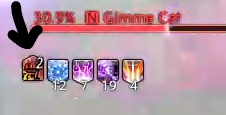 You can track how close the cat is to enraging by targeting it and looking at its buff stacks. Although not recommended due to it reducing your max HP and giving you a damage down, you can delay the enrage by intentionally getting hit by its AoE cast. The cat is very mobile, so it is mainly the responsibility of the ranged players to take them out. |
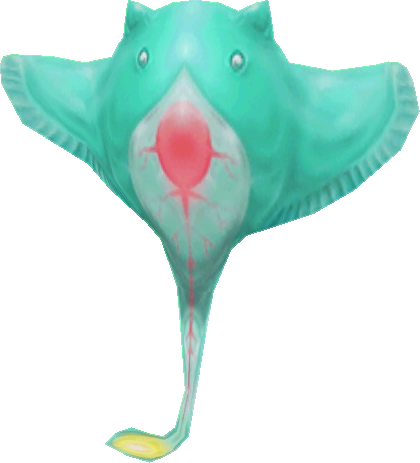 | This manta ray will tether to the first player that attacks it. Once tethered to a player, the ray will fire Water III in intervals against the target, which will leave behind a puddle that becomes impassable. The spell will also inflict a temporary vulnerability debuff that makes any attack fatal, auto attacks included, which means the tanks must avoid getting hit by them at all costs. |
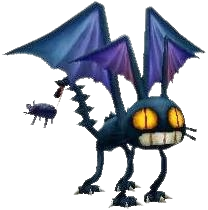
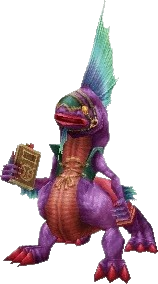 | The jabberwock will target a random healer, signaled by an arrow marker above the healer's head, and bind the healer in place. Once its prey is stuck in place, it will then march, slowly but menacingly, towards its target, killing the healer instantly if it successfully reaches him/her. The bind itself also inflicts quite some damage on the healer, so make sure that you've healed yourself up beforehand. Unlike all the other adds, the jabberwock can be stunned using Low Blow and Legsweep. |
This mechanic has four waves in total and this page tries to break it down as much as it can in order for you to successfully understand what you need to be prioritizing on and how you can persevere this phase.
Wave 1
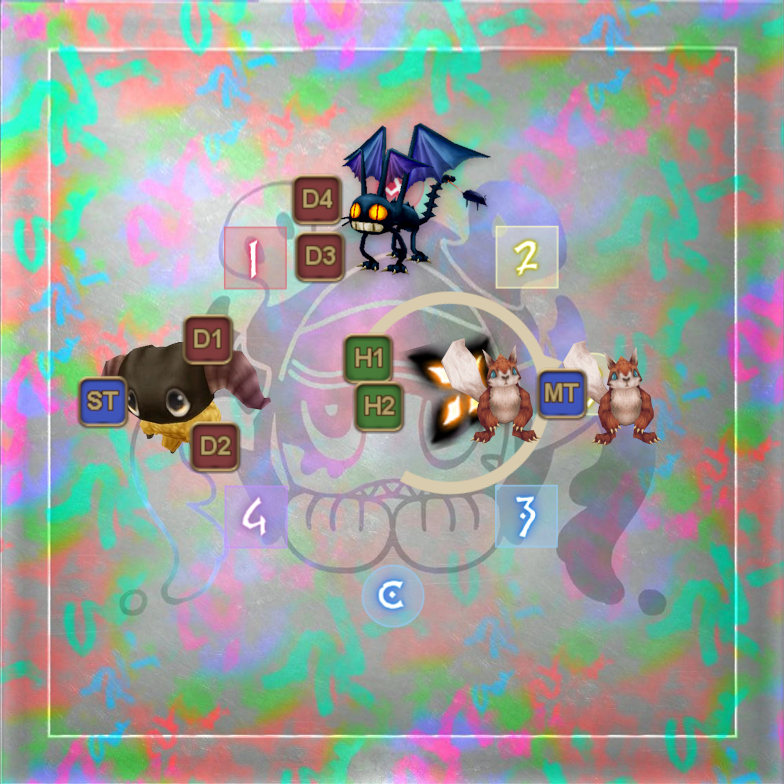 | Main objectives for wave 1:
|
Immediately at the first wave, there is a tech that your caster DPS can utilize. If your caster uses his/her LB2 immediately after Sugar Riot finishes casting Live Painting, then you can inflict extra damage onto the adds. Alternatively, you can also wait until the adds circle pulses 4 times before sending your caster LB. Pick whatever is consistent for you as your timing reference. Your LB gauge will be stolen by the cat regardless, so while not necessary, it is considered lost damage if you fail to utilize this.
Regardless of whether your party uses LB or not, the first wave is pretty straightforward. The ranged players will eliminate the Gimme Cat as soon as they can, while the melee DPS will focus fire on the Yan. Once the Gimme Cat is eliminated, the ranged should help out in eliminating the Yan. Healers should attempt to DoT all the adds, especially the cat! Your DoTs are automatically a gain once it ticks for 15 seconds, which you can use as reference for the latter waves to decide whether its worth it or not.
| Melee PoV | Ranged PoV |
|---|---|
During wave 1, you have the option to commit your 2 minute burst. However, if you notice that the DPS is lacking in the latter waves, then it is recommended that you save your 2 minutes for the second wave of adds instead. Delaying the burst window is by far the most popular choice in PF, but verify this with your party if there happens to be any questions surrounding it.
By the end of wave 1, both the Yan and Gimme Cat should be eliminated. The MT should be on standby around south along with the two Mu. If the ST wants to contribute to the damage, then make sure that their stance is off for the remainder of wave 1 and 2! The duty of the ST is to keep the sheeps busy, so it becomes problematic if the ST accidentally aggroes a squirrel.
Wave 2
 | Main objectives for wave 2:
|
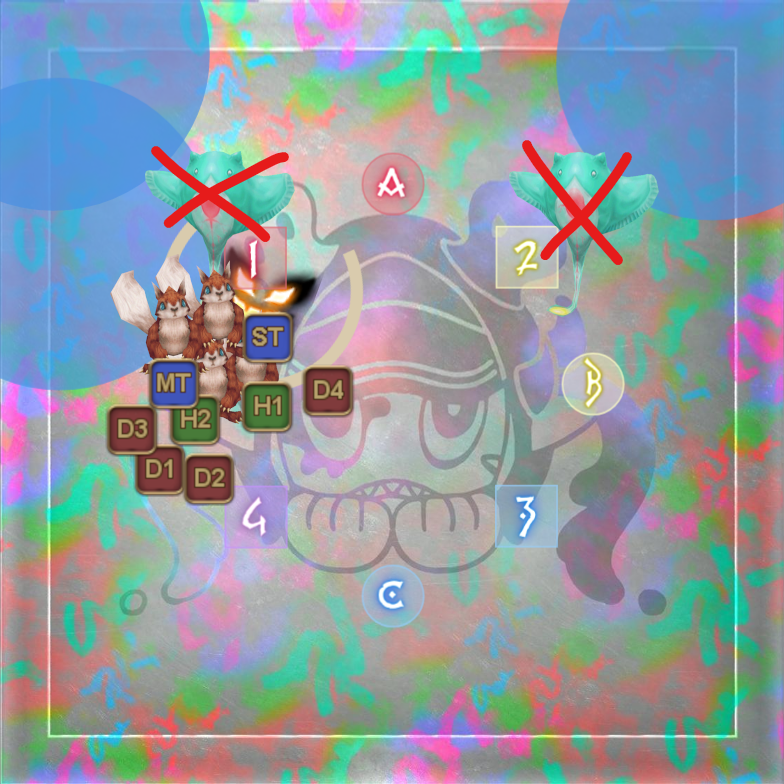
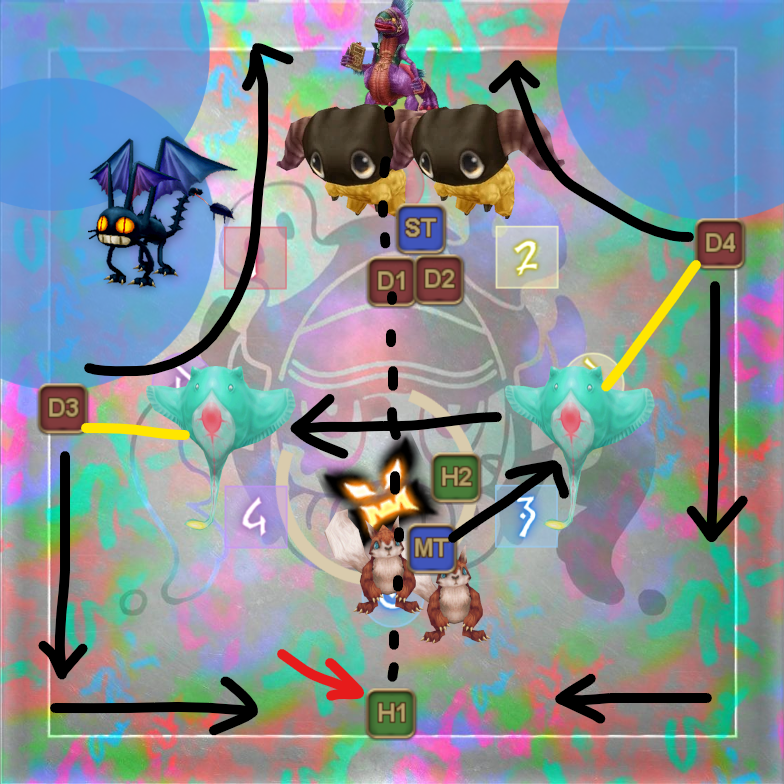
The D3 and H2 should immediately attack their rays once they become targetable and go to their respective corners at north for the puddle drops. This point can't be stressed enough, but everyone else should not mindlessly attack the Feather Rays. This is easily a common cause of a wipe, whether it be caused by an unfortunate accident or from the lack of discipline.
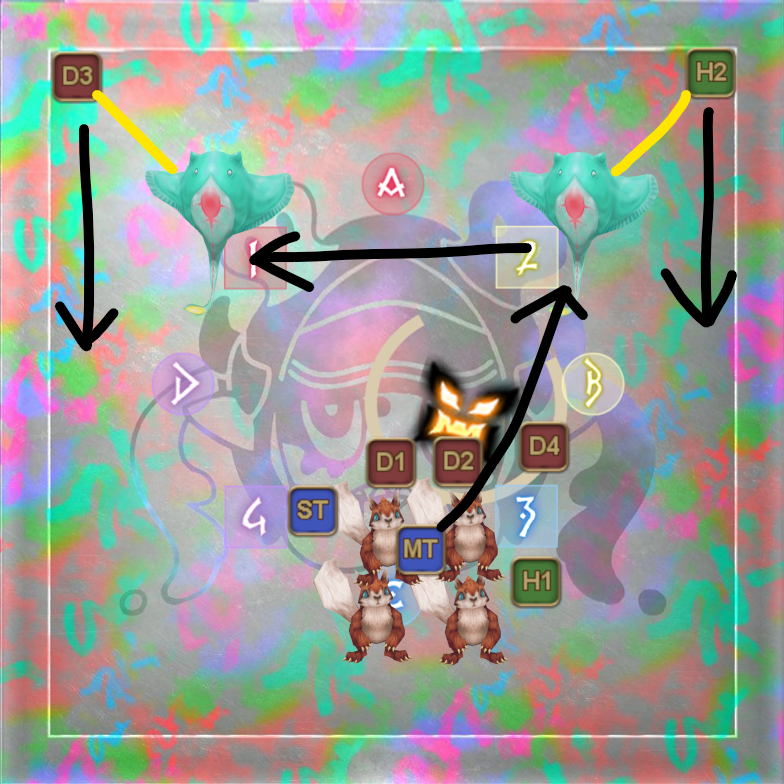
Upon confirming that the tethers are in place, the MT should now drag all the adds to the northeast Feather Ray. The rest of the party, which is now the death squad, are to use their 2 minute burst right here to eliminate the ray as fast as they can while also inflicting maximum damage on the squirrels that are clumped together around the ray. Inflict as much cleave damage as you can while targeting the key targets! Once the first ray is down, the MT can drag the pack to the 2nd ray and repeat the process.
| Melee DPS PoV | D3 PoV |
|---|---|
As D3, you do not need to stay at the wall either, as long as you don't drop a puddle anywhere in the middle. For reference, you can use the enemy list on your HUD to determine when the rays are casting Water III, which is your cue to get back to the wall.
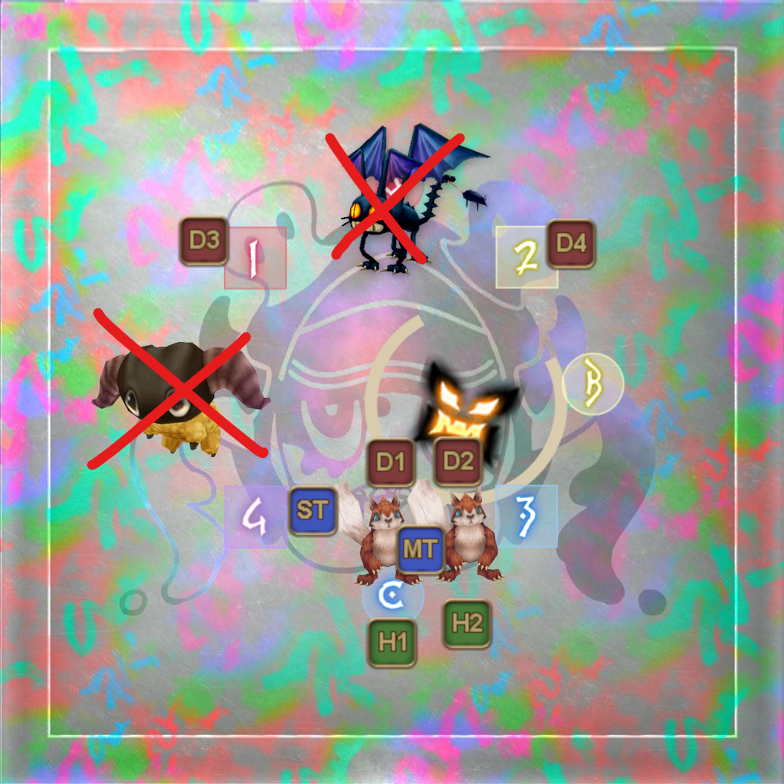
Wave 3
 | Main objectives for wave 3:
|
Time limit until the 4th wave spawns: 40 seconds | |
Once the 3rd wave spawns, the ST should immediately re-enable his/her stance and head over to north to provoke the Yan. Healers, DoT the cat if you have the opportunity to do so. The healer that gets targeted by Jabberwock should immediately move all the way to the southeast corner of the map. The rest of the DPS should AoE down the squirrels, until Jabberwock becomes targetable, after which everyone should be focus firing on it until it is defeated. Tanks and melee DPSes should take turns to use their stun abilities to buy more time for their party, using the following order: MT > D1 > D2.

When the Jabberwock is around halfway towards the healer, Sugar Riot will cast her first instance of Ready Ore Not, which is a strong raidwide that needs to be mitigated. However, what this raidwide also does is trigger the enrage condition for the Mu, which means you are now in a race against time to eliminate both the Jabberwock and Mu's before your party gets wiped.
Hopefully, your party has been diligently cleaving the squirrels to the point that they are weak enough now to be easily defeated. Once again, maximize your cleave damage as much as you can. Do not be afraid to use single target attacks instead regardless of whether it is a gain or not, just make sure that the Jabberwock dies quickly before it reaches the healer!
Absolutely do not forget the cat, which is another cause of wipes due to players thinking they're home free after defeating the squirrels. While it will not outright cause a wipe, it will cause an inconvenience if the cat isn't eliminated before the 4th wave spawns in. So if there are no other priority targets left, then you should contribute to hunting down the cat.
Once the 4th wave is about to spawn in, the ST should migrate further up north.
Wave 4
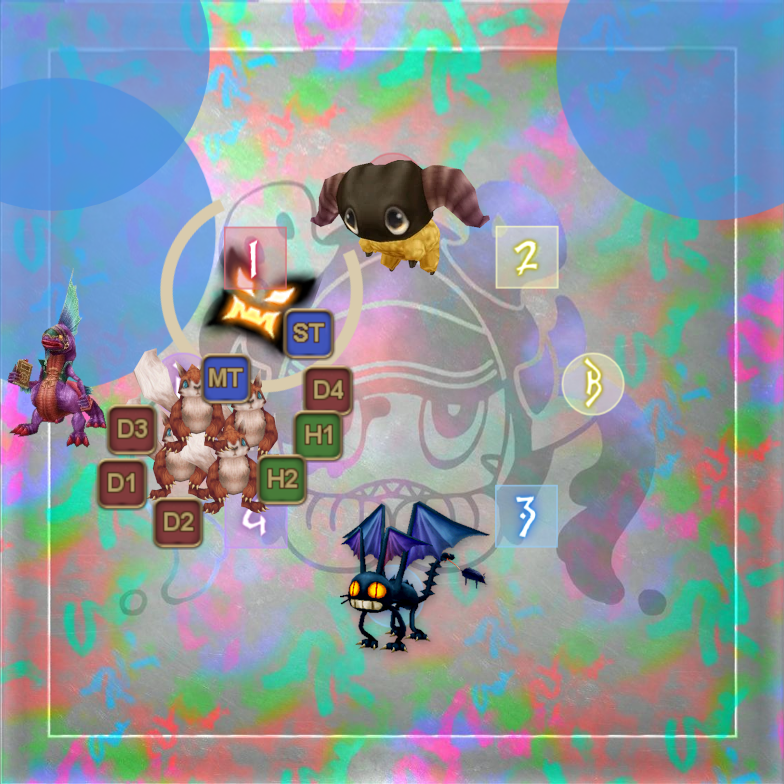
 | Main objectives for wave 4:
|
Time limit until Mousse Mural (enrage): 98 seconds | |
The whole zoo has appeared for the final wave. The tanks should establish enmity on their assigned targets, while D3 and D4 attacks their assigned Feather Rays for the puddle baits. The healer selected by Jabberwock should move all the way south at the wall. As a reminder, nobody except the assigned roles should attack the Feather Rays, until you can clearly see the tether. Oh, and healers, DoT whatever you can get your hands on, especially the cat.
During this phase, the ST will be constantly attacked by two Yans (roughly 120k damage total), so all the supports must step up their game and help out this poor tank. As for the ST, cycle through your mitigations like how you wall to wall in dungeons, and don't be afraid to use your invulnerability just to survive.
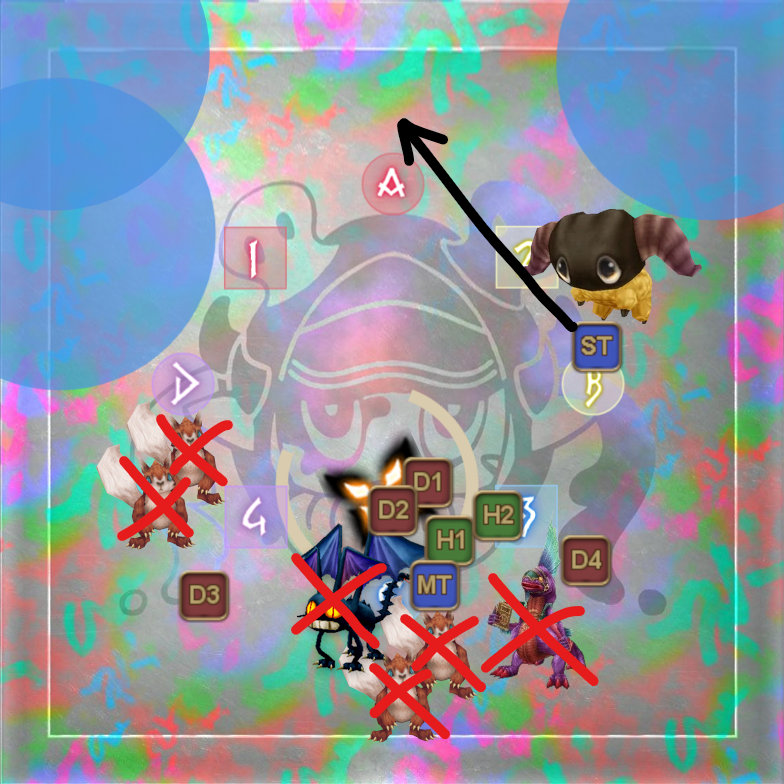
Just like before, attack whatever add you can find until the Jabberwock becomes targetable. Once targetable, every DPS should be focus firing the Jabberwock down. Since the Jabberwock starts close to the ST this time, the ST can stun it before it reaches south in which the MT can stun it again if it comes to that.
| Melee DPS PoV | D3 PoV |
|---|---|
With the Jabberwock eliminated, the responsibilities are now split. The ranged players should now hunt down the cat, while the melee DPS players eliminates the the Feather Rays, starting from the southeast one. Once the cat has been eliminated, the ranged DPS should assist the melee in taking down the Feather Rays. Finally, the healers should focus on making sure that the ST does not die, because as a reminder, he/she is still taking 120k damage per few seconds.
| Melee DPS PoV | D3 PoV |
|---|---|
I keep wiping my party as D3, how can I improve my pathing??
Of the two puddle droppers, D3 has it notably harder because the west manta dies last, forcing the D3 to bait more puddles. It is very likely that you might end up killing your tank by accident due to being clueless as to where else you can drop a puddle, which also happens to be a common complaint in PF. Here is my suggested route you can take as D3 for a smooth path to victory.
Whatever you do, do not drop the puddle on top of the manta!! Doing so would effectively prevent your melees from attacking the manta, which can cascade into a wipe.
Mu and Yan
With the cat and the rays cleaned up, the only thing that should be left are the Mu and Yans. Your 2 minute should be back up around here if you delayed it earlier during the 2nd wave, so use that and eliminate the squirrels. Once the squirrels are down, you can now shift your focus on the sheeps and eliminate them as well. Sugar Riot will not make it easy for you though, so be prepared for an incoming Ready Ore Not and a set of line AoEs that are coming from the walls.
After successfully dodging all the arrows from the walls, Sugar Riot will now cast Color Riot to remind the tanks that they still have a job to do. If all the adds are not defeated yet by this point, then Sugar Riot will get a huge attack buff which causes the incoming Mousse Mural to instantly wipe the party.
However, if all the adds have been defeated before that could happen, then your party will get a free LB3. Congratulations, but you will still have to deal with the incoming Mousse Mural, so heal up and mitigate as necessary. You are recommended to hold onto the LB3, as things can go wrong during Riverscape which makes recovery impossible without LB3.