M2S - Honey B. Live: 1st Beat
Honey B. Lovely starts the fight with Call Me Honey once pulled. Mitigiate this raidwide as necessary and have the ST establish secondary enmity as soon as possible. Once you've dealt with the raidwide, the boss will now either cast Splash of Venom or Drop of Venom.
Splash of Venom and Drop of Venom
This boss introduces stored attacks, which are attacks that will be executed much later once the boss casts another specific attack. These are essentially memory checks and will happen throughout the whole fight. As the title suggests, the boss can either cast Splash of Venom or Drop of Venom.
Splashes must be taken alone by spreading out, while drops targets either all supports or all dps and are meant to be taken by 2 people. The trigger for either of the stored attacks to execute is another two possible attacks that can happen: Tempting Twist or Honey Beeline.
Tempting Twist is essentially a donut attack that spawns honey bombs in a cardinal pattern, while Honey Beeline is line AoE through the middle that spawns honey bombs on the west/east sides of the arena. Your goal as a party is to remember whether its splash or drop, and resolve the mechanic while dodging all those honey bombs that are flying around. Keep in mind that whenever the boss executes Tempting Twist or Honey Beeline, the boss will automatically re-center herself and face north.| Tempting Twist (Splash) | Tempting Twist (Drop) |
|---|---|
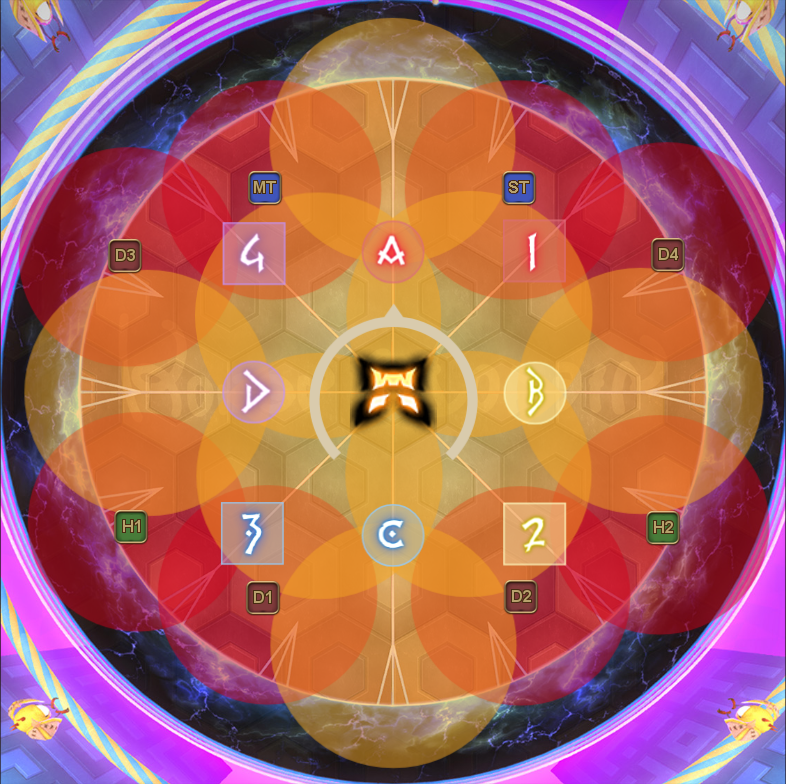 |  |
| Honey Beeline (Splash) | Honey Beeline (Drop) |
 |  |
This mechanic will occur multiple times throughout the whole fight, so if you are having issues passing this memory check, consider...
- Using signs to mark the boss, for example: Assign attack 1 if spread, attack 2 if drop.
- Edit your chat to also show "Actions initiated by engaged enemies" in your chatbox.
- Use the chat to type "spread" or "stack".
- Have a shotcaller in voice call who has a good memory and consistency in callouts.
Stinging Slash and Killer Sting
Once you have resolved two sets of venom, the boss will now cast either Stinging Slash or Killer Sting.
- Stinging Slash: Targets the two players with the highest enmity with a 90 degrees conal tankbuster. If the ST forgot to establish the 2nd highest aggro, then this means the tankbuster will target a DPS or a healer instead.
- Killer Sting: Targets the player with the highest enmity with a two-man tankbuster. This needs to be soaked together by both tanks if you're not invulning this.
| Stinging Slash | Killer Sting |
|---|---|
Once the tankbusters are resolved, the boss will now cast her first major mechanic.
Honey B. Live: 1st Beat
Honey B. Lovely will now cast Honey B. Live: 1st Beat and split 8 hearts among the players. The cast itself is a heavy hitting raidwide, so make sure to mitigate it.
| Debuff | Description | Additional notes |
|---|---|---|
    | Players will start with 0-2 hearts, which is also displayed above the heads of every player. Every attack you take during the live stage segments will increase your stack. Your goal is to try and not let this stack hit four. | 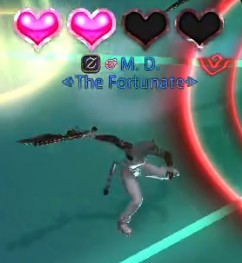 |
 | Accumulating four hearts will inflict this debuff, temporarily stunning the player. This will heal the boss by 1% while also giving her a damage up stack, which will make the rest of the fight more difficult from here on. The heart stacks of the player who became charmed will now reset back to zero. |
Centerstage and Outerstage Combos
Once you've transitioned to her live stage, the boss will now cast either Outerstage Combo or Centerstage Combo. Both of these attacks are a sequence of three attacks, with the order being dependent on which one she casts. You can use the waymarks on the floor in order to effectively dodge the sequence of attacks. Getting hit by any of the attacks will increase your heart count by one, so avoid them at all costs.
| Outerstage Combo Start outside first on a cardinal spot ----------> | ||
|---|---|---|
 |  |  |
| <---------- Centerstage Combo Start inside first on an intercard spot | ||
Love Me Tender
After dodging the sequence of attacks, the boss will now cast Love Me Tender, which spawns towers around the arena that needs to be soaked by one player. Spread out loosely in a clock spot and soak the towers one by one. The healers should try to aim for three hearts, while the melees for two hearts. Keep in mind that this is not always feasible, so adjust accordingly when push comes to shove.
If possible, try and give priority to melees if the tower spawns close to the boss so that they can maintain their uptime. If a tower somehow gets occupied by two players, try and jump to signal the other player that they should get out. A tower not getting soaked will explode, giving everyone in the party a heart, so avoid that at all costs, even if a tower is soaked by two players by accident.
If everything is done correctly, then the party should have at least 4 players who only has two hearts. This is important as you will see in the next mechanic.
The boss will now cast Loveseeker. Once you've dodged the AoE, the boss will now start shooting hearts bullets around her in a spiraling clockwise motion. Follow the spiraling motion in order to efficiently dodge the bullets that are coming towards you from the boss. This attack is followed up by another Love Me Tender, which will target one random player with the lowest amount of hearts with a stack marker. This stack marker will deal 4 hearts worth of damage, so this must be shared with the party in order to not have anyone overflow to 4 hearts.
This stack will always deal 4 hearts worth of damage and it will overflow if the people stacking is less than 4. You can resolve this with either four players with only 2 hearts, or three players with two having 2 hearts and one of them with 1 heart. Players with 3 hearts should avoid the stack.
| Example 1 (Two hearts) | Example 2 (Three hearts) | Example 3 (Two hearts) |
|---|---|---|
There are always a few safe spots on the cardinal directions of the arena. If you happen to be the stack marker, then you can seek out those safespots if you don't want to bother dodging those heart bullets while resolving the stack marker.
Once the bullet hell section is resolved, the boss will now cast Outerstage Combo or Centerstage Combo, which will be the opposite of what was used at the start of this phase. Resolve it accordingly to whether its in first or out first. Once the combo attack is resolved, the boss will end this phase by casting Honey B. Finale. Heal up and mitigate as necessary.