Ultimate Relativity
Upon successfully rescuing Ryne, she reveals that she is in fact Mitron in Ryne's body and proceeds to attack Gaia, causing an untelegraphed raidwide (Junction) in the process. This raidwide is fatal without mits and heals, so immediately use your mitigations and heals as soon as you transition into phase 3. As a result of Mitron's action, Gaia now transforms into the Oracle of Darkness.
When Gaia becomes targetable, she will immediately start the fight by using Hell's Judgement, which will reduce everyone's HP down to 1. Heal up as soon as you can because immediately after, she will warp to the middle and cast Ultimate Relativity, transitioning to the first major mechanic of phase 3. This cast is also a raidwide, so make absolutely sure to mitigate this.
Ultimate Relativity
Once Gaia finishes casting Ultimate Relativity, each member will be inflicted with a series of debuffs.
| Debuff | Description | Additional Notes |
|---|---|---|
Causes a moderately big AoE explosion once the timer runs out. This is fatal to your party members if it hits them, so do not be in the middle when this is about to go off. The timer for this debuff can either be 10s, 20s or 30s, which will become important in determining the positions during this mechanic. You cannot have this debuff at the same time as Dark Blizzard III. | ||
Create a donut with yourself as the center once the timer runs out. Stand in the middle of the arena to avoid the chance of the ice accidentally clipping anyone. There can only be one player with this debuff and this will also prevent this player from getting a Dark Fire III. | ||
A stack which must be soaked by at least five players. Soaking this attack with less than five players will inflict a Mark of Mortality on the players instead. This debuff can go off at the same time as Dark Blizzard III. | ||
Places a beacon on the floor once the timer runs out, which snapshots the player's position. This debuff will change into Return, which will rewind the player back to the beacon once the timer runs out. The beacon only snapshots the location, not the direction of the way the player is looking at. Your gaze location is dependent on which way your character is facing right when the rewind happens. | ||
A gaze attack which will inflict Doom on anyone that is looking at this player once the timer runs out. The Doom cannot be cured, which means getting gazed will effectively kill you. Players with this debuff must place their rewind in the center. | ||
A stack which must be soaked by at least four players. Soaking this attack with less than four players will inflict a Mark of Mortality on the players instead. This debuff is timed to go off right after a rewind, which means this attack must be soaked in the middle together with the players who has the Shadoweye debuff. | ||
Causes a small AoE explosion once the timer runs out. This attack will always occur directly after a rewind, which means that players with this debuff cannot place their rewind in the middle, where the Dark Water III will be going off. |
Notice how there is now a traffic light on each clockspot? Each of these traffic lights will fire an initial laser, after which it will continue to spin in a direction that it was telegraphed. Your goal here as a party is to make sure that each of these traffic lights are baited outwards by a player, so that it will never obliterate your party in the middle.
To make sure that not all eight traffic lights fire at the same time, Gaia will cast Speed to speed up three traffic lights while slowing down two traffic lights. The three traffic lights getting sped up is always targeted in an Y-shape. This shape can be used to determine the new north, which will become the foundation of the strategy used to solve this mechanic.
Y Runytivity
Your first step as a party is to assign each player to a traffic light. Identify whether you have Dark Fire III or Dark Blizzard III first. In case of Dark Fire III, your timer can be either 10s, 20s or 30s.
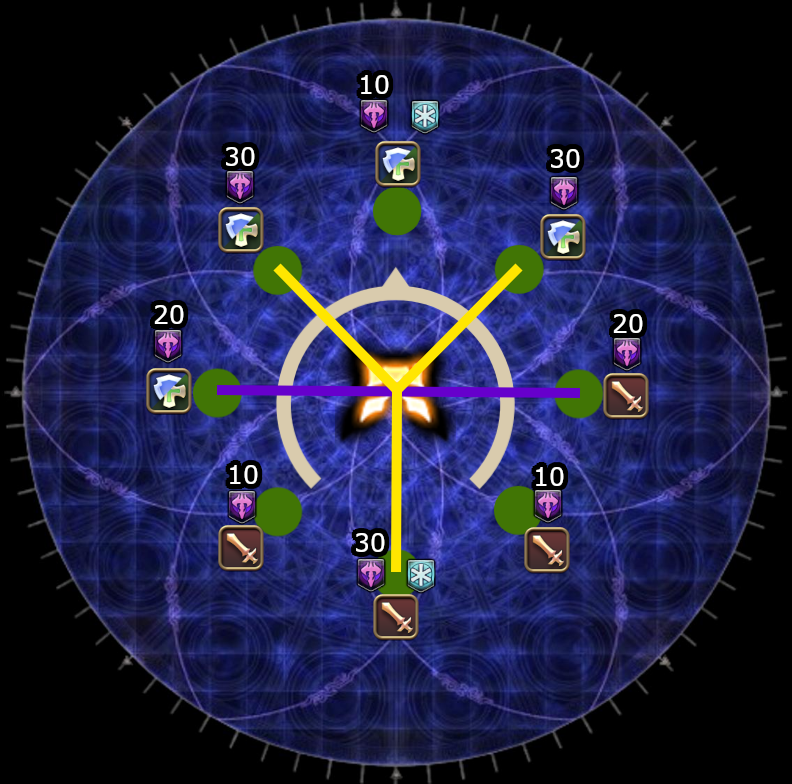
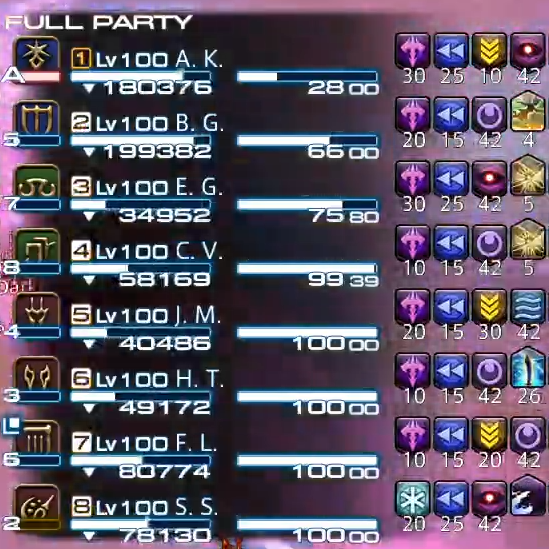
There can be two supports with 30s and two DPS with 10s, so the following priority system is used to resolve that conflict.
| West | East |
|---|
Below is a breakdown of how this mechanic is solved using the above party list example as input.
| Identify your traffic light and assign yourself to it. This traffic light is your spread spot and its laser will also be your responsibility for this mechanic. Be mindful that the healers are required to heal and mitigate throughout this mechanic, because the party will constantly take damage from different attacks throughout this mechanic. |  |
| The first set of Dark Fire III are about to detonate, so those players should immediately run out to their spread spot. All the other players should stack in the middle to soak the first Unholy Darkness. H1 does not have Dark Blizzard III in this example, so he/she must also run outside. |  |
| The first set of lasers are about to fire, which needs to be baited. Get into position and bait it in a way that it doesn't strafe into the middle. Be careful not to hit any other players, as there's also a group that are placing their rewind while this is happening. The DPS 20s should drop his/her rewind in the center on the west side. All the other players have the Dark Eruption debuff, so they should drop their rewind beacon right in front of their own traffic light. If the Support 20s wants uptime, then you can also opt to place your rewind beacon at the east spread spot instead, which is not used by the DPS 20s. |  |
| The second set of Dark Fire III are about to detonate. Wait a bit and be careful of the lasers that are spinning around. Once the coast is clear, slowly make your way out to the edge of the arena. The rest should stack in the middle to soak the second Unholy Darkness. This is the timing when the Dark Blizzard III detonates, so get as close to the center as you can if you don't have to run out for Dark Fire III. | 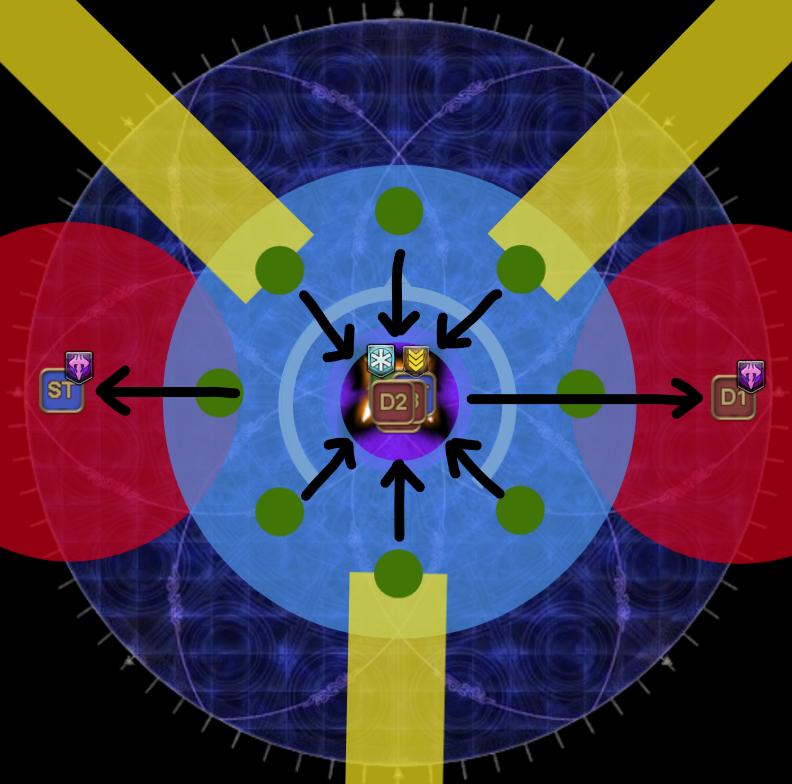 |
| The second set of lasers are about to fire. Unlike the first set, the baiters at the second set do not have to worry about accidentally hitting a party member. The players not baiting should now place their rewind in the middle, as this group has the Shadoweye debuff. | 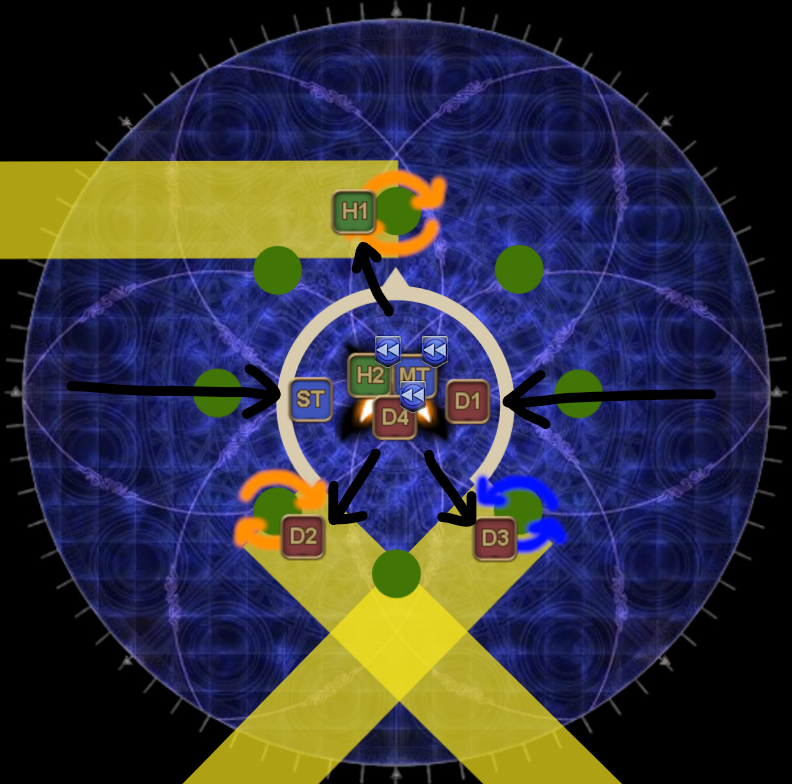 |
| The last set of Dark Fire III are now going to explode. Once again, be careful of the lasers that are spinning around and run out once its safe to do so. The rest should be in the middle to soak the final Unholy Darkness. The DPS at south does not have a Dark Fire III, so he/she can remain middle for the stack instead. |  |
| The final set of lasers are now about to go off. Except for the players who had 20s Dark Fire III, everyone can use this moment to preposition themselves before the rewind kicks in. Use the uptime tech by going to the other side of the boss, or drop uptime and face away, whichever you prefer. Do everything to make sure that you don't look towards the center after the rewind. The players with 20s Dark Fire III are responsible for baiting the last set of lasers, so they have a tighter window. You only have 2-3 seconds to adjust after baiting the laser, so it is recommended to drop your uptime, unless you've already set your rewind to allow uptime. |  |
| The rewind will now resolve. Have everyone run to the center and heal up in anticipation of a stack AoE. Gaia will not allow you to catch a break as she immediately casts Shell Crusher in an attempt to finish your party off. | 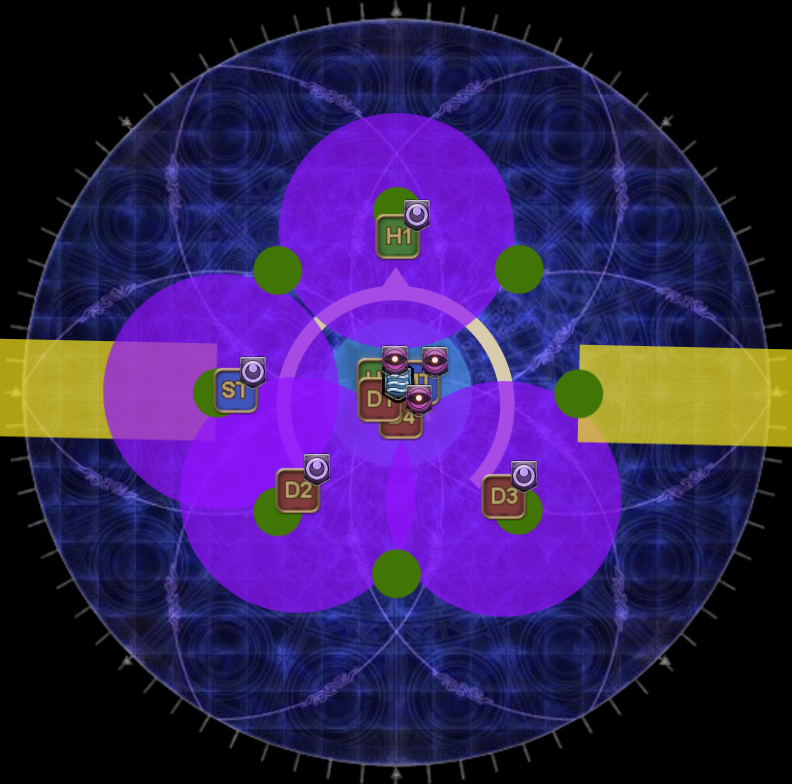 |
As you might've noticed, the resolution is relatively static once you've been assigned a traffic light. You do not need to remember all the possible patterns, as long as you keep an eye on your debuffs:
- Run out if your Dark Fire III timer is 5s or lower, otherwise, stay in center and soak the Unholy Darkness.
- Place rewind at spread spot if have Dark Eruption, otherwise place it in the center.
Below are some examples from each position if you still need references.
| North | West | Southwest |
|---|---|---|
Black Halo
Gaia will use Shockwave Pulsar and remove all the traffic lights, signaling the end of the Ultimate Relativity. The MT should use this moment to preposition at A, because Gaia will follow up with Black Halo, which is a tankbuster that targets the player with the highest aggro. Although this attack is meant to be soaked by two players, the damage is low enough that the MT alone can shrug it off if he/she uses all their mitigations.