Apocalypse
While the MT is busy taking the Black Halo, use this opportunity for the supports and DPS to preposition themselves at west and east respectively. The MT can opt to point Gaia towards northwest and wait until she casts Spell-in-Waiting Refrain. This allows the melee DPS to get their positionals while maintaining the shape of the box.
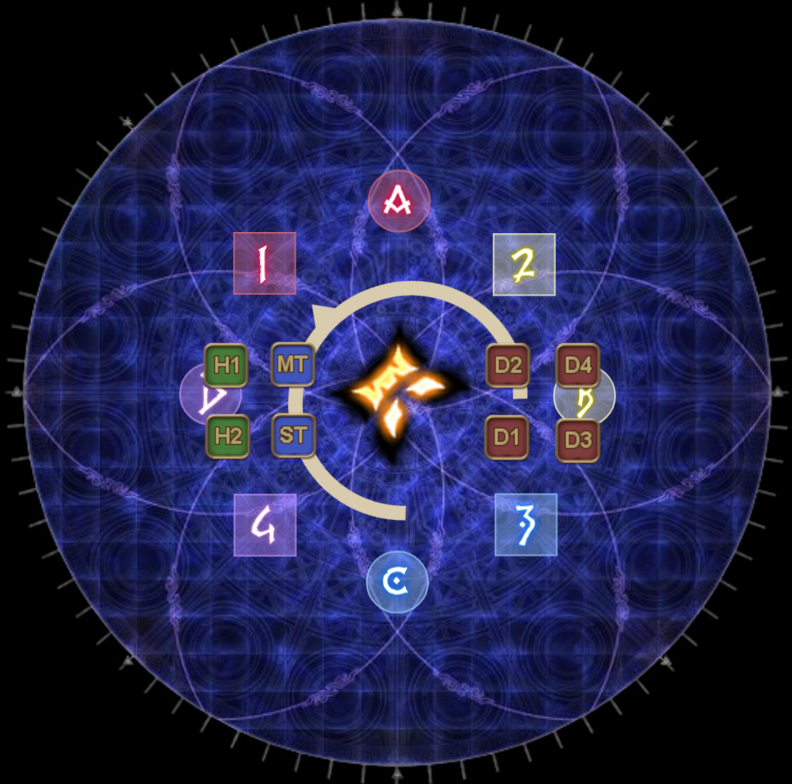
Respect the box shape, because this becomes relevant in determining who gets which spread spot in the next mechanic when a permaswap occurs.
Permaswap strategy
After her initial Spell-in-Waiting Refrain, Gaia will now cast Dark Water III. This will inflict a Dark Water III debuff on 6 random players, with a timer of 10, 29 or 38.
| Debuff | Description | Additional Notes |
|---|---|---|
A stack which must be soaked by at least four players. Soaking this attack with less than four players will inflict a Mark of Mortality on the players instead. The timers for this debuff can either be 10, 29 or 38. There is always two players assigned to each possible timer. |  |
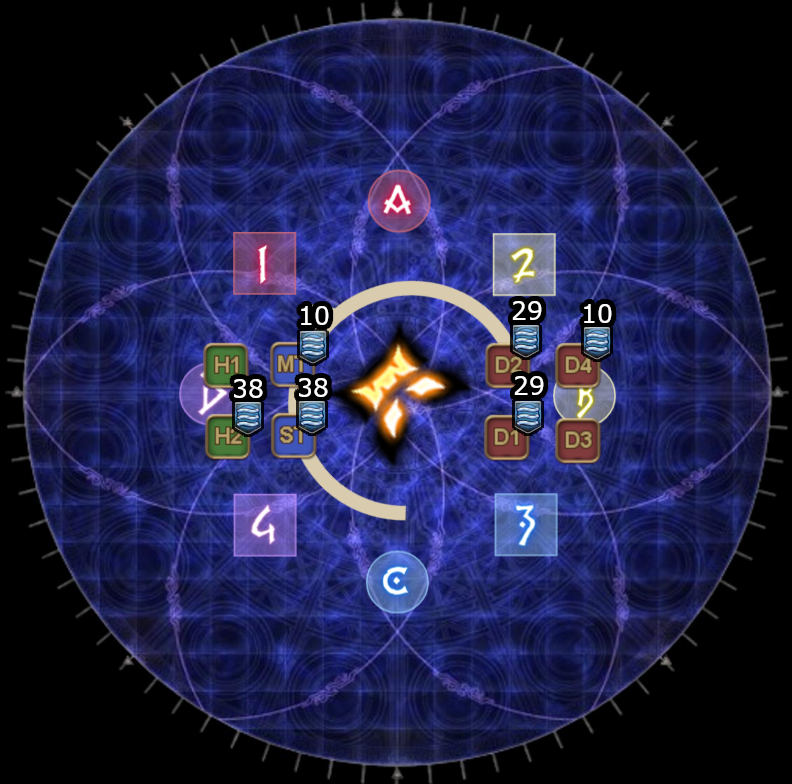
Your first task as a party is to immediately determine whether there are matching debuff timers in your group. Players with the same debuff, including no debuff, cannot stay in the same group and must swap to the other group. Thus, one of the three scenario can happen after the debuffs appear:
- No swap is needed.
- There's one conflict on each side, so those players must swap.
- There's two conflicting debuffs on each side, so two players on each sides must swap.
In case a conflicting debuff is identified, then a swap must occur using the following priority system.
| Adjust | Stay |
|---|
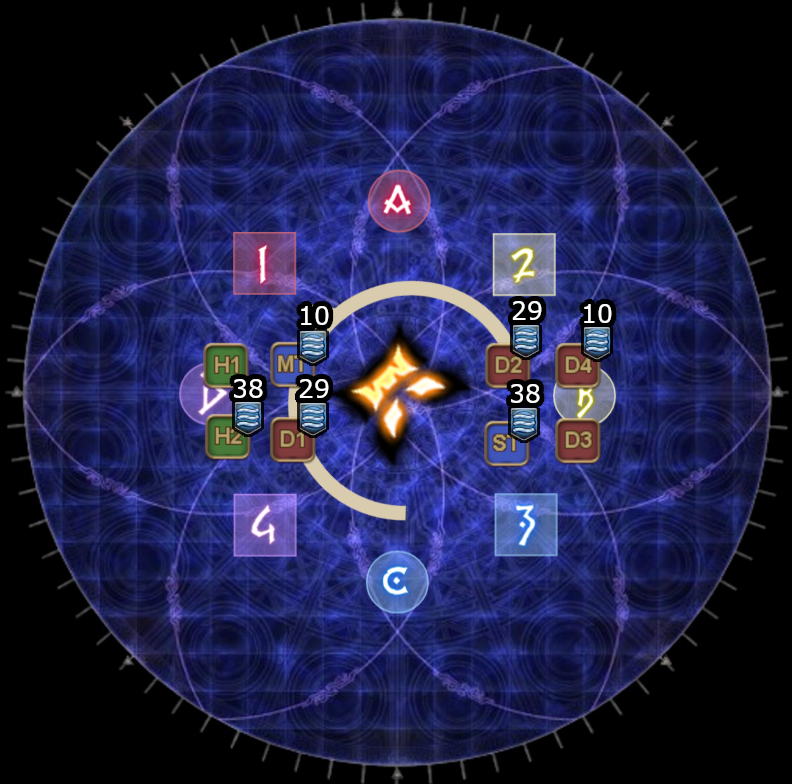
Below is an example of each scenario where a swap must occur.
| Single swap | ||
|---|---|---|
 | > |  |
| Double swap | ||
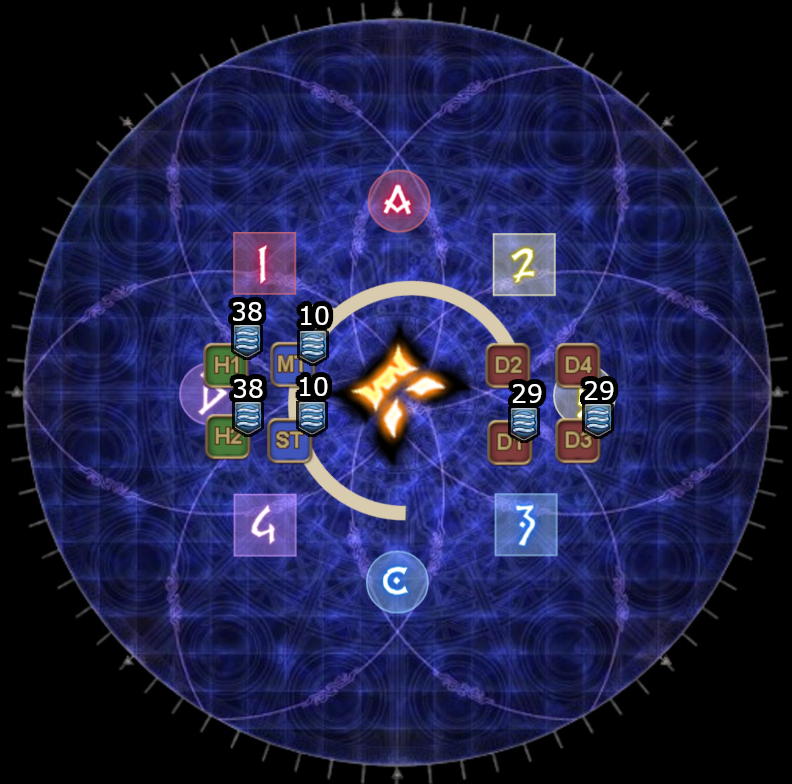 | > | 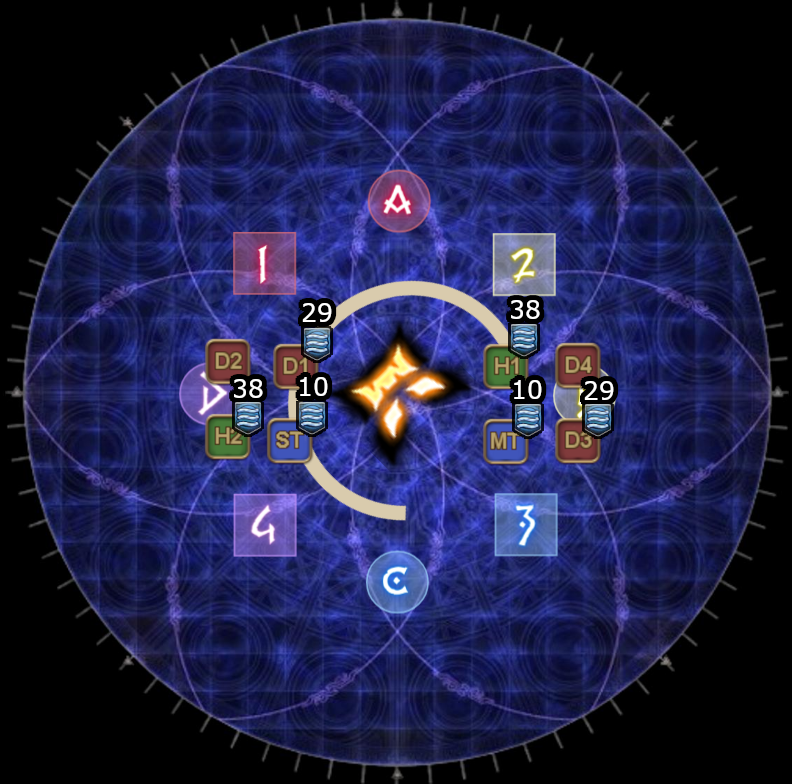 |
This is why the box preposition is important, because this allows the permaswapper to immediately identify which position he/she is taking in the new group. This is a potential cause for wipe if the swapper gets confused over which position they're taking in the spread.
Sextuple Apocalypse
With the conflicting debuffs out of the way, Gaia will now cast Apocalypse. Apocalypse will summon multiple small orbs of lights, with one pair directly opposite of each. The orbs on opposite ends will both randomly rotate either clockwise or counterclockwise around the arena. While the light orbs are traveling on the ground, they will pulse occasionally which will summon a giant explosion on the marked locations.
Your goal as a party is to resolve all the Dark Water III debuffs while avoiding the Apocalypse AoEs that are going rampant across the map. To make things harder, Gaia will also throw in various attacks throughout Apocalypse to keep the party on toes at all times.
There are two patterns to look out for, depending on whether the Apocalypse rotates clockwise or counterclockwise. Remember the box earlier? The box will be used to fill in the spread positions during Apocalypse, with swappers replacing a role's positions if a permaswap has occurred.
| Clockwise AC right safe | Counterclockwise AC left safe |
|---|---|
 |  |
| Spread positions relative to where Apocalypse has started. Waymark A1D4 belongs to support, while 2B3C belongs to DPS. | |
You will be attacked by Gaia while you are trying to identify the safe spots, so do try to focus on the mechanics first. Dying anywhere in this mechanic will likely cause a party wide Mark of Mortality, effectively preventing your party from clearing.
Below is a breakdown of how the mechanic goes from here.
| In this example, D1 and ST have traded places for the permaswap. With the permaswap(s) sorted out, form a small box around your (new) group in anticipation of the first Dark Water III that is about to go off. Gaia will now cast Apocalypse and send out the lights. |  |
| After soaking the first Dark Water III, immediately spread out! Gaia will jump on a random party member with Spirit Taker, which will cause anyone else caught in the blast to be sent flying to the wall. This moment is also your one and only chance to properly identify the safe spot that your group can use during Apocalypse. If you miss this, then you will have to hope that you can follow your party members in order to get to your safe spot. In this example, the Apocalypse starts at 2 and 4, and rotates counterclockwise. This means waymark DB and the left side is safe. | 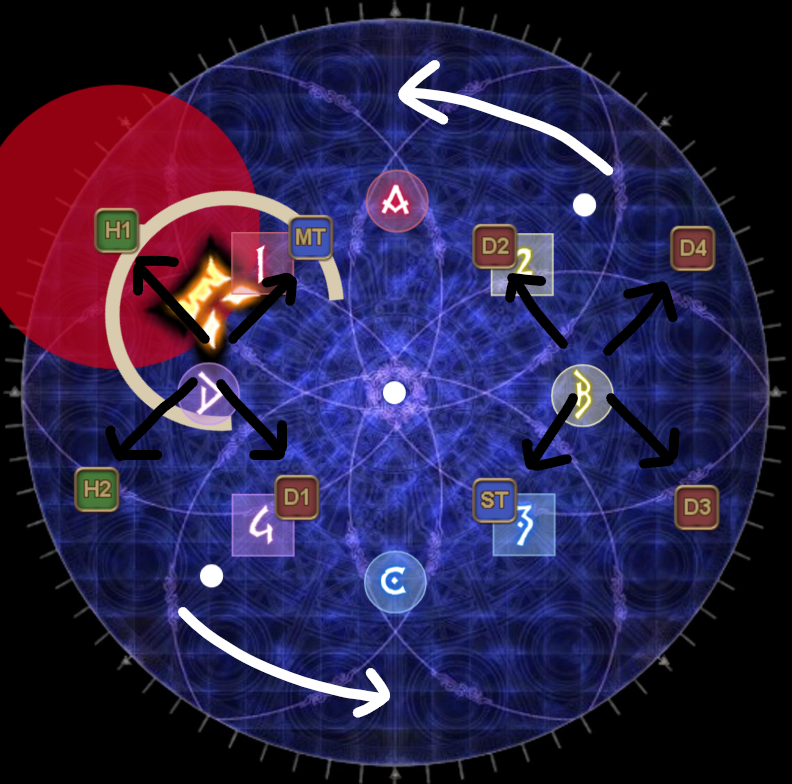 |
| After baiting the Spirit Taker, you can now get to your spread spot. The Dark Eruption AoEs will shortly appear. For reference, in order to not get clipped by the Apocalypse, the melees should stand as center as possible on the waymarks. As for ranged, its 2.5 crystals away from the shuriken at the wall. Notice the clockspots on waymark 1 and 3, which only has one player? Keep a note of it, because it becomes important later for Darkest Dance. | 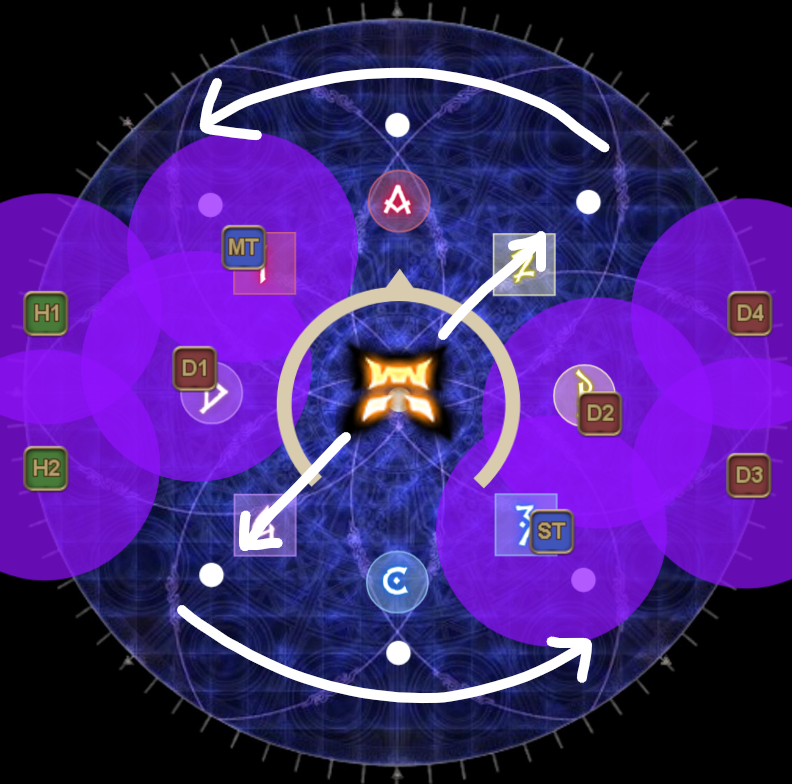 |
| Your next step is to run into the middle at the same time as your Dark Eruption goes off, because the area that you're now in will become unsafe soon due to the Apocalypse. Do not rely on the animation, but instead, use the castbar to time your movement. The snapshot occurs immediately as the castbar ends, so use that as reference to run towards the middle. While doable without, you are recommended to use Sprint here as its free. | 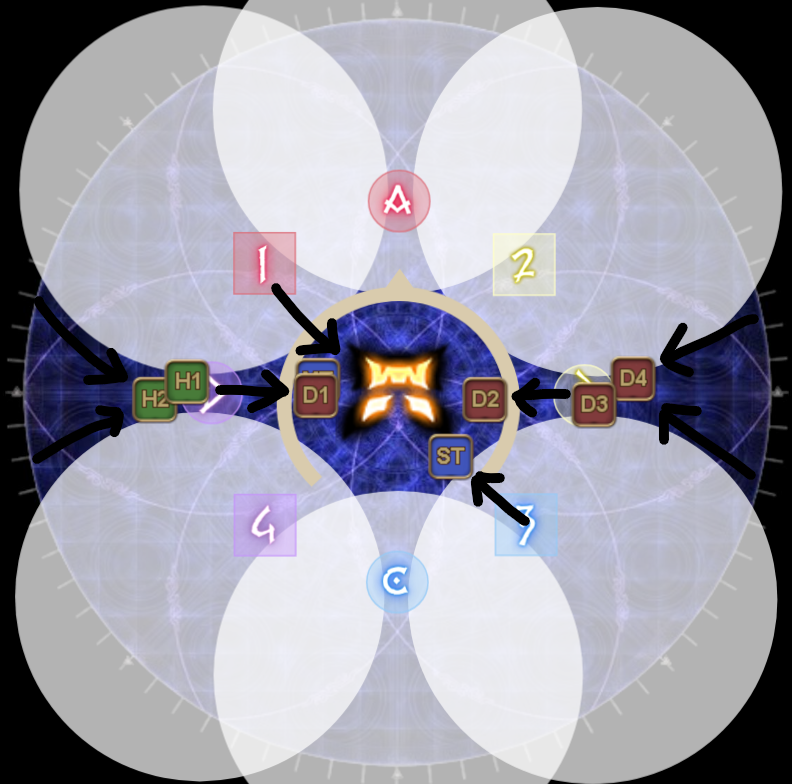 |
Now, two things will happens. First, the second Dark Water III will count down in the center. You can use the reference below to avoid getting hit by either the Apocalypse or the Dark Water III from the opposing party.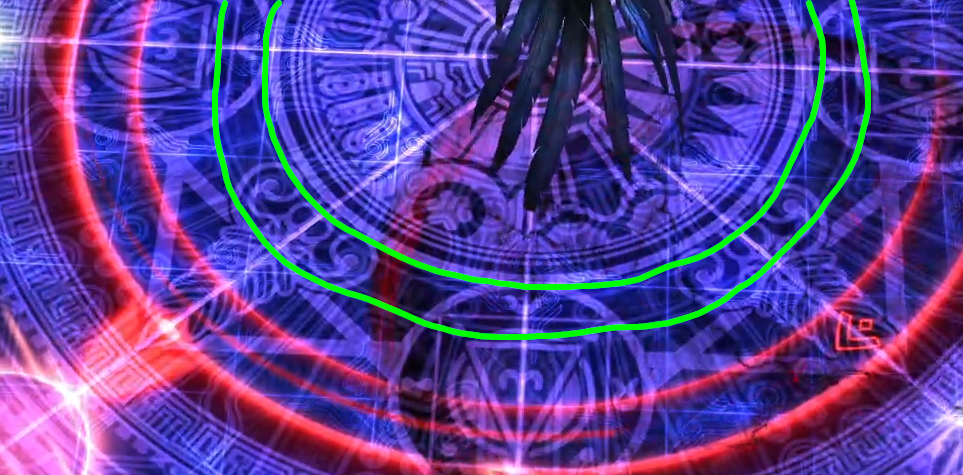 The second thing that will happen is that Gaia will prepare Darkest Dance, which is a tankbuster that will target the player who is the furthest away from Gaia. In order to bait this successfully, one of the tanks must immediately run out after soaking the Dark Water III using either all their mitigations or an invuln. Remember the clockspots that only had one player? Those are the locations which the final Apocalypse will not hit, making it safe for the tank to run towards to for the Darkest Dance bait. In this example, ST is the one baiting the tankbuster, so the ST can preposition themselves when in center and immediately start running outside once the Dark Water III drops down. Below is a PoV which you can use as reference. |   |
| Everyone should now run towards Gaia, because the immediate followup of her Darkest Dance is a knockback attack. While facing Gaia, have the support party on the left side and the DPS party on the right side. After getting knocked back, make your way back up to Gaia as soon as you can for the final Dark Water III stack. | 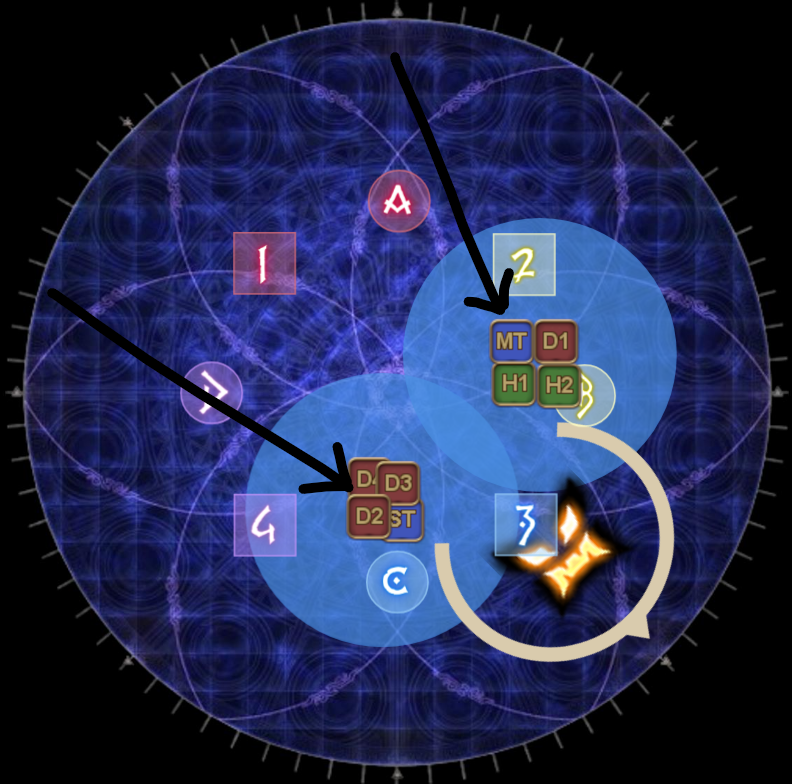 |
Some things to keep in mind...
- The Apocalypse animations and its snapshots are on different timings, which means that it is unreliable to use visual cues.
- Instead, use the castbar and run without fear, even if it looks light you might get hit by an Apocalypse or someone else's Dark Eruption AoE.
- Popping Sprint is recommended while trying to run to the center! Its free and also hard to do without the extra movement speed.
- If you cannot invuln Darkest Dance, then you are required to use all your mitigations just to survive.
- If you intend to kitchen sink this, then it is recommended to prepop your mitigations immediately once you've arrived at the center.
- The ST can always bait Darkest Dance regardless of tank compositions, but you can communicate with each other if you want to change the plan.
For references, here are some more examples of the whole mechanic from different PoVs.
| MT PoV Single swap | ST PoV Darkest Dance bait and double swap | MT PoV Single swapped to D3 position |
|---|---|---|
Memory's End
Gaia will do one final Shockwave Pulsar before casting her enrage, which is Memory's End. Just like in the previous phase, your goal is to knock Gaia's HP down to 19.9% or lower before she manages to cast Memory's End, or the raidwide will wipe the party instead.
Make sure to mitigate, even if Gaia's HP is lowered enough. Memory's End itself will cause deaths if there are no mitigations present. This attack will also bypass invulnerability, so be careful if you are reviving.