Another Sil'dihn Subterrane - Adds 2
A portal will be left behind upon defeating Silkie. Once you enter the portal, you will be transported to a new area with two Sil'dihn Armor and two Sil'dihn Dullahan patrolling the area. You are safe from enemy attacks until you jump down by touching the portal. Take your time and jump down only when you're ready to start picking them off one by one.
Each mob are essentially as strong as a miniboss, so avoid pulling more than one of them at the same time.
Sil'dihn Armor
The armor has three attacks:
- Hells' Nebula: Reduces everyone's HP to 1, but ignores the shield. Possibly fatal if you still have the bleed from the Sil'dihn Dullahan.
- Infernal Weight: A raidwide, which is used immediately after Hells' Nebula, that will inflicts a 12s heavy on everyone, slowing everyone's movements.
- Dominion Slash: The mob will face a random player for a 90 degrees frontal AoE. Sidestep or outrange the AoE to dodge it.
If your party fought a dullahan before, then wait until the bleed expires or is about to expire before pulling this mob. The melees can stand right under the mob to easily dodge the Dominion Slash while under the influence of the heavy debuff. The ranged players have another option, which is to stand far away from the mob so that the Dominion Slash wouldn't even reach you.
Sil'dihn Dullahan
The dullahan has three attacks:
- Infernal Pain: A raidwide which inflicts a 30s bleed on everyone.
- Blighted Gloom: An untelegraphed chariot attack. Immediately disengage once you see this mob cast this.
- King's Will: The mob will buff itself, essentially turning all auto attacks into mini-tankbusters for 12s. You have to mitigate this as a tank.
The dullahan is more straightforward to defeat. Keep your distance if you see Blighted Gloom and mitigate/heal the tank once you see the mob buff itself.
Attack plan
Each group consists of one Sil'dihn Dullahan and one Sil'dihn Armor. The groups have a fixed patrol route as seen below in the diagram. Notice how the west/east area behind the big wall are only patrolled by one of the groups?
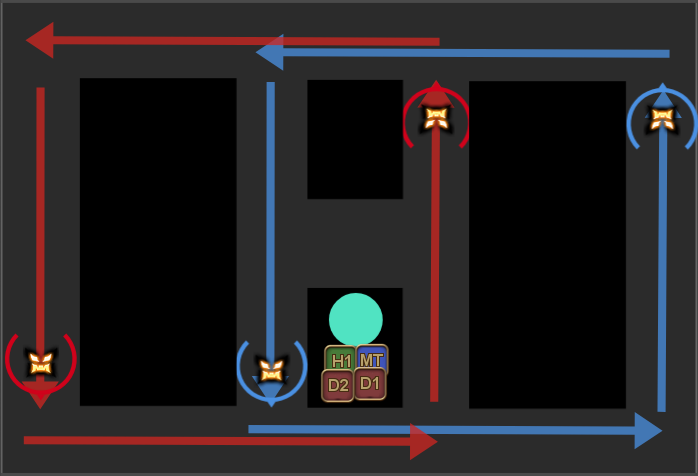
You have a choice here: Either you go northwest to pick off the Sil'dihn Armor first, or you go southeast instead to pick off a Sil'dihn Dullahan first. Regardless of your choice, you want to completely eliminate a patrol group in order to create a safe zone behind the walls. After eliminating the first group, you can then proceed to pick off the other patrol group. Below is an example of going after the Sil'dihn Armor first, which is northwest of the starting area.
| Let the dullahan on your left pass first before jumping down. Once the dullahan has passed the middle section, jump down and drag the armor immediately behind the wall in order for your party to beat it up. Burst it down as quickly as you can, as you do not want the dullahan to reach you while you're still fighting the armor. Heal up quickly once the mob uses Hells' Nebula, because it can quickly follow it up with another raidwide that can oneshot the party. | |
| A dullahan from the same patrol group should now be approaching you. Aggro it with a ranged attack and drag it behind the wall for your party to DPS it down. You can take your time, because you will not be bothered by the other patrol group while you're fighting this mob. | |
| You can now focus on the 2nd patrol group after you've eliminated the first group. Pick a mob, whichever is closest to you, and drag it behind the wall. Keep in mind, do not pull a Sil'dihn Armor if you still have the bleed debuff! | |
| The safe zone is no longer required as there's only one enemy left on the map. Seek out and destroy the last mob in order to reach the next boss. |